Continuous Delivery with TFS / VSTS – Configuring a Sample Application for Git in Visual Studio 2015
In this instalment of my blog post series on Continuous Delivery with TFS / VSTS we configure a sample application to work with Git in Visual Studio 2015 and perform our first commit. This post assumes that nothing has changed since the last post in the series.
Configure Git in Visual Studio 2015
In order to start working with Git in Visual Studio there are some essential and non-essential settings to configure. From the Team Explorer -- Home page choose Settings > Git > Global Settings. Visual Studio will have filled in as many settings as possible and the panel will look similar to this:

Complete the form as you see fit. The one change I make is to trim Repos from the Default Repository Location (to try and reduce max filepath issues) and then from Windows Explorer create the Source folder with child folders named GitHub, TFS and VSTS. This way I can keep repositories from the different Git hosts separate and avoid name clashes if I have a repository named the same in different hosts.
Clone the Repository
In the previous post we created ContosoUniversity (the name of the sample application we'll be working with) repositories in both TFS and VSTS. Before we go any further we need to clone the ContosoUniversity repository to our development workstation.
If you are working with TFS we finished-up last time with the Team Explorer -- Home page advising that we must clone the repository. However, at the time of writing Visual Studio 2015.1 seemed to have bug (TFS only) where it was still remembering the PRM repository that we deleted and wasn't allowing the ContosoUniversity repository to be cloned. Frustratingly, after going down several blind avenues the only way I found to fix this was to temporarily recreate the PRM repository from the Web Portal. With this done clicking on the Manage Connections icon on the Team Explorer toolbar now shows the ContosoUniversity repository:

Double-click the repository which will return you to the Team Explorer home page with links to clone the repository. Clicking one of these links now shows the Clone Repository details with the correct remote settings:

Make sure you change the local settings to the correct folder structure (if you are following my convention this will be ...\Source\TFS\ContosoUniversity) and click on Clone. Finally, return to the Web Portal and delete the PRM repository.
The procedure for cloning the ContosoUniversity repository if you are working with VSTS is similar but without the bug. However in the previous post we hadn't got as far as connecting VSTS to Visual Studio. The procedure for doing this is the same as for TFS however when you get to the Add Team Foundation Server dialog you need to supply the URI for your VSTS subscription rather than the TFS instance name:

With your VSTS subscription added you will eventually end up back at the Team Explorer -- Home page where you can clone the repository as for TFS but with a local path of ...\Source\VSTS\ContosoUniversity.
Add the Contoso University Sample Application
The Contoso University sample application I use is an ASP.NET MVC application backed by a a SQL Server database. It's origins are the MVC Getting Started area of Microsoft's www.asp.net site however I've made a few changes in particular to how the database side of things is managed. I'll be explaining a bit more about all this in a later post but for now you can download the source code from my GitHub repository here using the Download ZIP button. Once downloaded unblock the file and extract the contents.
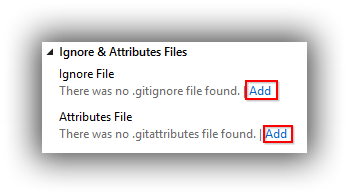
One of they key things about version control -- and Git in particular -- is that you want to avoid polluting it with files that are not actually part of the application (such as Visual Studio settings files) or files that can be recreated from the source code (such as binaries). There can be lots of this stuff but handily Git provides a solution by way of the .gitignore file and Microsoft adds icing to the cake by providing a version specifically tailored to Visual Studio. Although the sample code from my GitHub repository contains a .gitignore I've observed odd behaviours if this file isn't part of the repository before an existing Visual Studio solution is added so my technique is to add it first. From Team Explorer -- Home navigate to Settings > Git > Repository Settings. From there click on the Add links to add an ignore file and an attributes file:
Switch back to Team Explorer -- Home and click on Changes. These two files should appear under Included Changes. Supply a commit message and from the Commit dropdown choose Commit and Sync:

Now switch back to Windows Explorer and the extracted Contoso University, and drill down to the folder that contains ContosoUniversity.sln. Delete .gitattributes and .gitignore and then copy the contents of this folder to ...\Source\TFS\ContosoUniversity or ...\Source\VSTS\ContosoUniversity depending on which system you are using. You should end up with ContosoUniversity.sln in the same folder as .gitattributes and .gitignore.
Back over to Visual Studio and the Team Explorer -- Changes panel and you should see that there are Untracked Files:

Click on Add All and then Commit and Sync these changes as per the procedure described above.
That's it for this post. Next time we open up the Contoso University solution and get it configured to run.
Cheers -- Graham
Continuous Delivery with TFS / VSTS – Creating a Team Project and Git Repository
In the previous post in this blog series on Continuous Delivery with TFS / VSTS we looked at how to commission either TFS or VSTS. In this seventh post in the series we continue from where we left off by creating a Team Project and then within that team project the Git repository that will hold the source code of our sample application. Before we do all that though we'll want to commission a developer workstation in Azure.
Commission a Developer Workstation
Although it's possible to connect an on premises developer workstation to either VSTS (straightforward) or our TFS instance (a bit trickier) to keep things realistic I prefer to create a Windows 10 VM in Azure that is part of the domain. Use the following guide to set up such a workstation:
- If you are manually creating a VM in the portal it's not wholly clear where to find Windows 10 images. Just search for 10 though and they will appear at the top of the list. I chose Windows 10 Enterprise (x64) -- make sure you select to create in Resource Manager. (Although you can choose an image with Visual Studio already installed I prefer not to so I can have complete control.)
- I created my VM as a Standard DS3 on premium storage in my PRM-CORE resource group, called PRM-CORE-DEV. Make sure you choose the domain's virtual network and the premium storage account.
- With the VM created log in and join the domain in the normal way. Install any Windows Updates but note that since this in an Enterprise edition of Windows you will be stuck with the windows version that the image was created with. For me this was version 10.0 (build 10240) even though the latest version is 1511 (build 10586) (run winver at a command prompt to get your version). I've burned quite a few hours trying to upgrade 10.0 to 1511 (using the 1511 ISO) with no joy -- I think this is because Azure doesn't support in-place upgrades.
- Install the best version of Visual Studio 2015 available to you (for me it's the Enterprise edition) and configure as required. I prefer to register with a licence key as well as logging in with my MSDN account from Help > Register Product.
- Install any updates from Tools > Extensions and Updates.
Create a Team Project
The procedure for creating a Team Project differs depending on whether you are using VSTS or TFS. If you are using VSTS simply navigate to the Web Portal home page of your subscription and select New:

This will bring up the Create New Team Project window where you can specify your chosen settings (I'm creating a project called PRM using the Scrum process template and using Git version control):

Click on Create project which will do as it suggests. That button then turns in to a Navigate to project button.
If on the other hand you are using TFS you need to create a team project from within Visual Studio since a TFS project may have other setup work to perform for SSRS and SharePoint that doesn't apply to VSTS. The first step is to connect to TFS by navigating to Team Explorer and choosing the green Manage Connections button on the toolbar. This will display a Manage Connections link which in tun will bring up a popup menu allowing you to Connect to Team Project:

This brings up the Connect to Team Foundation Server dialog where you need to click the Servers button:

This will bring up the Add/Remove Team Foundation Server dialog where you need to click the Add button:

Finally we get to the Add Team Foundation Server dialog where we can add details of our TFS instance:

As long as you are using the standard path, port number and protocol you can simply type the server name and the dialog will build and display the URI in the Preview box. Click OK and work your way back down to the Connect to Team Foundation Server dialog where you can now connect to your TFS instance:

Ignore the message about Configure your workspace mappings (I chose Don't prompt again) and instead click on Home > Projects and My Teams > New Team Project:

This brings up a wizard to create a new team project. As with VSTS, I created a project called PRM using the Scrum process template and using Git version control. The finishing point of this process is a Team Explorer view that advises that You must clone the repository to open solutions for this project. Don't be tempted since there is another step we need to take!
Create a Repository with a Name of our Choosing
As things stand both VSTS and TFS have initialised the newly minted PRM team projects with a Git repository named PRM. In some cases this may be what you want (where the team project name is the same as the application for example) however that's not the case here since our application is called Contoso University. We'll be taking a closer look at Contoso University in the next post in this series but for now we just need to create a repository with that name. (In later posts we'll be creating other repositories in the PRM team project to hold different Visual Studio solutions.)
The procedure is the same for both VSTS and TFS. Start by navigating to the Web Portal home page for either VSTS or TFS and choose Browse under Recent projects & teams. Navigate to your team project and click on the Code link:

This takes you to the Code tab which will entice you to Add some code!. Resist and instead click on the down arrow next to the PRM repository and then click on New repository:

In the window that appears create a new Git repository called ContosoUniversity (no space).
In the interests of keeping things tidy we should delete the PRM repository so click the down arrow next to (the now selected) ContosoUniversity repository and choose Manage repositories. This takes you to the Version Control tab of the DefaultCollection‘s Control Panel. In the Repositories panel click on the down arrow next to the PRM repository and choose Delete repository:

And that's it! We're all set up for the next post in this series where we start working with the Contoso University sample application.
Cheers -- Graham
Continuous Delivery with TFS / VSTS – Commissioning TFS or VSTS
[Please note that I've edited this post since first publishing it to reflect new information and / or better ways of doing things. See revision list at the end of the post.]
It's taken a few posts to get here but finally we have arrived at the point in my blog series on Continuous Delivery with TFS / VSTS where we actually get to start using TFS or VSTS -- depending on the route you choose to go down. The main focus of this post is on getting up-and-running with these tools but it's worth talking a bit first about the merits of each platform.
TFS is Microsoft's on premises ALM platform. It needs planning, provisioning of servers, and care and feeding when it's in production. With TFS you are in complete control and -- disasters not withstanding -- all data stays in your network. VSTS on the other hand is Microsoft's hosted ALM platform. Pretty much everything is taken care of and you can be using VSTS within minutes of signing up. However apart from being able to choose from a couple of datacentres you don't have the same control over your data as you do with TFS. Of course VSTS is secure but if the nature of the business you are in puts restrictions on where your data can live then VSTS may not be an option.
In terms of features it's a mixed story. VSTS gets new features about every three weeks and TFS eventually catches up a few months later -- as long as you upgrade of course. However VSTS is missing some components that are present in TFS, notably reports (as in SQL Server Reporting Services, although Power BI looks like it will fill this gap) and SharePoint integration.
If there is no clear factor that helps you decide something else to bear in mind is that there is increasing adoption of VSTS inside Microsoft itself. So if it's good enough for them...
Getting Started with VSTS
It's trivially easy to get started with VSTS and the first five users are free, so there is almost no reason to not give it a try. The process is described here and within minutes you'll have your first project created. I'll be covering connecting to and working with projects in the next post in this series but if you can't wait I'll tell you now that I'll be using the Scrum process template and choosing Git for version control.
Getting Started with TFS
In contrast to VSTS getting started with TFS is quite a lengthy process. For an on premises installation you'll need to do some planning however for a POC environment in the cloud we can simplify things somewhat by using one VM to host everything. For some time now Ben Day has produced an excellent guide to installing TFS and you can find the 2015 version here. The guide pretty much covers everything you need to know in great detail and there's no point me repeating it. A high-level view of the process is as follows:
- Create a VM in Azure. I opted for a Standard DS4 VM running Windows Server 2012 R2 Datacentre which I created in my PRM-CORE resource group as PRM-CORE-TFS using the previously created storage account and virtual network.
- Configure a few Windows settings. The first part of Ben's guide covers installing Windows but you can skip that as it's taken care of for us by Azure. The starting point for us is the bit where Ben describes configuring a new server. One part you can skip is the Remote Desktop configuration as that's already set up for Azure VMs.
- Install pre-requisites. Nothing much to comment on here -- Ben describes what's required with excellent screenshots.
- Install SQL Server. Choose the latest supported version. For me this was SQL Server 2014 with SP1.
- Install TFS 2015. Choose the latest version which for me was TFS 2015 with SP1. Be sure to create (and use!) the three domain accounts for the different parts of TFS. For me this was PRM\TFSSERVICE, PRM\TFSREPORTS and PRM\TFSBUILD. Make sure to check the User cannot change password and Password never expires settings when these accounts are created in Active Directory Users and Computers. Go with Ben's advice and skip setting up SharePoint. It's not critical and is an extra complication that's not needed.
- One point to be aware of when installing TFS on an Azure VM is the installation wizard might suggest the D volume as the place for the file cache (D:\TfsData\ApplicationTier\_fileCache). This is a very bad thing on Azure Windows VMs as the D volume is strictly for temporary storage and you shouldn't put anything on this volume you aren't willing to lose. Make sure you change to use the C volume or some other attached disk if that's the route you've gone down.
- Install Visual Studio 2015. Ben's guide doesn't cover this, but the easiest way to ensure all the components are available to build .NET projects is to install VS 2015 -- obviously the latest version.
- I'm not sure if it's strictly necessary on build servers but I always licence VS installations (Help > Register Product > Unlock with a Product Key) just in case bad things happen after the 30-day trial period expires.
- Another post-installation task I carry out is to update all the extensions from Tools > Extensions and Updates.
- Install TFS Build. TFS Build isn't enabled as part of the core setup, which makes sense for scaled-out installations where other servers will take the build strain. (Don't forget that build has completely changed for TFS 2015, and whilst XAML builds are still supported the new way of doing things is the way forward.) For a POC installation you can get away with running build on the application tier, and installation is initiated from the Team Foundation Server Administration Console > $ServerName$ > Build:

In reality this just opens the Team Portal Control Panel at the Agent pools tab. From here you need to deploy a Windows build agent. The details are described here and it's pretty straightforward. In essence you download a zip (that contains the agent plus a settings file) and unzip to a permanent location eg C:\Agent. Run ConfigureAgent.cmd from an admin command prompt and respond to the prompts (TFS URL will be similar to http://prm-core-tfs:8080/tfs and you want to install as a Windows Service using the build credentials previously created) and you are done. If you chose default settings you should end up with a new agent in the Default pool.
- Since you'll almost certainly be needing the services of Nuget.exe it's a good idea to make sure it's at the latest version. Open an admin command prompt at C:\Program Files\Microsoft Team Foundation Server 14.0\Tools and run Nuget.exe update -self.
Compared with VSTS, setting up TFS was quite a bit of work -- several hours including all the installations and updates. Much of this activity will of course need to be repeated at every update. Not everyone will be able to go down the VSTS hosted route but if you can it could end up being quite a time saver.
Cheers -- Graham
Revisions:
9/1/2016 -- Updated with type of VM to reflect adoption of premium storage and expanded installing TFS build instructions.
Continuous Delivery with TFS / VSTS – Penny Pinching with Azure Automation
Chances are the day will come when you inadvertently leave your VMs running overnight and you wake up the next day to find a) the complimentary monthly Azure credits associated with your MSDN subscription have been completely used up or b) your MSDN Dev/Test Pay-As-You-Go Azure subscription is facing whopping charges and you have some explaining to do. In this fifth instalment of my blog series on Continuous Delivery with TFS / VSTS we look at how to guard against these situations.
Turn on Billing Alerts
The first line of defence is to activate billing alerts and set up appropriate alerts (there is a maximum of five) for your subscription. My Visual Studio Enterprise with MSDN subscription gets £95 worth of credits a month so I have alerts as follows:

Each alert allows for two email addresses to be contacted when the appropriate threshold is triggered. The thresholds can either be Monetary Credits or Billing Total and you'll need to choose according to whether your subscription has complimentary credits or whether you are accumulating a debt.
The billing alerts feature isn't foolproof though -- at least not unless you have your phone by your bedside with audible notifications enabled. And it won't help you if you can't get to a computer to shut down your VMs. Enter stage left -- Azure Automation!
The Big Picture
Azure Automation allows you to do, er, automation in Azure. The net effect is a bit like Windows Task Scheduler, in that it allows you to create jobs that can be run on a schedule. The resemblance ends there though as setting up Azure Automation is nothing like setting up Task Scheduler. There are quite a few moving parts to configure to get automation up-and-running and at the time of writing it is further complicated because ARM cmdlets are not recognised in the out-of-the-box automation configuration. We'll be covering the steps needed to run a PowerShell script that will loop through all VMs and turn off ones which are not running and are not a domain controller, and then make a second pass to turn off any running domain controllers. In case you were wondering there's no magic in the domain controller recognition -- just that I name any domain controllers with a DC suffix and don't use DC for anything else.
Create an Organisational Account
Azure Automation doesn't work with Microsoft accounts (typically this is an account that uses your work email address and the one you use to log in to Azure and MSDN). Instead you need to create an organisational account in Azure Active Directory. The instructions for this are here and at the time of writing this functionality is only available in the classic portal. I created an account called Automation.
Create an Automation Account
This is a container to group automation resources. Assuming you are authenticated to Azure via PowerShell a new account is created as follows:
|
|
New-AzureRmAutomationAccount -Name prmautomationaccount -ResourceGroupName PRM-COMMON -Location "West Europe" |
Obviously change the values of the parameters to suit your requirements.
Associate the Organisational Account with the Automation Account
As it stands our automation account doesn't have any permissions to interact with resources such as our VMs. This situation is remedied by associating the organisational account with the automation account. Your code should look similar to this:
|
|
$User = "automation@youraccountname.onmicrosoft.com" $Password = ConvertTo-SecureString "ThePasswordForAutomation" -AsPlainText -Force $Credential = New-Object -TypeName System.Management.Automation.PSCredential -ArgumentList $User, $Password New-AzureRmAutomationCredential -Name Automation -AutomationAccountName prmautomationaccount -ResourceGroupName PRM-COMMON -Value $Credential |
Obviously I've changed a couple of things above for security reasons but you get the idea. If you want to observe the effect of the code above head over to the new portal and navigate to Automation Accounts > $YourAutomationAccount$ > Assets > Credentials. You should see that the organisational account has been added and (as we'll see below) can be referenced from a PowerShell script.
Add AzureRM Modules
At the time of writing a newly created automation account doesn't know anything about ARM, although by the time you read this that may have been fixed. By way of further explanation, in the new portal navigate to Automation Accounts > $YourAutomationAccount$ > Assets > Modules. What you see here are the modules that contain PowerShell cmdlets that you can call from the automation account. If this list doesn't have what you need you need to manually add whatever module is missing. In our case we need the AzureRM, AzureRM.Compute and AzureRM.profile modules. We can conveniently get these from the PowerShell Gallery.
At the gallery, search for and then navigate to the AzureRM page, and notice the handy Deploy to Azure Automation button:

Clicking this button sends you back to the Azure portal and sets you up with the beginnings of a Custom deployment. This is the technique of deploying to ARM using JSON templates, a technique I'll be using later in this series to create VMs for the continuous deployment pipeline. The template contains a number of parameters and other details that are supplied by working your way through the sections of the custom deployment panel:

The screenshot above shows the Parameters section being edited. Be sure to save the section by clicking OK before moving to a new section. When all sections are complete clicking Create will deploy the module to the automation account. There isn't any real magic here -- if you look at the JSON template it is just uploading the module from its location on https://devopsgallerystorage.blob.core.windows.net/azureautomationpackages.
You'll need to repeat this process for AzureRM.Compute and AzureRM.profile. At the time of writing there was no button for AzureRM.Compute. No matter, you can achieve the same effect by pasting a URI similar to this in to your browser: https://www.powershellgallery.com/packages/AzureRM.Compute/1.1.0/DeployModuleToAzureAutomation. The preceding URI is specific to version 1.1.0 of AzureRM.Compute -- obviously you may need to tweak for a newer version.
Create a Runbook
At long last we get to the point of being able to do something useful, which in this case is to run a PowerShell script to stop all virtual machines -- member servers first and then any domain controllers. PowerShell scripts live inside a runbook which is created with the following code:
|
|
New-AzureRmAutomationRunbook -Name StopAllVirtualMachines -AutomationAccountName prmautomationaccount -ResourceGroupName PRM-COMMON -Type PowerShell |
With the runbook created the easiest way to test scripts is in the portal. Navigate to Automation Accounts > $YourAutomationAccount$ > Runbooks > StopAllVirtualMachines and click on the Edit button. This will take you to an editor that will allow you to write, test and finally publish your PowerShell script. The code I'm using is:
|
|
# Authenticate $Cred = Get-AutomationPSCredential -Name "Automation" Add-AzureRmAccount -Credential $Cred -SubscriptionId "zyb4a111-7e0b-1111-df9d-x4a160567809" # Stop member servers, defined as those that don't have a DC suffix Get-AzureRmVM | ForEach-Object { if (!$_.Name.EndsWith("DC")) { Write-Output "Shutting down: $($_.Name)" Stop-AzureRmVM -Force -Name $_.Name -ResourceGroupName $_.ResourceGroupName } } # Stop everything else that's running Get-AzureRmVM | Stop-AzureRmVM -Force |
Paste your version of the above in to the editor and click on Test pane. From here you can run the code and note any errors. It's then back to Edit to make any changes, which you should save before going back to the test pane. When all the kinks are ironed out click on Publish to make the runbook live.
[As an aside, I'm in two minds as to whether the above code is optimal because it doesn't check to see if a VM is already stopped (as my original version of this did) because of difficulties in determining the status when using the Get-AzureRmVM | ForEach-Object construct . However the Azure cmdlets are now idempotent so they don't really care and given this is running as a job in Azure rather than on my workstation I'm not too concerned about how long it takes.]
Create and Configure a Schedule
We want our runbook to run every day in case we accidentally forget to stop our VMs and for this we set up a Schedule using code similar to this:
|
|
$startTime = Get-Date "01:00:00" New-AzureRmAutomationSchedule -Name DailyAt0100 -AutomationAccountName prmautomationaccount -ResourceGroupName PRM-COMMON -StartTime $startTime.AddDays(1) -DayInterval 1 |
The preceding code sets up a schedule to start at 01:00 the next day. You'll need to remove .AddDays(1) if you are working just past midnight.
At the moment the schedule will run but it won't trigger anything. We need to associate the runbook with the schedule using the following code:
|
|
Register-AzureRmAutomationScheduledRunbook -AutomationAccountName prmautomationaccount -ResourceGroupName PRM-COMMON -RunbookName StopAllVirtualMachines -ScheduleName DailyAt0100 |
As a final test it's probably a good idea to create a scratch A0 VM and leave it running to confirm next day that everything is working as expected.
One Final Tip
A final thought to finish on is concerned with how you will stop your VMs after a session working with them. It might be tempting to use a local version of the code in the runbook however even if you could justify the code duplication this isn't always a great idea when you have a large number of VMs to stop as you'll wait for ages. Instead you can invoke the runbook from PowerShell:
|
|
Start-AzureRmAutomationRunbook -Name StopAllVirtualMachines -AutomationAccountName prmautomationaccount -ResourceGroupName PRM-COMMON |
The beauty of this technique is that execution only tales seconds so you don't have to wait for the ISE (or whatever you are using) to finish its business. Of course if you don't have access to PowerShell you can always use the portal.
Cheers -- Graham
Continuous Delivery with TFS / VSTS – Installing a Domain Controller
[Please note that I've edited this post since first publishing it to reflect new information and / or better ways of doing things. See revision list at the end of the post.]
This fourth blog post in my series on on Continuous Delivery with TFS / VSTS picks up from the previous post where we created some common infrastructure and moves on to installing a domain controller. If that seems a little over-the-top bear in mind that one of the aims of this series of blog posts is to help organisations with a traditional on premises TFS installation implement continuous delivery. Typically a domain controller running Active Directory is going to be part of the mix.
Create the PRM-CORE Resource Group
I'm planning to create my enduring servers in a resource group called PRM-CORE so the first step is to create the group:
|
|
New-AzureRmResourceGroup -Name "PRM-CORE" -Location "West Europe" |
Create the Domain Controller
My plan to create the domain controller in PowerShell came to an abrupt halt when the code bombed with an error that I couldn't fix. When I first started writing this post there was a bug in the new-style Azure PowerShell cmdlets that stops a VM from being created where the storage account already exists in a different group from the one the VM will be created in. With a newer version of the cmdlets this has now changed to a warning: WARNING: Storage account, prmstorageaccount, is not found. The OS disk may be in a different storage group. As far as I can tell, despite the message VMs are now created correctly. Anyway, all this was too late for me as I had already created the VM (called PRM-CORE-DC) via the portal. If you go down this route do make sure you set the DNS name label of the public IP address to the name of the VM. (See my post here for more details about why you should do this.) Other than that gotcha creating a VM in the portal is pretty straightforward but don't forget to specify the already-created premium storage account (if you have decided to go down the premium route as I have), virtual network and the resource group created above. I created my DM as a Standard DS2 (since I'm planning for it to be doing quite a lot of work) running Windows 2012 R2 Datacenter. Previously my DC would be configured as a Standard A0 and I would leave it turned on (which costs pennies per day) but the DS2 burns through credits much faster so I'll be turning it off. This will all be scripted so the DC can be shut down last (and started up first) and I'll also be showing how to automate this in case a lapse of memory leaves your VMs turned on.
Preparing for the Domain Controller Role
Probably the first thing to know about creating a domain controller in Azure is that it always needs to have the same internal IP address. If you never turn it off then that will work but the recommendation is to set a static internal IP address -- the first available one for the virtual network we are using is 10.0.0.4 . You can do this with the following PowerShell, assuming the VM is turned off and the target IP address isn't already in use:
|
|
$nic=Get-AzureRmNetworkInterface -Name YourNicName -ResourceGroupName YourResourceGroupName $nic.IpConfigurations[0].PrivateIpAllocationMethod = "Static" $nic.IpConfigurations[0].PrivateIpAddress = "10.0.0.4" Set-AzureRmNetworkInterface -NetworkInterface $nic |
You can also do this via the new portal. With your VM shut down navigate to its network interface then to Settings > IP addresses. From there you can make the IP address static and set it to 10.0.0.4:

The second thing to know about setting up a domain controller in Azure is that if the AD DS database, logs, and SYSVOL are not stored on a non-OS disk there is a risk of loosing data. For a lightly used POC environment I'm happy to take the risk but if you are not you'll need to add a data disk to your VM and specify this as the location for the AD DS database, logs, and SYSVOL during the installation of the AD role.
Installing Active Directory
This isn't a whole lot different in Azure from an on-premises installation, although there is one crucial step (see below) particular to Azure to ensure success. Of course if you are a developer you may not be installing AD on a regular basis so my previous statement may be less than helpful. Fear not as you can find a complete rundown of most of what you need to know here. In essence though the steps are as follows:
- Before installing AD in Azure you need to temporarily set the virtual network to a Custom DNS of 127.0.0.1 for the Primary DNS server setting. See this post for more details. It's crucial to do this before you start installing AD.
- Install the Active Directory Domain Services role via Server Manager > Add roles and features.
- The wizard steps are mostly straightforward but if you are unfamiliar with the process it may not be obvious that since we are starting from scratch you need to select Add a new forest on the Deployment Configuration step of the wizard.
- You'll also need to specify a Root domain name. I chose prm.local.
- With your VM restarted make sure you complete the Reset the DNS server for the Azure virtual network instructions in the documentation. Essentially this is replacing the temporary 127.0.0.1 primary DNS server setting with the one for the DC, ie 10.0.0.4.
- With AD up-and-running you'll probably want to navigate to Server Manager > Tools > Active Directory Users and Computers and create a user which you'll use to log on to servers when they have been added to the domain. It's not a best practice but you might find it useful if this user was in the Domain Admins group.
That's it for this time. Use your Domain Admin powers wisely!
Cheers -- Graham
Revisions:
12/12/2015 -- Replaced adding a DNS forwarder pointing to Google's DNS server with setting the virtual network's Secondary DNS Server to 168.63.129.16 to allow access to the Internet.
2/1/2016 -- Updated to reflect my adoption of premium storage and also to remove the change above and replace with a crucial technique for ensuring that the DNS roots hint list on the DC is populated correctly.
Continuous Delivery with TFS / VSTS – Laying Foundations in Azure
[Please note that I've edited this post since first publishing it to reflect new information and / or better ways of doing things. See revision list at the end of the post.]
In the previous post in this series on Continuous Delivery with TFS / VSTS we started working with the new-style Azure PowerShell cmdlets. In this post we use the cmdlets to lay some foundational building blocks in Azure.
Resource Groups
One of the new concepts in Azure Resource Manager (ARM) is that all resources live in Resource Groups which are really just containers. Over time best practices for resource groups will undoubtedly emerge but for the moment I'm planning to use resource groups as follows:
- PRM-COMMON -- this resource group will be the container for shared infrastructure such as a storage account and virtual network and is the focus of this post.
- PRM-CORE -- this resource group will be the container for enduring servers such as the domain controller and the TFS server.
- PRM-$ENV$ -- these resource groups will be containers for servers that together form a specific environment. The plan is that these environments can be killed-off and completely recreated through ARM's JSON templates feature and PowerShell DSC.
I'm using PRM as my container prefix but this could be anything that suits you.
Creating PRM-COMMON
Once you have logged in to Azure PowerShell creating PRM-COMMON is straightforward:
|
|
New-AzureRmResourceGroup -Name "PRM-COMMON" -Location "West Europe" |
Note that you need to specify a location for the resource group -- something to consider as you'll probably want all your groups close together. If you want to visually verify the creation of the group head over to the Azure Portal and navigate to Resource groups.
Create a Storage Account
In order to keep things simple I prefer just one storage account for all of the virtual hard disks for all the VMs I create, although this isn't necessarily a best practice for some production workloads such as SQL Server. One thing that is worth investigating is premium storage, which uses SSDs rather than magnetic disks. I'd originally discounted this as it looked like it would be expensive against my Azure credits however after experiencing how VS 2015 runs on standard storage (slow on a Standard A4 VM) I investigated and found the extra cost to be marginal and the performance benefit huge. I recommend you run your own tests before committing to premium storage in case you are on a subscription where the costs may not outweigh the performance gains, however I'm sold and most of my VMs from now on will be on premium storage. To take advantage of premium storage you need a dedicated premium storage account:
|
|
New-AzureRmStorageAccount -Name "prmstorageaccountp" -Location "West Europe" -ResourceGroupName "PRM-COMMON" -Type Premium_LRS |
Even though the resource group is in West Europe you still need to supply the location to the New-AzureRmStorageAccount cmdlet, and note that I've added a ‘p' on the end of the name to indicate the account is a premium one as I may well create a standard account for other purposes.
Create a Virtual Network
We also need to create a virtual network. Slightly more complicated but only just:
|
|
$subnet = New-AzureRmVirtualNetworkSubnetConfig -Name "default" -AddressPrefix "10.0.0.0/24" New-AzureRmVirtualNetwork -Name "prmvirtualnetwork" -Location "West Europe" -ResourceGroupName "PRM-COMMON" -AddressPrefix "10.0.0.0/16" -Subnet $subnet |
Create a SendGrid Account for Email Services
In later posts we'll want to configure some systems to send email notifications. The simplest way to achieve this in Azure is to sign up for a free SendGrid email service account from the Azure Marketplace. At the time of writing the documentation is still for the classic Azure portal which doesn't allow the SendGrid account to be created in a resource group. The new portal does though so that's the one to go for. Navigate to Marketplace > Web + Mobile and search for sendgrid to display the SendGrid Email Delivery which is what you want. Creating an account is straightforward -- I called mine PRMSMTP and created it in the PRM-COMMON resource group. Make sure you choose the free option.
Using Azure Resource Explorer
As an alternative to using the portal to examine the infrastructure we have just created we can also use the browser-based Azure Resource Explorer. This very nifty tool allows you to drill down in to your Azure subscriptions and see all the resources you have created and their properties. Give it a go!
Cheers -- Graham
Revisions:
31/12/15 -- Recommendation to investigate using premium storage.
Continuous Delivery with TFS / VSTS – A New Way of Working with Azure Resource Manager
In this second post in my Continuous Delivery with TFS / VSTS series it's time to make a fresh start in Microsoft Azure. Whaddaya mean a fresh start? Well for a little while now there has been a new way to interact with Azure, namely through a feature known as Azure Resource Manager or ARM. This is in contrast to the ‘old' way of doing things which is now referred to as Azure Service Management or ASM. As I mention in a previous blog post ARM is the way of the future and this new series of blog posts is going to be entirely based on using ARM using the new portal (codename Ibiza) where portal interaction is necessary. I have lots of VMs created in ASM but the plan is to clear those down and start again.
However, I'm a big fan of using PowerShell to work with Azure at every possible opportunity and a further reason for making a fresh start is that there is a new set of Azure PowerShell cmdlets for working with ARM (to avoid naming clashes with ASM cmdlets). To me it makes sense to start a new series of posts based on this new functionality.
As usual, the aim of this post isn't to teach you foundational concepts and if you need an introduction to ARM I have a Getting Started blog post with a collection of links to help you get going. Be aware that most of the resources pre-date the arrival of the new Azure PowerShell cmdlets. In the rest of this post we'll look at how to get up-and-running with the new cmdlets.
Install the new Azure PowerShell Cmdlets
First things first you'll need to install the new-style Azure PowerShell cmdlets. At the time of writing these were in preview, and the important thing to note is that the new version (1.0 or later) introduces breaking changes so do consider which machine you are installing them on. In the fullness of time we will be able to perform the installation from Web Platform Installer but initially at least it's a manual process. Details are available from the announcement blog here and Petri has a nice set of instructions as well.
Logging in has Completely Changed
If you have been used to logging in to Azure using the publish settings file method then you need to be aware that this method simply will not work with ARM since certificate-based authentication isn't supported. Instead you use the Login-AzureRmAccount cmdlet, which causes the Sign in to Microsoft Azure PowerShell dialog to display. What happens next depends on the type of account you attempt to log in with. If you use a Microsoft Account (typically this is the account your MSDN subscription is associated with) the dialog will recognise this and redirect you to a Sign in to your Microsoft account dialog. If you log in with an Azure AD account you are logged straight in -- assuming authentication is successful of course.
After a successful login you'll see the current ‘settings' for the login session. If you only have one Azure subscription associated with your login you are good to go. If you have more than one you may need to change to the subscription you want to use. The Get-AzureRMSubscription cmdlet will list your subscriptions and then there are a couple of options for changing subscription:
|
|
Get-AzureRmSubscription -SubscriptionName "Visual Studio Premium with MSDN" | Select-AzureRmSubscription #or Select-AzureRmSubscription -SubscriptionId "zyb4a111-7e0b-1111-df9d-x4a160567809" |
If using the second version obviously replace with your GUID. In case you were wondering the one above is made up...
The ASM version of Select-AzureRmSubscription takes a -Default parameter to set the default subscription but this seems to be missing in the ARM version -- hopefully only a temporary thing.
But I Don't Want to Type my Password Every Time I use Azure
When you log in using Login-AzureRmAccount it seems a token is set which expires after a period of time -- about 12 hours according to this source. This means that you are going to be logging in manually quite frequently which can get to be a chore and in any case is of little use in automated scripts. There is an answer although it doesn't feel as elegant as the publish settings file method.
The technique involves firstly saving your password to disk in encrypted format (a one-time operation) and then using your login and the encrypted password to create a pscredential object that can be used with the -Credential parameter of Login-AzureRmAccount. All the details you need are explained here however do note that this technique only works with an Azure AD account and also be aware that the PowerShell is pre new-style cmdlets. The resulting new-style code ends up something like this:
|
|
$subscriptionId = "zyb4a111-7e0b-1111-df9d-x4a160567809" $azurePassword = Get-Content -Path "C\Users\You\Documents\AzurePasword.txt" | ConvertTo-SecureString $azureUsername = "loginname@youraccount.onmicrosoft.com" $azureCredential = New-Object -TypeName pscredential -ArgumentList $azureUsername, $azurePassword Login-AzureRmAccount -Credential $azureCredential -SubscriptionId $subscriptionId |
If you only have one Azure subscription you can of course simplify the above snippet by removing the subscription details. Is it a good idea to store even an encrypted password on disk? It doesn't feel good to me but it seems for the moment that this is what we need to use. The smart money is probably on using an Azure AD account with very limited privileges and then adding permissions to the account as required. Do let me know in the comments if a better technique emerges!
Cheers -- Graham
Continuous Delivery with TFS / VSTS – Start of a New Journey
[Please note: Just a couple of weeks after publishing this post Microsoft changed the name of Visual Studio Online (VSO) to Visual Studio Team Services (VSTS). I've updated the title and URL of this post for consistency with future posts but the text below remains unchanged.]
I first started investigating how to implement continuous delivery with TFS -- working almost exclusively in Microsoft Azure -- nearly two years ago. Out of these investigations (and backed-up by practical experience where I work) came my original 24-post series on implementing continuous delivery with TFS and a shorter series covering continuous delivery with VSO.
Although the concepts that I covered in my original series haven't really changed the tooling certainly has -- only what you would expect in this fast-moving industry of ours of course. In particular there have been fundamental changes to the way Microsoft Azure works and we also have a brand new web-based implementation of Release Management coming our way. Additionally, there are aspects of continuous delivery that my original series didn't cover because the tooling I wanted to use simply wasn't in place or mature enough. Consequently it feels like the right time to start a brand new blog post series, and it is my intention in this post to set the scene for what's in store.
Aims of the new Series
- Hopefully by now most people realise that despite its name VSO (Visual Studio Online) is Microsoft's cloud version of TFS. My original continuous delivery series focussed on TFS since the Release Management tooling didn't originally work with VSO. Although that eventually changed the story is now completely different and the original WPF-based Release Management has a brand new web-based successor. As with most new ALM features coming out of Microsoft this will initially be available in VSO. TFS 2015 will get the new release management tooling sometime later -- see here to keep track of when this might be. Despite the possible complications of different release timeframes I'm planning to make this new series of posts applicable to both TFS and VSO. This will hopefully avoid unnecessary repetition and allow anyone working through the series to pick either VSO or TFS and be confident that they can follow along without finding I have been focussing on one of the implementations to the detriment of the other.
- Of all the things that can cause software to fail other than actual defects, application configuration is probably the one that is most troublesome. That's my experience anyway. However there is another factor that can cause problems which is the actual configuration of the server(s) the application is installed on. The big question here is how can we be sure that the configuration of the servers we tested on is the same in production, because if there are differences it could spell disaster? Commonly known as configuration as code I'm planning to address this issue in this new series of posts using Microsoft's PowerShell DSC technology.
- So we've got a process for managing the configuration of our server internals, but what about for actually creating the servers I hear you ask? It's an important point, since who doesn't want to be able to create infrastructure in an automated and repeatable way? I'll be addressing this requirement using the technologies provided by Azure Resource Manager, namely what I think are going to turn out to be idempotent PowerShell cmdlets and (as a different approach) JSON templates. For sure, you are unlikely to be using these technologies in an on premises situation however for me the important thing is to get hands-on experience of an infrastructure as code technology that helps me think strategically about this problem space.
- I'm a huge advocate for IT people using cloud technologies to help them with their continuous learning activities and if you have an MSDN subscription you could have up to £95 worth of Microsoft Azure credits to use each month. Being able to create servers in Azure and take advantage of the many other services it offers opens up a whole world of possibilities that just a few years ago were out of reach for most of us. However, as well as being a useful learning tool I also feel strongly that most IT people should be learning cloud technologies as they will surely have an effect on most of our jobs at some point. Maybe not today, maybe not tomorrow but soon etc. Consequently, I use Azure both because it is a great place to build sandbox environments but also because I'm confident that learning Azure will help my future career. I hope you will feel the same way about cloud technologies, whether it's Azure or another offering.
- Lastly, I'm planning to make each blog post shorter and to have a more specific theme. Something like the single responsibility principle for blogging. My hope is that shorter posts will make it easier for those ‘trying this at home' to follow along and will also make it easier to find where I've written about a specific piece of technology. Shorter posts will also help me as it will hopefully be an end to the nightmare blog post that takes several weeks to research, debug and explain in a coherent way.
Who is the new Series Aimed at?
Clearly I hope my blog posts will help as many people as possible. However I have purposefully chosen to work with a specific set of technologies and if this happens to be your chosen set then you are likely to get more direct mileage out of my posts than someone who uses different tools. If you do use different tools though I hope that you will still gain some benefit because many concepts are very similar. Using Chef or Puppet rather than PowerShell DSC? No problem -- go ahead and use those great tools. Your organisation has chosen Octopus Deploy as your release management tooling? My hope is that you should have little problem following along, using Octopus as a direct replacement for Microsoft's offering. As with my previous series I do assume a reasonable level of experience with the underlying technologies and for those for whom this is lacking I'll continue to publish Getting Started posts with link collections to help get up to speed with a topic.
I carry out my research activities with the benefit of an MSDN Enterprise subscription as this gives me access to all of Microsoft's tooling and also monthly Azure credits. If you don't have an MSDN subscription there are still ways you can follow along though. Anyone can sign up for a free VSO account and there is also a free Express version of TFS. Similarly there is a free Community version of Visual Studio and a free Express version of SQL Server. All this, combined with a 180-day evaluation of Windows Server which you could run using Hyper-V on a workstation with sufficient memory should allow you to get very close to the sort of setup that's possible with an MSDN account.
Looking to the Future
It might seem odd to be looking at the future at the beginning of a new blog post series however I can already see a time when this series is out of date and needs updating with a series that includes container technologies. However I'm purposefully resisting blogging about containers for the time being -- it feels just a bit too new and shiny for me at the moment and in any case there is no shortage of other people blogging in this space.
Happy learning!
Cheers -- Graham


