In my previous post I described my experience of working through Microsoft's Continuous Integration and Deployment of Multi-Container Docker Applications to Azure Container Service tutorial which is a walkthrough of how to use an Azure CLI 2.0 command to create a VSTS deployment pipeline to push Docker images to an Azure Container Registry and then deploy and run them on an Azure Container Service running a DC/OS cluster. Whilst it's great to be able to issue some commands and have stuff magically appear it's unlikely that you would use this approach to create production-grade infrastructure: having precise control over naming things is one good reason. Another problem with commands that create infrastructure is that you don't always get a good sense of what they are up to, and that's what I found with the az container release create command.
So I spent quite a bit of time ‘reverse engineering' az container release create in order to understand what it's doing and in this post I describe, step-by-step, how to build what the command creates. In doing so I gained first-hand experience of what I think will be an import pattern for the future -- running VSTS agents in a container. If your infrastructure is in place it's quick and easy to set up and if you want more agents it takes just seconds to scale to as many as you need. In fact, once I had figured what was going on I found that working with Azure Container Service and DC/OS was pretty straightforward and even a great deal of fun. Perhaps it's just me but I found being able to create 50 VSTS agents at the ‘flick of a switch' put a big smile on my face. Read on to find out just how awesome all this is...
Getting Started
If you haven't already worked through Microsoft's tutorial and my previous post I strongly recommend those as a starting point so you understand the big picture. Either way, you'll need to have the Azure CLI 2.0 installed and also to have forked the sample code to your own GitHub account and renamed it to something shorter (I used TwoSampleApp). My previous post has all the details. If you already have the Azure CLI installed do make sure you've updated it (pip install azure-cli --upgrade) since version 2.0 was recently officially released.
Creating the Azure Infrastructure
You'll need to create the following infrastructure in Azure:
A dedicated resource group (not strictly necessary but helps considerably with cleaning up the 30+ resources that get created).
An Azure container registry.
An Azure container service configured with a DC/OS cluster.
The Azure CLI 2.0 commands to create all this are as follows:
The az acs create command in particular is doing a huge amount of work behind the scenes, and if configuring a container service for a production environment you'd most likely want greater control over the names of all the resources that are created. I'm not worried about that here and the output of these commands is fine for my research purposes. If you do want to delve further you can examine the automation script for the top level resources these commands create.
Configuring VSTS
Over in your VSTS account you'll need to attend to the following items:
Create a new team project (I called mine TwoServiceApp) configured for Git. (A new project isn't strictly necessary but it helps when cleaning up.)
Create an Agent Pool called TwoServiceApp. You can get to the page that manages agent pools from the agent queues tab of your team project:
Create a service endpoint of type Github that grants VSTS access to your GitHub account. The procedure is detailed here -- I used the personal access token method and called the connection TwoServiceAppGh.
Create a service endpoint of type Docker Registry that grants access to the Azure container registry created above.I describe the process in this blog post and called the endpoint TwoServiceAppAcr.
Create a personal access token (granting permission to all scopes) and store the value for later use.
Ensure the Docker Integration extension is installed from the Marketplace.
Create a VSTS Agent
This is where the fun begins because we're going to create a VSTS agent in DC/OS using a Docker container. Yep -- you read that right! If you've only ever created an agent on ‘bare metal' servers then you need to forget everything you know and prepare for awesomeness. Not least because if you suddenly feel that you want a dozen agents a quick configuration setting will have them created for you in a flash!
The first step is to configure your workstation to connect to the DC/OS cluster running in your Azure container service. There are several ways to do this but I followed these instructions (Connect to a DC/OS or Swarm cluster > Create an SSH tunnel on Windows) to configure PuTTY to create an SSH tunnel. The host name will be something like azureuser@twoserviceappacsmgmt.westeurope.cloudapp.azure.com (you can get the master FQDN from the overview blade of your Azure container service and the default login name used by az acr create is azureuser) and you will need to have created a private key in .ppk format using PuTTYGen. Once you have successfully connected (you actually SSH to a DC/OS master VM) you should be able to browse to these URLs:
DC/OS -- http://localhost
Marathon -- http://localhost/marathon
Mesos -- http://localhost/mesos
If you followed the Microsoft tutorial then much of what you see will be familiar, although there will be nothing configured of course. To create the application that will run the agent you'll need to be in Marathon:
Clicking Create Application will display the configuration interface:
Whilst it is possible to work through all of the pages and enter in the required information, a faster way is to toggle to JSON Mode and paste in the following script (overwriting what's there):
"value":"grep ': Listening for Jobs$' /vsts/agent/_diag/*.log"
},
"gracePeriodSeconds":300,
"intervalSeconds":5,
"timeoutSeconds":20,
"maxConsecutiveFailures":3,
"ignoreHttp1xx":false
}
],
"portDefinitions":[
{
"port":10000,
"protocol":"tcp",
"labels":{}
}
]
}
You will need to amend some of the settings for your environment:
id -- choose an appropriate name for the application (note that /vsts-agents/ creates a folder for the application).
VSTS_POOL -- the name of the agent pool created above.
VSTS_TOKEN -- the personal access token created above.
VSTS_ACCOUNT -- the name of your VSTS account (ie if the URL is https://myvstsaccount.visualstudio.com then use myvstsaccount).
It will only take a few seconds to create the application after which you should see something that looks like this:
For fun, click on the Scale Application button and enter a number of instances to scale to. I scaled to 50 and it literally took just a few seconds to configure them all. This resulted in this which is pretty awesome in my book for just a few seconds work:
Scaling down again is even quicker -- pretty much instant in Marathon and VSTS was very quick to get back to displaying just one agent. With the fun over, what have we actually built here?
The concept is that rather than configure an agent by hand in the traditional way, we are making use of one of the Docker images Microsoft has created specifically to contain the agent and build tools. You can examine all the different images from this page on Docker Hub. Looking at the Marathon configuration code above in the context of the instructions for using the VSTS agent images it's hopefully clear that the configuration is partially around hosting the image and creating the container and partially around passing variables in to the container to configure the agent to talk to your VSTS account and a specific agent pool.
Create a Build Definition
We're now at a point where we can switch back to VSTS and create a build definition in our team project. Most of the tasks are of the Docker Compose type and you can get further details here. Start with an empty process and name the definition TwoServiceApp. On the Options tab set the Default agent queue to be TwoServiceApp. On the tasks tab in Get sources configure the build to point to your GitHub account:
Now add and configure the following tasks (only values that need adding or amending, or which need a special mention are listed):
Task #1 -- Docker Compose
Display name = Build repository
Docker Registry Connection = TwoServiceAppAcr (or the name of the Docker Registry endpoint created above if different)
Save the definition and queue a build. The source code will be pulled down and then the instructions in the ci-build node of docker-compose.ci.build.yml will be executed which will cause service-b to be built.
Task #2 -- Docker Compose
Display name = Build service images
Docker Registry Connection = TwoServiceAppAcr (or the name of the Docker Registry endpoint created above if different)
Docker Compose File = **/docker-compose.yml
Qualify Image Names = checked
Action = Build service images
Additional Image Tags = $(Build.BuildId) $(Build.SourceBranchName) $(Build.SourceVersion) (on separate lines)
Include Source Tags = checked
Include Latest Tag = checked
Save the definition and queue a build. The addition of this task causes causes Docker images to be created in the agent container for service-a and service-b.
Task #3 -- Docker Compose
Display name = Push service images
Docker Registry Connection = TwoServiceAppAcr (or the name of the Docker Registry endpoint created above if different)
Docker Compose File = **/docker-compose.yml
Qualify Image Names = checked
Action = Push service images
Additional Image Tags = $(Build.BuildId) $(Build.SourceBranchName) $(Build.SourceVersion) (on separate lines)
Include Source Tags = checked
Include Latest Tag = checked
Save the definition and queue a build. The addition of this task causes causes the Docker images to be pushed to the Azure container registry.
Task #4 -- Docker Compose
Display name = Write service image digests
Docker Registry Connection = TwoServiceAppAcr (or the name of the Docker Registry endpoint created above if different)
Save the definition and queue a build. The addition of this task creates immutable identifiers for the previously built images which provide a guaranteed way of referring back to a specific image in the container registry. The identifiers are stored in a file called docker-compose.images.yml, the contents of which will look something like:
Save the definition and queue a build. The addition of this task creates a new docker-compose.yml that is a composite of the original docker-compose.yml and docker-compose.images.yml. The contents will look something like:
This is the file that is used by the release definition to deploy the services to DC/OS.
Task #6 -- Copy Files
Display name = Copy Files to: $(Build.StagingDirectory)
Contents = **/docker-compose.env.*.yml
Target Folder = $(Build.StagingDirectory)
Save the definition but don't bother queuing a build since as things stand this task doesn't have any files to copy over. Instead, the task comes in to play when using environment files (see later).
Task #7 -- Publish Build Artifacts
Display name = Publish Artifact: docker-compose
Path to Publish = $(Build.StagingDirectory)
Artifact Name = docker-compose
Artifact Type = Server
Save the definition and queue a build. The addition of this task creates the build artefact containing the contents of the staging directory, which happen to be docker-compose.yml and docker-compose.images.yml, although only docker-compose.yml is needed. The artifact can be downloaded of course so you can examine the contents of the two files for yourself.
Create a Release Definition
Create a new empty release definition and configure the Source to point to the TwoServiceApp build definition, the Queue to point to the TwoServiceApp agent queue and check the Continuous deployment option:
With the definition created, edit the name to TwoServiceApp, rename the default environment to Dev and rename the default phase to AcsDeployPhase:
Add Docker Deploy task to the AcsDeployPhase and configure as follows (only values that need changing are listed):
Display Name = Deploy to ACS DC/OS
Docker Registry Connection = TwoServiceAppAcr (or the name of the Docker Registry endpoint created above if different)
Target Type = Azure Container Service (DC/OS)
Docker Compose File = **/docker-compose.yml
ACS DC/OS Connection Type = Direct
The final result should be as follows:
Trigger a release and then switch over to DC/OS (ie at http://localhost) and the Services page. Drill down through the Dev folder and the three services defined in docker-compose.yml should now be deployed and running:
To complete the exercise the Dev environment can now be cloned (click the ellipsis in the Dev environment to show the menu) to create Test and Production environments with manual approvals. If you want to view the sample application in action follow the View the application instructions in the Microsoft tutorial.
At this point there is no public endpoint for the production instance of TwoServiceApp. To remedy that follow the Expose public endpoint for production instructions in the Microsoft tutorial. Additionally, you will need to amend the production version of the Docker Deploy task so the Additional Docker Compose Files section contains docker-compose.env.production.yml.
Final Thoughts
Between Microsoft's tutorial and my two posts relating to it you have seen a glimpse of the powerful tools that are available for hosting and orchestrating containers. Yes, this has all been using Linux containers but indications are that similar functionality -- if perhaps not using exactly the same tools -- is on the way for Windows containers. Stay tuned!
Whilst I'm somewhat sceptical about using generic scaffolding tooling to create production-ready workloads (I find that the naming conventions used are usually unsuitable for example) there is no doubt that they are great for quickly building proof of concepts and also for learning (what are hopefully!) best practices. It was with this aim that, armed with a large cup of tea, I sat down one afternoon to plough my way through the tutorial. It was a great learning experience, however I went down some blind alleys to get the pipeline working and then ended up doing quite a lot of head scratching (due to my ignorance I hasten to add) to fully understand what had been created.
So in this post I'm writing-up my experience of working through the tutorial with notes that I hope will help anyone else using it. In a follow-up post I'll attempt to document what the az container release create command actually creates and configures. Just a reminder that with this tutorial we're still very much in the Linux container world. Whilst this might be frustrating for those eager to see advanced tutorials based on Windows containers the learning focus here is mostly Docker and VSTS so the fact that the containers are running Linux shouldn't put you off.
On a final note before we get started, I'm using a Windows 10 Professional workstation with the beta version (1.13.0 at the time of writing) of Docker for Windows installed and running.
Getting Started with the Azure CLI
The tutorial requires version 2.0 of Azure CLI which is based on Python. The Azure CLI installation documentation suggests running Azure CLI in Docker but don't go down that path as it's a dead end as far as the tutorial is concerned. Instead follow these installation steps:
From a command prompt upgrade pip (package management system for Python) using the python -m pip install --upgrade pip command.
Install Azure CLI 2.0 using pip install azure-cli. (If you have previously installed Azure CLI 2.0 you should check for an upgrade using pip install azure-cli --upgrade.)
Check Azure CLI is working using the az command. You should see this:
The next step is to actually log in to the Azure CLI. The process is as follows:
Supply the one-time authentication code supplied by the az login command.
Complete the authentication process using your Azure credentials.
If you have multiple subscriptions you may need to set the default subscription:
At the command prompt type az account list to show details of all your accounts.
Each account has an isDefault property which will tell you the default account.
If you need to make a change use az account set --subscription <Id> -- you can copy and paste the subscription Id from the accounts list.
Creating the Azure Container Service Cluster with DC/OS
This step is pretty straightforward and the tutorial doesn't need any further explanation. My commands to create the resource group and the ACS cluster were:
Be aware that the az acs create command results in a request to provision 18 cores. This might exceed your quota for a given region, even if you have previously contacted Microsoft Support to request an increase in the total number of cores allowed for your subscription (which you might have to do anyway if you have cores already provisioned). I found that choosing a region where I didn't have any cores provisioned fixed a quotaExceeded exception that I was getting.
For simplicity I used the --generate-ssh-keys option to save having to do this manually. This creates id_rsa and id_rsa.pub files (ie a private / public key pair) in C:\Users\<username>\.ssh.
A word of warning -- if you are using an Azure subscription with MSDN credits be aware that an ACS cluster will eat your credits at an alarming rate. As of the time of writing this post I've not found a reliable way of turning everything off and turning it back on again with everything fully working (specifically the build agent). Consequently I tend to delete the resource group and the VSTS project when I'm finished using them and then recreate them from scratch when I next need them. If you do this do be aware that if you have multiple Azure subscriptions the az account set --subscription <Id> command to set the default subscription can't be relied upon to be ‘sticky', and you can find yourself creating stuff in a different subscription by mistake.
Working with the Sample Code
The tutorial uses sample code that consists of an Angular.js-based web app (with a Node.js backend) that calls a separate .NET Core application, and these are deployed as two separate services. The problem I found was that the name of the GitHub repo (container-service-dotnet-continuous-integration-multi-container) is extremely long and is used to name some of the artefacts that get created by the Azure CLI container release command. This makes for some very unwieldy names which I found somewhat irksome. You can fix this as follows:
Use the Rename option to give the forked repo a more manageable name -- I chose TwoServiceApp.
Clone the repo to your workstation in your preferred way -- for me this involved opening a command prompt at C:\Source\GitHub and running git clone https://github.com/GrahamDSmith/TwoServiceApp.git.
At this point it's probably a good idea to get the sample app working locally which will help with understanding how multi-container Docker deployments work. If you want to examine the source code then Visual Studio Code is an ideal tool for the job. To run the application the first step is to build the .NET Core component. At a command prompt at the root of the application run the following command:
This runs docker-compose with a specific .yml file, and executes the instructions at the ci-build node. The really neat thing about this command is that it uses a Docker container to build the .NET Core app (service-b), which means your workstation doesn't need the .NET Core to be installed for this to work. Looking at the key parts of the docker-compose.ci.build.yml file:
image: microsoft/dotnet:1.0.0-preview2.1-sdk -- this specifies that this particular Microsoft official Docker image for .NET Core on Linux should be used.
volumes: -- ./service-b:/src -- this causes the local service-b folder on your workstation to be ‘mirrored' to a folder named src in the container that will be created from the microsoft/dotnet:1.0.0-preview2.1-sdk image.
working_dir: /src -- set the working directory in the container to src.
command: /bin/bash -c "dotnet restore && dotnet publish -c Release -o bin ." -- this is the command to build and publish service-b.
Because the service-b folder on your workstation is mirrored to the src folder in the running container the result of the build command is copied from the container to your workstation. Pretty nifty!
To actually run the application now run this command:
MS DOS
1
docker-composeup--build
By convention docker-compose will look for a docker-compose.yml file so there is no need to specify it. On examining docker-compose.yml it should be pretty easy to see what's going on -- three services (service-a, service-b and mycache) are specified and service-a and service-b are built according to their respective Dockerfile instructions. Both service-a and service-b containers are set to listen on port 80 at runtime and in addition service-a is accessible to the host (ie your workstation) on port 8080. Consequently, you should be able to navigate to http://localhost:8080 in your browser and see the app running.
Creating the Deployment Pipeline
This step is straightforward and the tutorial doesn't need any further explanation. One extra step I included was to create an Azure Container Registry instance in the same resource group used to create the Azure Container Service. Despite repeated attempts, for some reason I couldn't create this at the command line so ended up creating it through the portal. The command though should look similar to this:
To facilitate easy teardown I also created a dedicated project in VSTS called TwoServiceApp. The command to create the pipeline (GitHub token made up of course) was then as follows:
This command results in the creation of build and release definitions in VSTS (along with other supporting items) and a deploy of the image to a Dev environment.
Viewing the Application
To view the application as deployed to the Dev environment you need to launch the DC/OS dashboard. The tutorial instructions are easy to follow, however you might get tripped-up by the instructions for configuring Pageant since the instructions direct you to "Launch PuttyGen and load the private SSH key used to create the ACS cluster (%homepath%\id_rsa)". On my machine at least the id_rsa file was created at %homepath%\.ssh\id_rsa rather than %homepath%\id_rsa. If you persist with the instructions you eventually end up running the application in the Dev environment, but if like me you are new to cluster technologies such as DC/OS it all feels like some kind of sorcery.
A final observation here is that the configuration to launch the DC/OS dashboard requires your browser's proxy to be set. This knocked-out the Internet connection for all my other browser tabs, and was the cause of alarm for a few seconds when I realised that the tab I was using to edit my WordPress blog wouldn't save. If you launched the DC/OS dashboard from the command line (using az acs dcos browse --name TwoServiceAppAcs --resource-group TwoServiceAppRg) you need to use CTRL+C from the command line to close the session. In an emergency head over to Windows Settings > Network & Internet > Proxy to reset things back to normal.
In this blog series on Continuous Delivery with Containers I'm documenting what I've learned about Docker and containers (both the Linux and Windows variety) in the context of continuous delivery with Visual Studio Team Services. It's a new journey for me so do let me know in the comments if there is a better way of doing things!
In the previous post in this series I explained how to use VSTS and Docker to build and deploy an ASP.NET Core application to a Linux VM running in Azure. It's a good enough starting point but one of the first objections anyone working in a private organisation is likely to have is publishing Docker images to the public Docker Hub. One answer is to pay for a private repository in the Docker Hub but for anyone using Azure a more appealing option might be the Azure Container Registry. This is a new offering from Microsoft -- it's still in preview and some of the supporting tooling is only partially baked. The core product is perfectly functional though so in this post I'm going to be amending the pipeline I built in the previous post with Azure Container Registry to find out how it differs from Docker Hub. If you want to follow along with this post you'll need to make sure you have a working pipeline as I describe in my previous post.
Create an Azure Container Registry
At the time of writing there is no PowerShell experience for ACR so unless you want to use the CLI 2.0 it's a case of using the portal. I quite like the CLI but to keep things simple I'm using the portal. For some reason ACR is a marketplace offering so you'll need to add it from New > Marketplace > Containers > Container Registry (preview). Then follow these steps:
Create a new resource group that will contain all the ACR resources -- I called mine PrmAcrResourceGroup.
Create a new standard storage account for the ACR -- I called mine prmacrstorageaccount. Note that at the time of writing ACR is only available in a few regions in the US and the storage account needs to be in the same region. I chose West US.
Create a new container registry using the resource group and storage account just created -- I called mine PrmContainerRegistry. As above, the registry and storage account need to be in the same location. You will also need to enable the Admin user:
Add a New Docker Registry Connection
This registry connection will be used to replace the connection made in the previous post to Docker Hub. The configuration details you need can be found in the Access key blade of the newly created container registry:
Use these settings to create a new Docker Registry connection in the VSTS team project:
Amend the Build
Each of the three Docker tasks that form part of the build need amending as follows:
Docker Registry Connection = <name of the Azure Container Registry connection>
Image Name = aspnetcorelinux:$(Build.BuildNumber)
Qualify Image Name = checked
One of the most crucial amendments turned out to be the Qualify Image Name setting. The purpose of this setting is to prefix the image name with the registry hostname, but if left unchecked it seems to default to Docker Hub. This causes an error during the push as the task tries to push to Docker Hub which of course fails because the registry connection has authenticated to ACR rather than Docker Hub:
It was obvious once I'd twigged what was going on but it had me scratching my head for a little while!
Final Push
With the amendments made you can now trigger a new build, which should work exactly as before except now the docker image is pushed to -- and run from -- your ACR instance rather than Docker Hub.
Your next question is probably going to be how can I get a list of the repositories I've created in ACR? Don't bother looking in the portal since -- at the time of writing at least -- there is no functionality there to list repositories. Instead one of the guys at Microsoft has created a separate website which, once authenticated, shows you this information:
If you want to do a bit more you can use the CLI 2.0. The syntax to list repositories for example is az acr repository list -n <Azure Container Registry name>.
It's early days yet however the ACR is looking like a great option for anyone needing a private container registry and for whom an Azure option makes sense. Do have a look at the documentation and also at Steve Lasker's Connect(); video here.
In this blog series on Continuous Delivery with Containers I'm documenting what I've learned about Docker and containers (both the Linux and Windows variety) in the context of continuous delivery with Visual Studio Team Services. The Docker and containers world is mostly new to me and I have only the vaguest idea of what I'm doing so feel free to let me know in the comments if I get something wrong.
Although the Windows Server Containers feature is now a fully supported part of Windows it is still extremely new in comparison to containers on Linux. It's not surprising then that even in the world of the Visual Studio developer the tooling is most mature for deploying containers to Linux and that I chose this as my starting point for doing something useful with Docker. As I write this the documentation for deploying containers with Visual Studio Team Services is fragmented and almost non-existent. The main references I used for this post were:
However to my mind none of these blogs cover the whole process to any satisfactory depth and in any case they are all somewhat out of date. In this post I've therefore tried to piece all of the bits of the jigsaw together that form the end-to-end process of creating an ASP.NET Core app in Visual Studio and debugging it whilst running on Linux, all the way through to using VSTS to deploy the app in a container to a target node running Linux. I'm not attempting to teach the basics of Docker and containers here and if you need to get up to speed with this see my Getting Started post here.
Install the Tooling for the Visual Studio Development Inner Loop
In order to get your development environment properly configured you'll need to be running a version of Windows that is supported by Docker for Windows and have the following tooling installed:
I started off by creating a new Team Project in VSTS and called Containers and then from the Code tab creating a New repository using Git called AspNetCoreLinux:
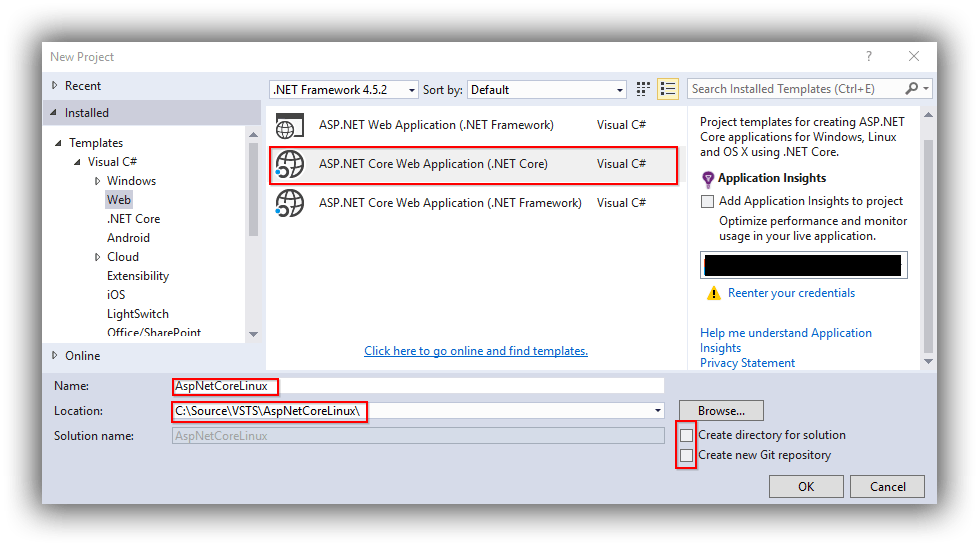
Over in Visual Studio I then cloned this repository to my source control folder (in my case to C:\Source\VSTS\AspNetCoreLinux as I prefer a short filepath) and added .gitignore and .gitattributes files (see here if this doesn't make sense) and committed and synced the changes. Then from File > New > Project I created an ASP.NET Core Web Application (.NET Core) application called AspNetCoreLinux using the Web Application template (not shown):
Visual Studio will restore the packages for the project after which you can run it with F5 or Ctrl+F5.
The next step is to install support for Docker by right-clicking the project and choosing Add > Docker Support. You should now see that the Run dropdown has an option for Docker:
With Docker selected and Docker for Windows running (with Shared Drives enabled!) you will now be running and debugging the application in a Linux container. For more information about how this works see the resources on the Visual Studio Tools for Docker site or my list of resources here. Finally, if everything is working don't forget to commit and sync the changes.
Provision a Linux Build VM
In order to build the project in VSTS we'll need a build machine. We'll provision this machine in Azure using the Azure driver for Docker Machine which offers a very neat way for provisioning a Linux VM with Docker installed in Azure. You can learn more about Docker Machine from these sources:
By default this will create a Standard A2 VM running Ubuntu called vstsbuildvm (note that "Container names must be 3-63 characters in length and may contain only lower-case alphanumeric characters and hyphen. Hyphen must be preceded and followed by an alphanumeric character.") in a resource group called VstsBuildDeployRG in the West US datacentre (make sure you use your own Azure Subscription ID). It's fully customisable though and you can see al the options here. In particular I've added the option for the VM to be created with a static public IP address as without that there's the possibility of certificate problems when the VM is shut down and restarted with a different IP address.
Azure now wants you to authenticate. The procedure is explained in the output of the command window, and requires you to visit https://aka.ms/devicelogin and enter the one-time code:
Docker Machine will then create the VM in Azure and configure it with Docker and also generate certificates at C:\Users\<yourname>\.docker\machine. Do have a poke a round the subfolders of this path as some of the files are needed later on and it will also help to understand how connections to the VM are handled.
This step isn't strictly necessary right now, but if you want to run Docker commands from the current command prompt against the Docker Engine running on the new VM you'll need to configure the shell by first running docker-machine env vstsbuildvm. This will print out the environment variables that need setting and the command (@FOR /f "tokens=*" %i IN (‘docker-machine env vstsbuilddeployvm') DO @%I) to set them. These settings only persist for the life of the command prompt window so if you close it you'll need to repeat the process.
In order to configure the internals of the VM you need to connect to it. Although in theory you can use the docker-machine ssh vstsbuildvm command to do this in practice the shell experience is horrible. Much better is to use a tool like PuTTY. Donovan Brown has a great explanation of how to get this working about half way down this blog post. Note that the folder in which the id_rsa file resides is C:\Users\<yourname>\.docker\machine\machines\<yourvmname>. A tweak worth making is to set the DNS name for the server as I describe in this post so that you can use a fixed host name in the PuTTY profile for the VM rather than an IP address.
With a connection made to the VM you need to issue the following commands to get it configured with the components to build an ASP.NET Core application:
Upgrade the VM with sudo apt-get update && sudo apt-get dist-upgrade.
Install .NET Core following the instructions here, making sure to use the instructions for Ubuntu 16.04.
Next up is installing the VSTS build agent for Linux following the instructions for Team Services here. In essence (ie do make sure you follow the instructions) the steps are:
Create and switch to a downloads folder using mkdir Downloads && cd Downloads.
At the Get Agent page in VSTS select the Linux tab and the Ubuntu 16.04-x64 option and then the copy icon to copy the URL download link to the clipboard:
Back at the PuTTY session window type sudo wget followed by a space and then paste the URL from the clipboard. Run this command to download the agent to the Downloads folder.
Go up a level using cd .. and then make and switch to a folder for the agent using mkdir myagent && cd myagent.
Extract the compressed agent file to myagent using tar zxvf ~/Downloads/vsts-agent-ubuntu.16.04-x64-2.108.0.tar.gz (note the exact file name will likely be different).
Install the Ubuntu dependencies using sudo ./bin/installdependencies.sh.
Configure the agent using ./config.sh after first making sure you have created a personal access token to use. I created my agent in a pool I created called Linux.
Configure the agent to run as a service using sudo ./svc.sh install and then start it using sudo ./svc.sh start.
If the procedure was successful you should see the new agent showing green in the VSTS Agent pools tab:
Provision a Linux Target Node VM
Next we need a Linux VM we can deploy to. I used the same syntax as for the build VM calling the machine vstsdeployvm:
Apart from setting the DNS name for the server as I describe in this post there's not much else to configure on this server except for updating it using sudo apt-get update && sudo apt-get dist-upgrade.
Gearing Up to Use the Docker Integration Extension for VSTS
Configuration activities now shift over to VSTS. The first thing you'll need to do is install the Docker Integration extension for VSTS from the Marketplace. The process is straightforward and wizard-driven so I won't document the steps here.
Next up is creating three service end points -- two of the Docker Host type (ie our Linux build and deploy VMs) and one of type Docker Registry. These are created by selecting Services from the Settings icon and then Endpoints and then the New Service Endpoint dropdown:
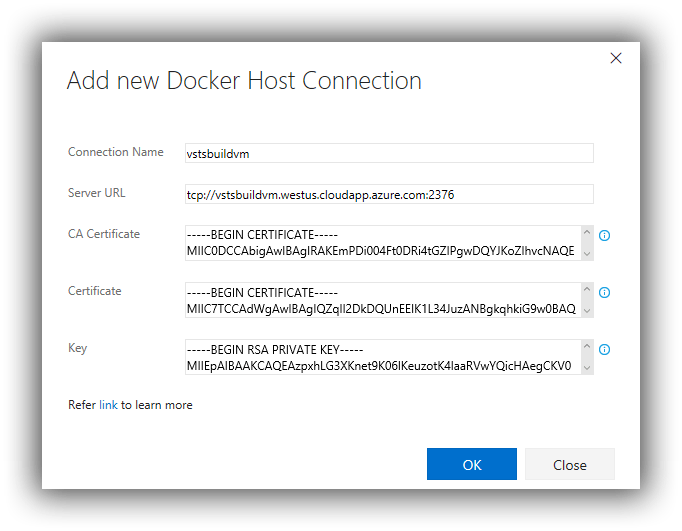
To create a Docker Host endpoint:
Connection Name = whatever suits -- I used the name of my Linux VM.
Server URL = the DNS name of the Linux VM in the format tcp://your.dns.name:2376.
CA Certificate = contents of C:\Users\<yourname>\.docker\machine\machines\<yourvmname>\ca.pem.
Certificate = contents of C:\Users\<yourname>\.docker\machine\machines\<yourvmname>\cert.pem.
Key = contents of C:\Users\<yourname>\.docker\machine\machines\<yourvmname>\key.pem.
The completed dialog (in this case for the build VM) should look similar to this:
Repeat this process for the deploy VM.
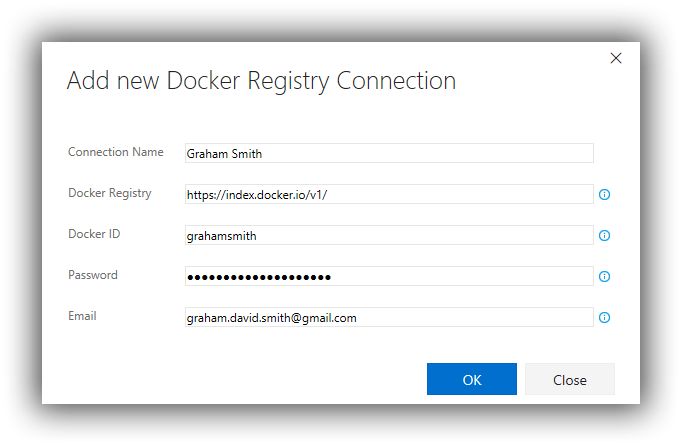
Next, if you haven't already done so you will need to create an account at Docker Hub. To create the Docker Registry endpoint:
Connection Name = whatever suits -- I used my name
Docker Registry = https://index.docker.io/v1/
Docker ID = username for Docker Hub account
Password = password for Docker Hub account
The completed dialog should look similar to this:
Putting Everything Together in a Build
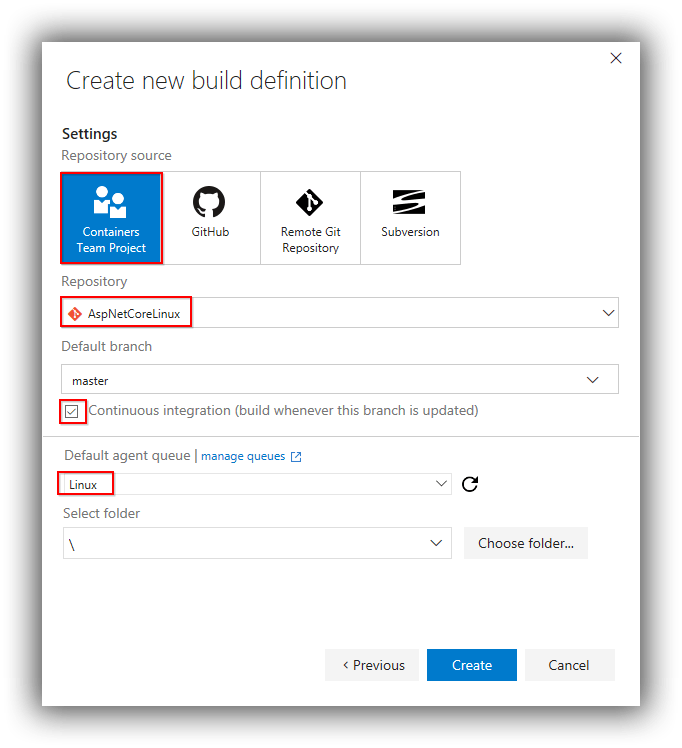
Now the fun part begins. To keep things simple I'm going to run everything from a single build, however in a more complex scenario I'd use both a VSTS build and a VSTS release definition. From the VSTS Build & Release tab create a new build definition based on an Empty template. Use the AspNetCoreLinux repository, check the Continuous integration box and select Linux for the Default agent queue (assuming you create a queue named Linux as I've done):
Using Add build step add two Command Line tasks and three Docker tasks:
In turn right-click all but the first task and disable them -- this will allow the definition to be saved without having to complete all the tasks.
The configuration for Command Line task #1 is:
Tool = dotnet
Arguments = restore -v minimal
Advanced > Working folder = src/AspNetCoreLinux (use the ellipsis to select)
Save the definition (as AspNetCoreLinux) and then queue a build to make sure there are no errors. This task restores the packages specified in project.json.
Advanced > Working folder = src/AspNetCoreLinux (use the ellipsis to select)
Enable the task and then queue a build to make sure there are no errors. This task publishes the application to$(Build.StagingDirectory)/app (which equates to home/docker-user/myagent/_work/1/a/app).
The configuration for Docker task #1 is:
Docker Registry Connection = <name of your Docker registry connection>
Image Name = <your Docker ID>/aspnetcorelinux:$(Build.BuildNumber)
Docker Host Connection = vstsbuildvm (or your Docker Host name for the build server)
Working Directory = $(Build.StagingDirectory)/app
Enable the task and then queue a build to make sure there are no errors. If you run sudo docker images on the build machine you should see the image has been created.
The configuration for Docker task #2 is:
Docker Registry Connection = <name of your Docker registry connection>
Action = Push an image
Image Name = <your Docker ID>/aspnetcorelinux:$(Build.BuildNumber)
Advanced Options > Docker Host Connection = vstsbuildvm (or your Docker Host name for the build server)
Advanced Options > Working Directory = $(System.DefaultWorkingDirectory)
Enable the task and then queue a build to make sure there are no errors. If you log in to Docker Hub you should see the image under your profile.
The configuration for Docker task #3 is:
Docker Registry Connection = <name of your Docker registry connection>
Action = Run an image
Image Name = <your Docker ID>/aspnetcorelinux:$(Build.BuildNumber)
Container Name = aspnetcorelinux$(Build.BuildNumber) (slightly different from above!)
Ports = 80:80
Advanced Options > Docker Host Connection = vstsdeployvm (or your Docker Host name for the deploy server)
Advanced Options > Working Directory = $(System.DefaultWorkingDirectory)
Enable the task and then queue a build to make sure there are no errors. If you navigate to the URL of your deployment sever (eg http://vstsdeployvm.westus.cloudapp.azure.com/) you should see the web application running. As things stand though if you want to deploy again you'll need to stop the container first.
That's all for now...
Please do be aware that this is only a very high-level run-through of this toolchain and there many gaps to be filled: how does a website work with databases, how to host a website on something other than the Kestrel server used here and how to secure containers that should be private are just a few of the many questions in my mind. What's particularly exciting though for me is that we now have a great solution to the problem of developing a web app on Windows 10 but deploying it to Windows Server, since although this post was about Linux, Docker for Windows supports the same way of working with Windows Server Core and Nanao Server (currently in beta). So I hope you found this a useful starting point -- do watch out for my next post in this series!
[Please note: Just a couple of weeks after publishing this post Microsoft changed the name of Visual Studio Online (VSO) to Visual Studio Team Services (VSTS). I've updated the title and URL of this post for consistency with future posts but the text below remains unchanged.]
I first started investigating how to implement continuous delivery with TFS -- working almost exclusively in Microsoft Azure -- nearly two years ago. Out of these investigations (and backed-up by practical experience where I work) came my original 24-post series on implementing continuous delivery with TFS and a shorter series covering continuous delivery with VSO.
Although the concepts that I covered in my original series haven't really changed the tooling certainly has -- only what you would expect in this fast-moving industry of ours of course. In particular there have been fundamental changes to the way Microsoft Azure works and we also have a brand new web-based implementation of Release Management coming our way. Additionally, there are aspects of continuous delivery that my original series didn't cover because the tooling I wanted to use simply wasn't in place or mature enough. Consequently it feels like the right time to start a brand new blog post series, and it is my intention in this post to set the scene for what's in store.
Aims of the new Series
Hopefully by now most people realise that despite its name VSO (Visual Studio Online) is Microsoft's cloud version of TFS. My original continuous delivery series focussed on TFS since the Release Management tooling didn't originally work with VSO. Although that eventually changed the story is now completely different and the original WPF-based Release Management has a brand new web-based successor. As with most new ALM features coming out of Microsoft this will initially be available in VSO. TFS 2015 will get the new release management tooling sometime later -- see here to keep track of when this might be. Despite the possible complications of different release timeframes I'm planning to make this new series of posts applicable to both TFS and VSO. This will hopefully avoid unnecessary repetition and allow anyone working through the series to pick either VSO or TFS and be confident that they can follow along without finding I have been focussing on one of the implementations to the detriment of the other.
Of all the things that can cause software to fail other than actual defects, application configuration is probably the one that is most troublesome. That's my experience anyway. However there is another factor that can cause problems which is the actual configuration of the server(s) the application is installed on. The big question here is how can we be sure that the configuration of the servers we tested on is the same in production, because if there are differences it could spell disaster? Commonly known as configuration as code I'm planning to address this issue in this new series of posts using Microsoft's PowerShell DSC technology.
So we've got a process for managing the configuration of our server internals, but what about for actually creating the servers I hear you ask? It's an important point, since who doesn't want to be able to create infrastructure in an automated and repeatable way? I'll be addressing this requirement using the technologies provided by Azure Resource Manager, namely what I think are going to turn out to be idempotent PowerShell cmdlets and (as a different approach) JSON templates. For sure, you are unlikely to be using these technologies in an on premises situation however for me the important thing is to get hands-on experience of an infrastructure as code technology that helps me think strategically about this problem space.
I'm a huge advocate for IT people using cloud technologies to help them with their continuous learning activities and if you have an MSDN subscription you could have up to £95 worth of Microsoft Azure credits to use each month. Being able to create servers in Azure and take advantage of the many other services it offers opens up a whole world of possibilities that just a few years ago were out of reach for most of us. However, as well as being a useful learning tool I also feel strongly that most IT people should be learning cloud technologies as they will surely have an effect on most of our jobs at some point. Maybe not today, maybe not tomorrow but soon etc. Consequently, I use Azure both because it is a great place to build sandbox environments but also because I'm confident that learning Azure will help my future career. I hope you will feel the same way about cloud technologies, whether it's Azure or another offering.
Lastly, I'm planning to make each blog post shorter and to have a more specific theme. Something like the single responsibility principle for blogging. My hope is that shorter posts will make it easier for those ‘trying this at home' to follow along and will also make it easier to find where I've written about a specific piece of technology. Shorter posts will also help me as it will hopefully be an end to the nightmare blog post that takes several weeks to research, debug and explain in a coherent way.
Who is the new Series Aimed at?
Clearly I hope my blog posts will help as many people as possible. However I have purposefully chosen to work with a specific set of technologies and if this happens to be your chosen set then you are likely to get more direct mileage out of my posts than someone who uses different tools. If you do use different tools though I hope that you will still gain some benefit because many concepts are very similar. Using Chef or Puppet rather than PowerShell DSC? No problem -- go ahead and use those great tools. Your organisation has chosen Octopus Deploy as your release management tooling? My hope is that you should have little problem following along, using Octopus as a direct replacement for Microsoft's offering. As with my previous series I do assume a reasonable level of experience with the underlying technologies and for those for whom this is lacking I'll continue to publish Getting Started posts with link collections to help get up to speed with a topic.
I carry out my research activities with the benefit of an MSDN Enterprise subscription as this gives me access to all of Microsoft's tooling and also monthly Azure credits. If you don't have an MSDN subscription there are still ways you can follow along though. Anyone can sign up for a free VSO account and there is also a free Express version of TFS. Similarly there is a free Community version of Visual Studio and a free Express version of SQL Server. All this, combined with a 180-day evaluation of Windows Server which you could run using Hyper-V on a workstation with sufficient memory should allow you to get very close to the sort of setup that's possible with an MSDN account.
Looking to the Future
It might seem odd to be looking at the future at the beginning of a new blog post series however I can already see a time when this series is out of date and needs updating with a series that includes container technologies. However I'm purposefully resisting blogging about containers for the time being -- it feels just a bit too new and shiny for me at the moment and in any case there is no shortage of other people blogging in this space.
If you work in a profession such as IT where there is constant change it is probably no bad thing to understand the thoughts and feelings of fellow professionals working in your chosen area, as this can open up whole new areas of understanding to help you in your day-to-day work. Conferences are typically very good for this sort of thing -- both the sessions that are presented by conference speakers and the networking that goes on with fellow delegates.
Conferences usually make a big impact on the training budget though, and that can be the case even if the event is in your country. However if overseas travel is required then this can often completely rule out any chance of attending. So what about alternatives?
Most of us probably subscribe to a daily diet of blog posts, podcasts and email newsletters, but none of these approach the ‘dynamic' nature of attending a conference in person. But hey! In these modern times what about an online conference where there is a panel of guests discussing a particular topic?
I mention all this because a couple of weeks ago I was privileged to be a panellist on the Architecting for Continuous Delivery episode of Electric Cloud's Continuous Discussions series of online events about continuous delivery, DevOps and agile practices. If you are interesting in watching the episode I took part in you can check it out here:
The themes for this episode included pipeline orchestration, treating servers as cattle rather than pets, service orientation and decoupling, and messaging and data management. What I found really interesting was that each panellist often had a completely different take on the theme, typically an angle I hadn't really considered before.
At the time of writing there are 27 episodes in this series covering a broad range of topics and each episode features panellists who are able to offer from-the-trenches thinking and commentary about the topic in question. I urge you to check this resource out -- there is some fantastic content! And kudos to Electric Cloud for organising and hosting these community panels -- there's a big effort going on behind the scenes to bring everything together.
In a previous post I described the high-level process for upgrading the continuous delivery platform I've been using for my Continuous Delivery with TFS blog post series to TFS 2013 Update 5. With the release of TFS 2015 on 6 August 2015 it's now time to upgrade this platform to the brand new version. See my previous post for the list of servers that participate in my continuous delivery platform, and as with the upgrade to TFS 2013 Update 5 all servers had been patched with the latest Windows Updates.
Since I was upgrading a non-production instance I dove straight in, mounted the iso and started the setup routine. After installing the bits the Upgrade Wizard started automatically and as with previous upgrades each page of the wizard was straightforward.
One addition to the wizard is a page to configure the new Team Foundation Build. Although in the fullness of time anyone upgrading will want to move to the new build system it is quite likely that you will need to keep existing XAML builds running as you gradually move over. This is fully supported but you will need to enable this from the Team Foundation Server Administration Console under Additional Tools and Components > XAML Build Configuration. The good news is that settings from the previous version of TFS are remembered. You can read the release notes for TFS 2015 here and the list of known issues here.
Visual Studio
Although TFS 2015 is backwards compatible with some prior versions of Visual Studio many teams are likely to want to move to Visual Studio 2015 at the same time as moving to TFS 2015. Visual Studio 2015 installs side-by-side with previous versions and whilst the installation process is straightforward there are some other things to consider since the installation routine now offers third party products as well as the ability to select just the Microsoft components you require. I chose to keep things light but did take the opportunity to install PowerShell and Git-based components as they are areas I want to explore for future blogs.
As a test of Visual Studio 2015 I opened up my Contoso University sample application (previously created in Visual Studio 2013) and the only issue was with the SQL Server Database Project whose connection string was referring to a previous version of LocalDB. This was a quick fix as per Bill Wagner's post -- don't forget to update Web.config as well if this affects you. Whilst Contoso University worked fine locally, running an existing XAML build on the new TFS 2015 instance wasn't quite as successful and partially failed with TF900547: The directory containing the assemblies for the Visual Studio Test Runner is not valid ‘C:\Program Files (x86)\Microsoft Visual Studio 14.0\Common7\IDE\CommonExtensions\Microsoft\TestWindow'. I'd pretty much expected something like this since I hadn't installed Visual Studio 2015 yet on my all-in-one TFS machine which hosts the build agent, and performing the install (Microsoft components only) fixed this problem. (As an aside, I always make sure Visual Studio instances on a build agent server are registered with a licence key to avoid trial period expiry problems.) You can read the release notes for Visual Studio 2015 here and the list of known issues here.
Release Management
As discussed in my previous post there was no Update 5 to Release Management 2013 and instead Release Management 2015 was released and is backwards compatible with TFS 2013. Since I'd already upgraded to Release Management 2015 there was nothing much for me to do except test that the build definition that started my release pipeline still worked -- which it did! However, the automated web tests part of the pipeline (based on the MTM Automated Tests Manager tool) was still running against 2013 Agents and Microsoft Test Manager 2013 and naturally I wanted to get these components upgraded.
Microsoft Test Manager and Agents for Visual Studio
Microsoft Test Manager 2015 (aka Test Professional 2015) is installed as part of Visual Studio 2015 Enterprise however it is also available as a separate installation for testers who don't use Visual Studio or where it is needed to run the bundled tcm.exe. The latter scenario applies to me as I have a Windows 8.1 web client machine that runs automated web tests written using Selenium that require FireFox, Microsoft Test Manager and Agents for Visual Studio (Test Agent component) to be installed. I upgraded this machine (please keep reading as most of what I did was unnecessary) by first uninstalling Microsoft Test Manager 2013 and the Agents for Visual Studio 2013 and then installing and configuring the 2015 replacements. One key difference was that at the time of writing there was no upgrade to the Test Controller component of the Agents for Visual Studio 2015 so the Test Agent was shipping as a standalone exe. However, when I came to configure the Test Agent there was no Test Agent Configuration Tool for Agents for Visual Studio 2015. No matter since I knew it would be possible to partially configure the agent from Microsoft Test Manager 2015 (Lab Center > Environments and then choose to repair). However, all this did was install Agents for Visual Studio 2013. (Note that when it does this the service will run under Network Service. If you want to use a domain account you need to use the Test Agent Configuration Tool on the machine where the test agent is installed.) So a lot of work for nothing and it looks like we'll need to wait for a new Test Controller before the Test Agent can be upgraded.
Last Piece of the Puzzle
I wasn't done yet, since I upgraded Microsoft Test Manager on the web client and it turns out that the PowerShell script that forms part of the MTM Automated Tests Manager tool in Release Management 2015 hasn't been upgraded to work with the Visual Studio 2015 installation path. The proper way to fix this would be to create a new tool in Release Management (since the built-in tools can't be edited) with an updated script that includes a reference to the VS140COMNTOOLS system environment variable which allows the script to locate tcm.exe. Since I'm due to retire my current continuous delivery infrastructure in the near future (as I prepare for a new blog post series based on TFS2015 Update 1 which should contain the new web-based Release Management) I opted for the quick and dirty trick of pointing the VS120COMNTOOLS system environment variable to C:\Program Files (x86)\Microsoft Visual Studio 14.0\Common7\Tools\. Probably not something for a production environment but good enough to get my automated web tests working and showing green. Always a relief...
For both Microsoft and .NET developers alike 20 June 2015 was a big day, with a huge raft of updates being released. Whilst the headline news was Visual Studio 2015 (TFS 2015 missing the original launch date because of quality issues) there was also an Update 5 release for Visual Studio 2013 and TFS 2013. Whilst I'm sure Microsoft would love everyone to move to TFS 2015 very quickly for many organisations this isn't a possibility for a variety of reasons. On the other hand, an upgrade to Update 5 may well be following a well-trodden path and a more realistic next step in the upgrade cycle.
I decided to upgrade the Azure-based TFS 2013 continuous delivery platform I've been using for my Continuous Delivery with TFS blog post series to Update 5 as it's one option we're considering where I work. However when I stopped to think about what was involved I realised that it amounted to quite a few upgrades. I've documented the high-level process I followed in case it helps anyone else considering this route.
Server Landscape
My setup in Azure is focussed on conserving the Azure credits I get with MSDN rather than creating a typical TFS environment, so I have fewer servers than might otherwise be present in a live environment. My setup comprises:
Active Directory Domain Controller running Windows Server 2012 R2.
All-in-one TFS server (including SQL Server 2012 SP2) running Windows Server 2012 R2.
Development machine for Visual Studio, Release Management Client, Microsoft Test Manager and the like running Windows 8.1.
Application web server (for IIS) running Windows Server 2012 R2.
Application database server (for SQL Server 2012 SP2) running Windows Server 2012 R2.
Application client machine (for FireFox and Microsoft Test Manager) running Windows 8.1.
All machines were patched with the latest Windows Updates and the TFS ecosystem components were all at Update 4.
Team Foundation Server
Because I have an all-in-one machine for TFS that was the only box that needed the new version, however if you have build controller and build agent machines (and there are other variants) don't forget you will need to upgrade these machines as well. I have upgraded TFS many times and always found it to be a very slick, the wizard-driven process being very intuitive. However, if you are upgrading your live environment then do take all the usual upgrade precautions of having backups available and so on. Don't forget that the process involves uninstalling the current version of TFS (the databases are not affected) and then installing and configuring the new version, although the installer takes care of all of this. You can read the release notes here and the list of fixed bugs and known issues here.
Visual Studio
Whilst it's pretty obvious that you will have Visual Studio installed on your development machine(s) it's easy to forget that you probably have it installed on the machines running your build agents as this is the easiest way to ensure a build agent server has all of the bits needed to compile your application. This can add up to quite a few servers in a live environment but in my case I only had two instances. Update 5 for Visual Studio 2013 updates an existing instance of Visual Studio and the upgrade -- as usual -- was uneventful. One thing I did do after upgrading both versions of Visual Studio was check for any new versions of extensions (Tools > Extensions and Updates). The extensions that seemed most critical were an update to NuGet, the latest version of the Microsoft Azure SDK and the latest release of the SQL Server Data Tools.
Since there was an update to NuGet I also ensured that the version of NuGet used by TFS Build was updated, as this is not the one installed as the Visual Studio extension. The procedure is to open an Administrative command prompt at C:\Program Files\Microsoft Team Foundation Server 12.0\Tools and run nuget.exe update -self. You can read the release notes for Visual Studio 2013 Update 5 here and the list of fixed bugs and known issues here.
Release Management
The Release Management situation might seem confusing at first because there is no Update 5 for Release Management 2013 however there is a Release Management 2015 release. This 2015 release is fully compatible with TFS 2013 and is the upgrade to go for if you want the current latest and greatest. It's worth mentioning here that TFS 2015 Update 1 will ship with an all-new browser-based release management service which will presumably eventually replace the current offering so it's worth bearing this in mind if you are considering starting a new project with the Release Management 2013 / 2015 tooling.
There are three separate components to Release Management: server, client and deployment agent. As with TFS the existing components need uninstalling (the database is unaffected) before the new ones are installed, however unlike TFS the installer doesn't do this for you and it's a manual process. During the installation process for all components it amusingly looks like you are forced in to joining the customer experience program which is greyed-out and can't be unchecked:
As it turned out it was possible to change this when configuring each component -- possibly important if your servers don't have access to the Internet.
There is only one installed instance of the server component of course and for me this lives on my all-in-one TFS server. I have the client installed on my all-in-one TFS server and my development machine and the deployment agent on my three application machines. It's a few minutes' work to get all this upgraded and it's not helped by the components not remembering any of their previous configuration settings (with the exception of the server component that remembered a couple of them).
Whilst the upgrade process was successful the initial testing wasn't, and the release part of the build process kept returning an Exception Message: The directory name is invalid (type Win32Exception) error. I eventually traced this to an updated ReleaseTfvcTemplate.12.xaml template that shipped with Release Management 2015. Fixing this involved copying this file from C:\Program Files (x86)\Microsoft Visual Studio 14.0\Release Management\Client\bin to the BuildProcessTemplates folder of my Team Project workspace and checking the file in. I then cloned an existing (but failing) build definition and upgraded the template in Process > Build process template. The reason for cloning is that I've edited my build process template so when I get some time I'll need to fix the template in the original build definition. If you go down the cloning route do make sure you remove any spaces from the build definition name (otherwise automated tests run via tcm.exe are unlikely to run) and also update the properties of the Release Management template with the new build definition name or nothing will run. Don't ask me how I know.
Microsoft Test Manager
Although there is an Update 5 for Microsoft Test Manager 2013 it's not immediately obvious how to apply it since as far as I know there is no separate standalone installer for Microsoft Test Manager. Rather, if Microsoft Test Manager 2013 was installed at the same time as Visual Studio 2013 it will be upgraded to Update 5 when you upgrade Visual Studio. If you installed Microsoft Test Manager separately -- on a Web client machine for example -- then one way to upgrade is to use the Updates link on the home screen:
All this really does though is start the Visual Studio 2013 Update 5 installer so feel free to use that if you have a copy handy. Please don't miss upgrading standalone versions of Microsoft Test Manager as I have seen nasty bugs when using the recording tools on an outdated version against an upgraded TFS instance.
Agents for Visual Studio
Last but not least is ensuring that any test controller or test agent services are upgraded. My test controller is on my all-in-one TFS server and upgrading was just a case of running the exe from the TestController folder of the mounted iso. A reboot was required after which it's necessary to run the Test Controller Configuration Tool. The settings hadn't been remembered so make sure you have these handy before upgrading.
You need the test agent installed anywhere you are running tests or collecting metrics and for me this was my Web client machine and my application Web server which I'd previously configured for Test Impact Analysis. The iso contains an exe in a TestAgent folder and this starts a configuration mini wizard which again doesn't remember previous settings. You'll probably find that after upgrading the environment that the machine running the test agent has errors so you'll need to go to Microsoft Test manager and repair the environment from Lab Center > Lab > Environments.
Final Thoughts
Although I encountered relatively few glitches with this multi-machine upgrade it took a good few hours to accomplish over several days. Having the iso files already downloaded from MSDN and copied a media library was a big time saver as was knowing what was installed on which server. My continuous delivery platform is now in good shape to be upgraded to TFS 2015 soon after the RTM is available. As always, please share your own experiences in the comments!
In another series of blog posts on this website I describe how to implement continuous delivery with TFS. I start from scratch by describing how to install and configure TFS and there's no denying that it's quite a lot of work. Once installed TFS can require a not inconsiderable amount of care and feeding and in bigger organisations it's almost certainly going to be someone's full-time job. There is an alternative though -- Visual Studio Online. This is a SaaS version of TFS hosted in Azure, and started life as Team Foundation Service back in 2012. The name change coincided with the release of Visual Studio 2013 in November 2013.
VSO isn't the full-blown TFS as it's missing the SSRS reporting capabilities and the SharePoint portal integration. At the time of writing a subscription can only consist of one Team Project Collection and editing of process templates isn't supported. On the other hand, VSO receives updates approximately every three weeks so it contains new application features well ahead of TFS. A post here has a nice comparison. What you may find interesting is that as per Brian Harry's blog post Microsoft are planning to gradually move their teams currently using TFS over to VSO. If that isn't putting faith in VSO then I don't know what is!
So if it's good enough for Microsoft it's surely good enough for the rest of us. But as always the key questions for some people are how to get started and can using VSO give us the nice integration with the other tools such as Microsoft Test Manager and Release Management? This blog post series will focus on answering those very questions. I'm aiming to write a soup-to-nuts guide on how to implement continuous delivery with VSO, comparing and contrasting with the TFS blog post series as we go. Do use the comments system to give me feedback!
In a previous post in this series on implementing continuous delivery with TFS we looked at how some simple tweaks to the build process can help with the goal of baking quality in. This post continues in the vein of making improvements to the pipeline by addressing the issue of assembly versioning. What issue is that, I hear some of you asking? It's the situation where your Visual Studio solution contains many projects (maybe dozens) and you want all the projects to have same assembly versioning, ie the details you would traditionally set in AssemblyInfo.cs. A Google search will reveal several ways to accomplish this but most techniques involve some maintenance when a new project is added. In this post I explain how to make a publicly available low maintenance solution work with the Release Management build process template. I should point out that this issue won't affect everyone, and if you or your business don't care about this issue then do feel free to ignore. It is quite interesting though as it involves editing a build process template.
TFSVersioning on CodePlex
If assembly versioning is important to you and you use TFS there is a good chance you've seen the TFSVersioning solution available on CodePlex. It's a very nice piece of work that versions all of your solution's assemblies as part of the build process. If a new project is added it automatically gets included, so it's a low maintenance solution. There are essentially two ways to use TFSVersioning -- with the build process template that the project provides or with your own process template. This latter technique is a little involved as it requires editing your build template, but it's the technique we need to use here since we would like to use the ReleaseTfvcTemplate.12.xml build process template that ships with Release Management 2013.4. It turns out that editing this template is quite a job and I'm indebted to my good friend, colleague and TFS guru Bharath Sundaresan for figuring out all of the complicated details. An additional required hurdle is that the project hasn't been updated for TFS 2013 but fortunately it's not a lot of work to remedy this. The TFSVersioning deployment pack is available from the Downloads page and it has some great documentation which I recommend reading before you begin.
Update TFSVersioning for TFS2013
The core component that we need to update for TFS 2013 is TfsBuild.Versioning.Activities.dll. To accomplish this follow these steps:
Download the latest source code for TFSVersioning from the Source Code page and unzip to somewhere convenient.
Navigate to the latest version under Prod and open BuildVersioning.sln. Remove the TfsBuild.Versioning.Activities.Tests and TfsBuild.Versioning.Activities.Tests.Stubs projects as we don't need to amend them for what we are doing here.
Expand the References node of the TfsBuild.Versioning.Activities project and notice that the Microsoft.TeamFoundation.* references are marked as missing:
Remove these references and replace them with the 2013 versions from C:\Program Files (x86)\Microsoft Visual Studio 12.0\Common7\IDE\ReferenceAssemblies\v2.0.
You shoud now be able to build a Release version of TfsBuild.Versioning.Activities.dll.
Once you have succesfully updated the project for TFS 2013 it's probably a good idea to make sure that a basic installation of TFSVersioning works. Follow these steps to verify this:
Download and unzip the latest TFSVersioning deployment pack -- currently 2.0.1. Copy VersioningBuildTemplate20.xaml from the pack to the ContosoUniversity BuildProcessTemplates folder and check in to version control.
Under ContosoUniversity create a new folder called CustomActivityStorage and copy over the new version of TfsBuild.Versioning.Activities.dll. Check in to version control.
From Team Explorer in Visual Studio navigate to Builds > Actions > Manage Build Controllers.
In Manage Build Controllers dialog choose Properties and in Manage Controller Properties set Version control path to custom assemblies to $/ContosoUniversity/CustomActivityStorage.
Now create a test build definition, replacing the standard release template with VersioningBuildTemplate20.xaml and setting all required properties including the drop folder.
Whilst editing the build definition set any properties under the Build Versioning and Build Versioning (Optional) sections as you wish. Refer to the documentation for TFSVersioning for details.
Queue a manual build of the test build definition. Observe in the drops folder that the ContosoUniversity.* binaries all have the same File version.
Update the ReleaseTfvcTemplate.12 Release Template with the TFSVersioning Custom Activity
This process broadly follows the Harder Installation but More Instructive section of the TfsVersioning User and Development Guide however modifying ReleaseTfvcTemplate.12.xaml requires several more steps. Partly this is because TfsBuild.Versioning.Activities.dll contains more functionality that isn't referred to in the documentation and partly because ReleaseTfvcTemplate.12.xaml is missing some activities that (reading between the lines) were present in the template that was used by the TFSVersioning project. In the instructions below I assume a degree of familiarity with editing release templates. If you need guidance take a look here for just one example of how to get started. You should be aware that there are two ways to edit templates: through the XAML designer and through notepad. The former is less prone to error but slow and the latter is much faster but with the distinct possibility of a copy and paste error. The technique I describe below also sets you up for relatively easy debugging of the process template since there is a good chance of not getting everything right first time.
Install the updated TfsBuild.Versioning.Activities.dll to the Global Assembly Cache by opening a Visual Studio command prompt (from C:\Program Files (x86)\Microsoft Visual Studio 12.0\Common7\Tools\Shortcuts if your shortcuts are missing in Windows 8.1) and issuing a command similar to gacutil -i "C:\Users\Graham\Downloads\tfsversioning-103318\Prod\V 2.0.1.0\Source\TfsBuild.Versioning.Activities\bin\Release\TfsBuild.Versioning.Activities.dll".
Copy C:\Program Files (x86)\Microsoft Visual Studio 12.0\Release Management\Client\bin\ReleaseTfvcTemplate.12.xaml to the ContosoUniversity BuildProcessTemplates folder and check in to version control. Chances are you already have a template with the same name so you'll probably want to change the name to ReleaseTfvcTemplate.12.Versioning.xaml or similar. Once checked in open this template in Visual Studio so it displays in the XAML editor.
Set up the Visual Studio Toolbox to work with TfsBuild.Versioning.Activities.dll in a custom tab. You can reference the version in CustomActivityStorage. Note that you only need to add the VersionAssemblyInfoFiles item.
Drag the VersionAssemblyInfoFiles activity from the toolbox to the workflow as the first item under Compile, Test and Publish. Feel free to give the activity a custom name. If you examine the properties of the activity you will see all the InArguments that need to be married up with either Variables or Arguments that do not yet exist in the process template:
The arguments can be created as per the TfsVersioning User and Development Guide instructions using the Arguments editor but a faster way is to open the template in Notepad, copy the following values and append them to the <x:Members> section.
The next step is to add the metatdata items that allow each of the above arguments to be set. Again, it's possible to use the Metadata editor but the faster Notepad way is to copy the following values and append them to the <mtbw:ProcessParameterMetadataCollection> section.
XHTML
1
2
3
4
5
6
7
8
9
10
11
12
13
14
15
16
17
<mtbw:ProcessParameterMetadata Category="Build Versioning"Description="This is the pattern used to replace the AssemblyFileVersion value."DisplayName="Assembly File Version Pattern"ParameterName="AssemblyFileVersionPattern" />
<mtbw:ProcessParameterMetadata Category="Build Versioning"Description="This is the pattern used to replace the AssemblyVersion value."DisplayName="Assembly Version Pattern"ParameterName="AssemblyVersionPattern" />
<mtbw:ProcessParameterMetadata Category="Build Versioning"Description="This is the pattern used to find the AssemblyInfo files. Generally, you shouldn't need to change this value."DisplayName="AssemblyInfo File Pattern"ParameterName="AssemblyInfoFilePattern" />
<mtbw:ProcessParameterMetadata Category="Build Versioning"Description="Indicated whether the AssemblyInfo files should be checked back into source control after they are modified."DisplayName="Perform Check-in of the AssemblyInfo Files"ParameterName="DoCheckinAssemblyInfoFiles" />
<mtbw:ProcessParameterMetadata Category="Build Versioning"Description="If true, the versioning process will create AssemblyVersion or AssemblyFileVersion values even if they do not already exist."DisplayName="Force Create Version"ParameterName="ForceCreateVersion" />
<mtbw:ProcessParameterMetadata Category="Build Versioning"Description="Indicate which values to use as the versioning patterns. If set to True, the "seedfile.xml" file must exist in the location described by the "Version Seed File Path" setting. Otherwise, the "Assembly Version Pattern" and "Assembly File Version Pattern" values will be used."DisplayName="Use Version Seed File"ParameterName="UseVersionSeedFile" />
<mtbw:ProcessParameterMetadata Category="Build Versioning"Description="Relative path location for the seed (xml) file containing the Assembly Version and Assembly File Version values."DisplayName="Version Seed File Path"ParameterName="VersionSeedFilePath" />
<mtbw:ProcessParameterMetadata Category="Build Versioning"Description="Number added to the version component that uses the "B" symbol pattern (Build Number). This helps create a unique version for a build definition."DisplayName="Build Number Prefix"ParameterName="BuildNumberPrefix" />
<mtbw:ProcessParameterMetadata Category="Build Versioning (Optional)"Description="Assembly Title Attribute: String value specifying a friendly name for the assembly. For example, an assembly named comdlg might have the title Microsoft Common Dialog Control."DisplayName="Assembly Title Pattern"ParameterName="AssemblyTitlePattern" />
<mtbw:ProcessParameterMetadata Category="Build Versioning (Optional)"Description="Assembly Description Attribute: String value specifying a short description that summarizes the nature and purpose of the assembly."DisplayName="Assembly Description Pattern"ParameterName="AssemblyDescriptionPattern" />
<mtbw:ProcessParameterMetadata Category="Build Versioning (Optional)"Description="Assembly Configuration Attribute: String value indicating the configuration of the assembly, such as Retail or Debug. The runtime does not use this value."DisplayName="Assembly Configuration Pattern"ParameterName="AssemblyConfigurationPattern" />
<mtbw:ProcessParameterMetadata Category="Build Versioning (Optional)"Description="Assembly Company Attribute: String value specifying a company name."DisplayName="Assembly Company Pattern"ParameterName="AssemblyCompanyPattern" />
<mtbw:ProcessParameterMetadata Category="Build Versioning (Optional)"Description="Assembly Culture Attribute: Enumerated field indicating the culture that the assembly supports. An assembly can also specify culture independence, indicating that it contains the resources for the default culture."DisplayName="Assembly Culture Pattern"ParameterName="AssemblyCulturePattern" />
<mtbw:ProcessParameterMetadata Category="Build Versioning (Optional)"Description="Assembly Informational Version Attribute: String value specifying version information that is not used by the common language runtime, such as a full product version number. "DisplayName="Assembly Informational Version Pattern"ParameterName="AssemblyInformationalVersionPattern" />
Back in the XAML editor navigate to the Arguments editor and supply default values for some arguments as follows:
AssemblyFileVersionPattern = "1.0.J.B"
AssemblyInfoFilePattern = "AssemblyInfo.*"
AssemblyVersionPattern = "1.0.0.0"
BuildNumberPrefix = 0
DoCheckinAssemblyInfoFiles = False
ForceCreateVersion = False
UseVersionSeedFile = False
VersionSeedFilePath= "TfsVersion\VersionSeed.xml"
Navigate to the Variables editor and create the following variables (you may need to Browse for Types to get some of the variable types):
Name = BuildAgent; Variable Type = Microsoft.TeamFoundation.Build.Client.iBuildAgent; Scope = Compile, Test and Publish
Name = BuildDetail; Variable Type = Microsoft.TeamFoundation.Build.Client.iBuildDetail; Scope = Compile, Test and Publish
Name = BuildDirectory; Variable Type = String; Scope = Compile, Test and Publish
Name = Workspace, Variable Type = Microsoft.TeamFoundation.VersionControl.Client.Workspace; Scope = Compile, Test and Publish
From Toolbox > Team Foundation Build Activities add the following activities to the top of Compile, Test and Publish so they appear in the order listed:
Activity = GetBuildAgent; Result = BuildAgent
Activity = GetBuildDetail; Result = BuildDetail
Activity = GetWorkspace; Name = String.Format("{0}_{1}_{2}", BuildDetail.BuildDefinition.Id, Microsoft.TeamFoundation.LinkingUtilities.DecodeUri(BuildAgent.Uri.AbsoluteUri).ToolSpecificId, BuildAgent.ServiceHost.Name); Result = Workspace
Return to the properties of the VersionAssemblyInfoFiles activity and use the ellipsis at the end of each row to replace Enter a VB expression with the correct value. The result should be as follows:
As a final step in this section save all the changes and check them in to version control.
Testing the Updated ReleaseTfvcTemplate.12 Release Template
At long last we are in a position to test the new template. The easiest way is to edit the test build definition created above and replace VersioningBuildTemplate20.xaml with our updated ReleaseTfvcTemplate.12.xaml version. Set any properties as required and queue a new build. With luck you will have a successful build and a set of uniformly versioned assemblies!
If you are having difficulty in implementing the steps above the debugging process is reasonably straightforward. Once the build template has been added to the test build definition you can make changes to the template, save them and then check them in to version control. Simply queue a new build to check your changes.
The final piece of the jigsaw when everything is working is to edit ContosoUniversity_Main_Nightly to use the new version of the template. And to enjoy a well-deserved drink.