Getting Started with Git for Visual Studio Developers
If you are just getting started with learning Git it's important to distinguish between Git the actual version control technology and services that use Git such as GitHub and TFS / VSO / Visual Studio. The resources below are the ones I think will provide a good starting point for the Visual Studio developer wishing to use Git in conjunction with repositories hosted in GitHub, TFS or VSO.
The integration of Git with TFS / Visual Studio dates back to early 2013 and in mid 2015 now feels particularly mature. Additionally there is the fairly recent announcement of the GitHub extension for Visual Studio 2015. Despite all the great integration with Visual Studio it's worth remembering that sometimes you may need to drop down to the command line to perform some Git operations. This is where having spent some time learning the Git basics will pay off. The MVA jump start course above covers Git basics and a web search will provide numerous other sources.
Cheers -- Graham
Continuous Delivery with VSO: Executing Automated Web Tests with Microsoft Test Manager
In this fourth post in my series on continuous delivery with VSO we take a look at executing automated web tests with Microsoft Test Manager. There are quite a few moving parts involved in getting all this working so it's worth me explaining the overall aim before diving in with the specifics.
Overview
The tests we want to run are automated web tests written using the Selenium framework. I first wrote these tests for my Continuous Delivery with TFS blog posts series and you can read about how to create the tests here and how run run them using MTM and TFS here. The goal in this post is to run these tests using MTM and VSO, triggered as part of the DAT stage of the pipeline from RM. The tests are run from a client workstation that is configured with MTM (a requirement at the time of writing) and the Microsoft Test Agent. I've used Selenium's Firefox driver in the test code so Firefox is also required on the client machine.
In terms of what actually happens, firstly RM copies the complete build over to the client workstation and then executes a PowerShell script that runs TCM.exe which is a command-line utility that lets you run tests that are part of a test plan. Precisely what happens next is under the bonnet stuff but it's along the lines of the test controller is informed that there is work to be done and that in turn informs the test agent on the client machine that it needs to run tests. The test agent knows from the test plan which tests to run and in which DLL they live and has access to the DLLs in the local copy of the build folder. Each test first starts Firefox and then connects to the web server running the deployed Contoso University and performs the automation specified in the test.
In many ways the process of getting all this to work with VSO rather than TFS is very similar and because of that I don't go in to every detail in this post and instead refer back to my TFS blog post.
Configure a Test Controller
VSO doesn't offer a test controller facility so you'll need to configure this yourself. If you have a test controller already in use then it's simplicity itself to repurpose it to point to your VSO account using the Browse button. If you are starting from scratch see here for the details but obviously ensure you connect to VSO rather than TFS. One other difference is that in order to get past some permissions problems I found it necessary to specify credentials for the lab service account -- I used the same as the service logon account.
Although I started off by repurposing an existing controller, because of permissions problems I ended up creating a dedicated build and test server as I wanted to start with a clean sheet. One thing I found was that the Visual Studio Test Controller service wouldn't automatically start after booting the OS from the Stopped (deallocated) state. The application error log was clearly reporting that the test controller wasn't able to connect to VSO. Manually starting the service was fine so presumably there was some sort of timing issue with other OS components not being ready.
Configure Microsoft Test Manager
If MTM isn't already installed on your development workstation then that's the first step. The second step is to connect MTM to your VSO account. I already had MTM installed and when I went to connect it to VSO the website was already listed. If that's not the case you can use the Add server link from the Connect to Your Team Project dialog. Navigating down to your Team Project (ContosoUniversity) enables the Connect now link which then takes you to a screen that allows you to choose between Testing Center and Lab Center. Choose the latter and then configure Lab Center as per the instructions here.
Continue following these instructions to configure Testing Centre with a new test plan and test cases. Note that you need to have the Contoso University solution open in order to associate the actual tests with the test cases. You'll also need to ensure that when deployed the tests navigate to the correct URL. In the Contoso University demo application this is hard-coded and you need to make the change in Driver.cs located in the ContosoUniversity.Web.SeFramework project.
Configure a Web Client Test Machine
The client test machine needs to be created in the cloud service that was created for DAT and joined to the domain if you are using one. The required configuration is very similar to that required for TFS as described here with the exception that the Release Management Deployment Agent isn't required and nor is the RMDEPLOYER account. Getting permissions correctly configured on this machine proved critical and I eventually realised that the Windows account that the tests will run under needs to be configured so that MTM can successfully connect to VSO with the appropriate credentials. To be clear, these are not the test account credentials themselves but rather the normal credentials you use to connect to VSO. To configure all this, once the test account has been added to the Local Administrators group and MTM has been installed and the licence key applied you will need to log on to Windows as the test account and start MTM. Connect to VSO and supply your VSO credentials in the same way as you did for your development workstation and and verify that you can navigate down to the Contoso University team project and open the test plan that was created in the previous section.
Initially I also battled with getting the test agent to register correctly with the test controller. I eventually uninstalled the test agent (which I had installed manually) and let the test controller perform the install followed by the configuration. Whether that was the real solution to the problem I don't know but it got things working for me.
Executing TCM.exe with PowerShell
As mentioned above the code that starts the tests is a PowerShell script that executes TCM.exe. As a starting point I used the script that Microsoft developed for agent-based release templates but had to modify it to make it work with RM-VSO. In particular changes were made to accommodate the way variables are passed in to the script (some implicit such as $TfsUrl or $TeamProject and some explicit such as $PlanId or $SuiteId) and to remove the optional build definition and build number parameters which are not available to the vNext pipeline and caused errors when specified on the TCM.exe command line. The modified script (TcmExecvNext.ps1) and the original Microsoft script for comparison (TcmExec.ps1) are available in a zip here and TcmExecvNext.ps1 should be copied to the Deploy folder in your source control root. One point to note is that for agent-based pipelines to TFS Collection URL is passed as $TfsUrlWithCollection however in vNext pipelines it is passed in as $TfsUrl.
Configure Release Management
Because we are using RM-VSO this part of the configuration is completely different from the instructions for RM-TFS. However before starting any new configuration you'll need to make a change to the component we created in the previous post. This is because TCM.exe doesn't seem to like accepting the name of a build folder if it has a space in it. Some more fiddling with PowerShell might have found a solution but I eventailly changed the component's name from Drop Folder to DropFolder. Note that you'll need to visit the existing action and reselect the newly named component. Another issue which cropped-up is that TCM.exe choked when the build directory parameter was supplied with a local file path. The answer was to create a share at C:\Windows\DtlDownloads\DropFolder and configure with appropriate permissions.
The new configuration procedure for RM-VSO is as follows:
- From Configure Paths > Environments link the web client test machine to the DAT environment.
- From Configure Apps > vNext Release Templates open Contoso University\DAT>DQA.
- From the Toolbox drag a Deploy Using PS/DSC action to the deployment sequence to follow Deploy Web and Database and rename the action Run Automated Web Tests.
- Open up the properties of Run Automated Web Tests and set the Configuration Variables as follows:
- ServerName = choose the name of the web client test machine from the dropdown.
- UserName = this is the test domain account (ALM\TFSTEST in my case) that was configured for the web client test machine.
- Password = password for the UserName
- ComponentName = choose DropFolder from the dropdown.
- PSScriptPath = Deploy\TcmExecvNext.ps1
- SkipCaCheck = true
- Still in the properties of Run Automated Web Tests and set the Custom configuration as follows:
- PlanId = 8 (or whatever your Plan ID is as it is likely to be different)
- SuiteId = 10 (or whatever your Suite ID is as it is likely to be different)
- ConfigId = 1 (or whatever your Configuration ID is as it is likely to be different)
- BuildDirectory = \\almclientwin81b\DtlDownloads\DropFolder (your machine name may be different)
- TestEnvironment = ALMCLIENTWIN81B (yours may be different)
- Title = Automated Web Tests
Bearing in mind that the Deploy Using PS/DSC action doesn't allow itself to be resized to show all configuration values the result should look something like this:

Start a Build
From Visual Studio manually queue a new build from your build definition. If everything is in place the build should succeed and you can open Microsoft Test Manager to check the results. Navigate to Testing Center > Test > Analyze Test Runs. You should see your test run listed and double-clicking it will hopefully show the happy sight of passing tests:

Testing Times
As I noted in the TFS version of this post there are a lot of moving parts to get configured and working in order to be able to trigger tests to run from RM. Making all this work with VSO took many hours working through all the details and battling with permissions problems and myriad other things that didn't work in the way I was expecting them to. With luck I've hopefully captured all the details you need to try this in your own environment. If you do encounter difficulties please post in the comments and I'll do what I can to help.
Cheers -- Graham
Continuous Delivery with VSO: Application Deployment with Release Management
In the previous post in my blog series on implementing continuous delivery with VSO we got as far as configuring Release Management with a release path. In this post we cover the application deployment stage where we'll create the items to actually deploy the Contoso University application. In order to achieve this we'll need to create a component which will orchestrate copying the build to a temporary location on target nodes and then we'll need to create PowerShell scripts to actually install the web files to their proper place on disk and run the DACPAC to deploy any database changes. Note that although RM supports PowerShell DSC I'm not using it here and instead I'm using plain PowerShell. Why is that? It's because for what we're doing here -- just deploying components -- it feels like an unnecessary complication. Just because you can doesn't mean you should...
Sort out Build
The first thing you are going to want to sort out is build. VSO comes with 60 minutes of bundled build which disappears in no time. You can pay for more by linking your VSO account to an Azure subscription that has billing activated or the alternative is to use your own build server. This second option turns out to be ridiculously easy and Anthony Borton has a great post on how to do this starting from scratch here. However if you already have a build server configured it's a moment's work to reconfigure it for VSO. From Team Foundation Server Administration Console choose the Build Configuration node and select the Properties of the build controller. Stop the service and then use the familiar dialogs to connect to your VSO URL. Configure a new controller and agent and that's it!
Deploying PowerShell Scripts
The next piece of the jigsaw is how to get the PowerShell scripts you will write to the nodes where they should run. Several possibilities present themselves amongst which is embedding the scripts in your Visual Studio projects. From a reusability perspective this doesn't feel quite right somehow and instead I've adopted and reproduced the technique described by Colin Dembovsky here with his kind permission. You can implement this as follows:
- Create folders called Build and Deploy in the root of your version control for ContosoUniversity and check them in.
- Create a PowerShell script in the Build folder called CopyDeployFiles.ps1 in and add the following code:
1 2 3 4 5 6 7 8 9 10 11 12 13 14 15 16 17 18 19 20 |
Param( [string]$srcPath = $env:TF_BUILD_SOURCESDIRECTORY, [string]$binPath = $env:TF_BUILD_BINARIESDIRECTORY, [string]$pathToCopy ) try { $sourcePath = "$srcPath\$pathToCopy" $targetPath = "$binPath\$pathToCopy" if (-not(Test-Path($targetPath))) { mkdir $targetPath } xcopy /y /e $sourcePath $targetPath Write-Host "Done!" } catch { Write-Host $_ exit 1 } |
- Check CopyDeployFiles.ps1 in to source control.
- Modify the process template of the build definition created in a previous post as follows:
2.Build > 5. Advanced > Post-build script arguments = -pathToCopy Deploy
2.Build > 5. Advanced > Post-build script path = Build/CopyDeployFiles.ps1
To explain, Post-build script path specifies that CopyDeployFiles.ps1 created above should be run and Post-build script arguments feeds in the -pathToCopy argument which is the Deploy folder we created above. The net effect of all this is that the Deploy folder and any contents gets created as part of the build.
Create a Component
In a multi-server world we'd create a component in RM from Configure Apps > Components for each server that we need to deploy to since a component is involved in ensuring that the build is copied to the target node. Each component would then be associated with an appropriately named PowerShell script to do the actual work of installing/copying/running tests or whatever is needed for that node. Because we are hosting IIS and SQL Server on the same machine we only actually need one component. We're getting ahead of ourselves a little but a side effect of this is that we will use only one PowerShell script for several tasks which is a bit ugly. (Okay, we could use two components but that would mean two build copy operations which feels equally ugly.)
With that noted create a component called Drop Folder and add a backslash (\) to Source > Builds with application > Path to package. The net effect of this when the deployment has taken place is the existence a folder called Drop Folder on the target node with the contents of the original drop folder copied over to the remote folder. As long as we don't need to create configuration variables for the component it can be reused in this basic form. It probably needs a better name though.
Create a vNext Release Template
Navigate to Configure Apps > vNext Release Templates and create a new template called Contoso University\DAT>DQA based on the Contoso University\DAT>DQA release path. You'll need to specify the build definition and check Can Trigger a Release from a Build. We now need to create the workflow on the DAT design surface as follows:
- Right-click the Components node of the Toolbox and Add the Drop Folder component.
- Expand the Actions node of the Toolbox and drag a Deploy Using PS/DSC action to the Deployment Sequence. Click the pen icon to rename to Deploy Web and Database.
- Double click the action and set the Configuration Variables as follows:
- ServerName = choose the appropriate server from the dropdown.
- UserName = the name of an account that has permissions on the target node. I'm using the RMDEPLOYER domain account that was set up for Deployment Agents to use in agent based deployments.
- Password = password for the UserName
- ComponentName = choose Drop Folder from the dropdown.
- SkipCaCheck = true
- The Actions do not display very well so a complete screenshot is not possible but it should look something like this (note SkipCaCheck isn't shown):

At this stage we can save the template and trigger a build. If everything is working you should be able to examine the target node and observe a folder called C:\Windows\DtlDownloads\Drop Folder that contains the build.
Deploy the Bits
With the build now existing on the target node the next step is to actually get the web files in place and deploy the database. We'll do this from one PowerShell script called WebAndDatabase.ps1 that you should create in the Deploy folder created above. Every time you edit this and want it to run do make sure you check it in to version control. To actually get it to run we need to edit the Deploy Web and Database action created above. The first step is to add Deploy\WebAndDatabase.ps1 as the parameter to the PSScriptPath configuration variable. We then need to add the following custom configuration variables by clicking on the green plus sign:
- destinationPath = C:\inetpub\wwwroot\CU-DAT
- websiteSourcePath = _PublishedWebsites\ContosoUniversity.Web
- dacpacName = ContosoUniversity.Database.dacpac
- databaseServer = ALMWEBDB01
- databaseName = CU-DAT
- loginOrUser = ALM\CU-DAT
The first section of the script will deploy the web files to C:\inetpub\wwwroot\CU-DAT on the target node, so create this folder if you haven't already. Obviously we could get PowerShell to do this but I'm keeping things simple. I'm using functions in WebAndDatabase.ps1 to keep things neat and tidy and to make debugging a bit easier if I want to only run one function.
The first function is as follows:
1 2 3 4 5 6 7 8 9 10 11 12 13 14 15 16 17 18 19 20 21 22 23 24 25 26 27 28 29 |
function copy_web_files { if ([string]::IsNullOrEmpty($destinationPath) -or [string]::IsNullOrEmpty($websiteSourcePath) -or [string]::IsNullOrEmpty($databaseServer) -or [string]::IsNullOrEmpty($databaseName)) { $(throw "A required parameter is missing.") } Write-Verbose "#####################################################################" -Verbose Write-Verbose "Executing Copy Web Files with the following parameters:" -Verbose Write-Verbose "Destination Path: $destinationPath" -Verbose Write-Verbose "Website Source Path: $websiteSourcePath" -Verbose Write-Verbose "Database Server: $databaseServer" -Verbose Write-Verbose "Database Name: $databaseName" -Verbose $sourcePath = "$ApplicationPath\$websiteSourcePath" Remove-Item "$destinationPath\*" -recurse Write-Verbose "Deleted contents of $destinationPath" -Verbose xcopy /y /e $sourcePath $destinationPath Write-Verbose "Copied $sourcePath to $destinationPath" -Verbose $webDotConfig = "$destinationPath\Web.config" (Get-Content $webDotConfig) | Foreach-Object { $_ -replace '__DATA_SOURCE__', $databaseServer ` -replace '__INITIAL_CATALOG__', $databaseName } | Set-Content $webDotConfig Write-Verbose "Tokens in $webDotConfig were replaced" -Verbose } copy_web_files |
The code clears out the current set of web files and then copies the new set over. The tokens in Web.config get changed in the copied set so the originals can be used for the DQA stage. Note how I'm using Write-Verbose statements with the -Verbose switch at the end. This causes the RM Deployment Log grid to display a View Log link in the Command Output column. Very handy for debugging purposes.
The second function deploys the DACPAC:
|
|
function deploy_dacpac { if ([string]::IsNullOrEmpty($dacpacName) -or [string]::IsNullOrEmpty($databaseServer) -or [string]::IsNullOrEmpty($databaseName)) { $(throw "A required parameter is missing.") } Write-Verbose "#####################################################################" -Verbose Write-Verbose "Executing Deploy DACPAC with the following parameters:" -Verbose Write-Verbose "DACPAC Name: $dacpacName" -Verbose Write-Verbose "Database Server: $databaseServer" -Verbose Write-Verbose "Database Name: $databaseName" -Verbose $cmd = "& 'C:\Program Files (x86)\Microsoft SQL Server\120\DAC\bin\sqlpackage.exe' /a:Publish /sf:'$ApplicationPath'\'$dacpacName' /tcs:'server=$databaseServer; initial catalog=$databaseName'" Invoke-Expression $cmd | Write-Verbose -Verbose } deploy_dacpac |
The code is simply building the command to run sqlpackage.exe -- pretty straightforward. Note that the script is hardcoded to SQL Server 2014 -- more on that below.
The final function deals with the Create login and database user.sql script that lives in the Scripts folder of the ContosoUniversity.Database project. This script ensures that the necessary SQL Server login and database user exists and is tokenised so it can be used in different stages -- see this article for all the details.
1 2 3 4 5 6 7 8 9 10 11 12 13 14 15 16 17 18 19 20 21 22 23 24 25 |
function run_create_login_and_database_user { if ([string]::IsNullOrEmpty($loginOrUser) -or [string]::IsNullOrEmpty($databaseName)) { $(throw "A required parameter is missing.") } Write-Verbose "#####################################################################" -Verbose Write-Verbose "Executing Run Create Login and Database User with the following parameters:" -Verbose Write-Verbose "Login or User: $loginOrUser" -Verbose Write-Verbose "Database Server: $databaseServer" -Verbose Write-Verbose "Database Name: $databaseName" -Verbose $scriptName = "$ApplicationPath\Scripts\Create login and database user.sql" (Get-Content $scriptName) | Foreach-Object { $_ -replace '__LOGIN_OR_USER__', $loginOrUser ` -replace '__DB_NAME__', $databaseName } | Set-Content $scriptName Write-Verbose "Tokens in $scriptName were replaced" -Verbose $cmd = "& 'sqlcmd' /S $databaseServer /i '$scriptName' " Invoke-Expression $cmd | Write-Verbose -Verbose Write-Verbose "$scriptName was executed against $databaseServer" -Verbose } run_create_login_and_database_user |
The tokens in the SQL script are first swapped for passed-in values and then the code builds a command to run the script. Again, pretty straightforward.
Loose Ends
At this stage you should be able to trigger a build and have all of the components deploy. In order to fully test that everything is working you'll want to create and configure a web application in IIS -- this article has the details.
To create the stated aim of an initial pipeline with both a DAT and DQA stage the final step is to actually configure all of the above for DQA. It's essentially a repeat of DAT so I'm not going to describe it here but do note that you can copy and paste the Deployment Sequence:

One remaining aspect to cover is the subject of script reusability. With RM-TFS there is an out-of-the-box way to achieve reusability with tools and actions. This isn't available in RM-VSO and instead potential reusability comes via storing scripts outside of the Visual Studio solution. This needs some thought though since the all-in-one script used above (by necessity) only has limited reusability and in a non-demo environment you would want to consider splitting the script and co-ordinating everything from a master script. Some of this would happen anyway if the web and database servers were distinct machines but there is probably more that should be done. For example, tokens that are to be swapped-out are hard-coded in the script above which limits reusability. I've left it like that for readability but this certainly feels like the sort of thing that should be improved upon. In a similar vein the path to sqlpackage.exe is hard coded and thus tied to a specific version of SQL Server and probably needs addressing.
In the next post we'll look at executing automated web tests. Meantime if you have any thoughts on great ways to use PowerShell with RM-VSO please do share in the comments.
Cheers -- Graham
Continuous Delivery with VSO: Configuring Release Management
In this post in my blog series on continuous delivery with VSO we look at configuring Release Management for Visual Studio. RM is part of the TFS ecosystem and is used to deploy our code to the different environments that constitute the delivery pipeline. It was originally built to work with TFS however the 2013.4 version released in November 2014 now works with VSO. Inevitably of course I'm going to be comparing how RM with VSO stacks up against RM with TFS.
Setting the Scene
From now on in this series of blog posts I'm going to assume that you are working in Azure and have a setup that resembles the one I created for my Continuous Delivery with TFS series of posts. If you are starting from scratch and need to catch up then these are the posts that can help:
One of the big advantages of RM-VSO is that there is no need to run a TFS instance. Additionally there is no need to run an RM server instance or Deployment Agents on target nodes since this is all taken care of, either behind the scenes in the case of the RM server or by using a different technique in the case of deploying to target nodes. Whilst the RM-VSO offering reduces the number of moving parts (which is good) it also imposes restrictions. As an example, RM-TFS allows us to reuse deployment VMs in different environments. In contrast RM-VSO doesn't allow this and consequently a multi-tenant model (eg one IIS machine hosting multiple websites) isn't possible, at least not without a substantial amount of jiggery-pokery. Does this matter? It depends... For a demo environment fewer VMs is preferable if you need to preserve your Azure credits, but in vivo you probably want separate VMs anyway. There is an easy -- if inelegant -- workaround for those that want to preserve Azure credits and I describe this below.
Configuring Azure to Work with RM
Our initial pipeline will consist of two environments: DAT (Development Automated Test) and DQA (Development Quality Assurance). Our Contoso University sample application has a web component and a database component so we'll need the services of IIS and SQL Server. With RM-TFS these can be dedicated web and database VMs that host multiple websites and databases but as mentioned above out of the box this isn't possible with RM-VSO. An additional requirement is a one-to-one mapping between RM-VSO environments and Azure cloud services. To work around all this we'll use VMs that host both IIS and SQL Server. A bit hacky for a demo setup but what to do? The procedure for setting all this up is as follows:
- In the Azure portal create two new cloud services to host VMs for each RM-VSO environment. I called mine datcloudservice.cloudapp.net and dqacloudservice.cloudapp.net -- you'll need to choose unique names for your services.
- Now create two new VMs -- one in each cloud service. I called mine ALMWEBDB01 and ALMWEBDB02. The good news is that despite being in different cloud services these servers can be in the same virtual network, affinity group and storage account. This keeps everything neat and tidy and also means the servers can be part of your domain if you have set one up.
- Both of these servers need to have IIS and SQL Server installed. This is fairly standard stuff so I won't be covering this here. One note of caution is that to preserve Azure credits be sure to install SQL Server from scratch rather than use an image from the gallery with SQL Server pre-installed as the latter technique is much more costly.
- These servers also need an account adding to the local administrators group that will be used in the deployment process. I used the RMDEPLOYER domain account that was set up for Deployment Agents to use in agent based deployments. In addition RMDEPLOYER will need a login for SQL Server and appropriate permissions. The easy path in a demo environment is to grant sysadmin but clearly that may be unwise in production.
The other VM which is core to all this is your developer workstation running Visual Studio, Release Management and Microsoft Test Manager. See above for the link to getting this machine configured if necessary.
Connect Release Management to VSO
I'm making the assumption here that you already have the RM client connected to TFS and want to connect it to VSO. If you have a new install of RM client the steps will be similar. You'll need to start an already configured RM client with your TFS instance up-an-running otherwise it just chokes. To switch over from TFS to VSO navigate to Administration > Settings > System Settings and click on the Edit link at the end of the Release management Server URL setting:

In the Configure Services dialog that appears add in the URL of your VSO account, ie https://myaccount.visualstudio.com. You'll probably be prompted to enter credentials after which you'll be prompted to allow the client to restart. When it does you have an instance of the client ‘re-branded' for VSO, by which I mean there are some changes to the user interface to reflect the difference between the features supported by TFS and VSO. One immediately obvious difference is that there is no place to specify SMTP settings as VSO handles all that.
Connect Release Management to Azure and Configure an Environment
One key difference between VSO and TFS is that VSO can only deploy to Azure VMs. In order to allow this you must configure RM with your Azure subscription:
- Download a text file containing your Azure subscription settings from here.
- From Administration > Manage Azure click on New and fill in the Name, Subscription ID and Management Certificate Key from the text file. Pay particular attention if you have more than one Azure subscription. For the Management Certificate Key you want everything between the quotes. Get the appropriate Storage Account Name from here. Consider deleting the Azure subscription settings file when you are finished with it for security purposes.
- Create DAT and DQC stages from Administration > Manage Pick Lists. See here for my TFS equivalent post.
- From Configure Paths > Environments click on New vNext: Azure to create a new environment and click Link Azure Environment to bring up the Azure Environments dialog. Select your Azure subscription and then use the Link button to link the DAT cloud service.
- With the environment created click on Link Azure Servers to link the VM hosted in the DAT cloud service:

- Note that you can't change the name of the environment -- it is fixed as the name of the cloud service.
- Now repeat the process for the DQA cloud service, after which you should have two environments:

Configure a vNext Release Path
With the environments created we can create a release path. Navigate to Configure Paths > vNext Release Paths and create a new path called Contoso University\DAT>DQA. Add two stages to it (one for DAT and another for DQA) and configure with the respective environments. You will need to add yourself or another user to the approvals workflow as the concept of groups isn't available in RM-VSO. Additionally the DAT workflow should be automated. You should end up with something similar to this:

Again there are differences between the VSO version and the TFS version, since for some reason the toggle email notification icons are missing from the VSO version. Other than that createing a release path with RM-VSO is very similar to RM-TFS.
Until Next Time
That's as far as we are going in this post. Next time we'll configure the actual release template and get to grips with using PowerShell scripts to deploy our components.
Cheers -- Graham
Continuous Delivery with VSO: Configuring the Basics
In this first post on my series on implementing continuous delivery with Visual Studio Online we look at configuring the basics, including setting up an account and linking in to Visual Studio. As usual I assume a degree of familiarity with the tooling and if you need to get up to speed with VSO I have a getting started post here. I also assume that you already have a Microsoft account and I'll be writing the series from the perspective of someone with an MSDN subscription who has access to Microsoft software and Azure credits. If that's not you then all is not lost since much of the tooling is available for free or as trial versions.
Create a VSO Account and Configure a Project
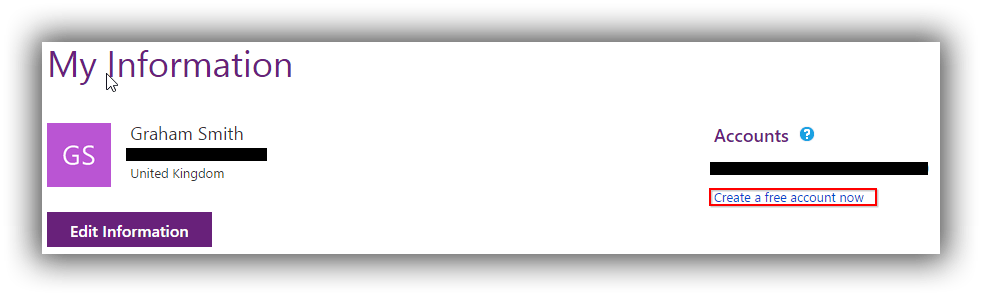
Our journey begins by creating a new VSO account. Head over to this page and sign in with your Microsoft account. Under the Accounts list there is a Create a free account now link which allows you to create a new account using a unique URL ending in visualstudio.com. A fairly recent addition is the ability to have the account hosted in West Europe by clicking Change options. Once created you should see your account listed with any other accounts that you have created or have been invited to join.
The first time you visit your account (analogous to a Team Project Collection in on-premise TFS) you will need to Create your first project which is analogous to a Team Project. I created a project called ContosoUniversity based on the Microsoft Visual Studio Scrum 2013.4 process template and using Team Foundation Version Control.
Link the VSO Account to Visual Studio 2013
Once your new project is created the next step is to hook it up to Visual Studio 2013. You can do this from the Overview page of your new project if you have the account open in a browser running on your development machine or you can do as I did and manually connect in Visual Studio via Team Explorer -- Connect. I added a new server using https://pleasereleaseme.visualstudio.com and that was all that was required for Visual Studio to prompt me for credentials.
With the account added the next step is to map a workspace. I'd previously mapped ContosoUniversity to the TFS version of the project and the filepath was already in use so I added a VSO folder before the project name to keep everything tidy and avoid a ContosoUniversity2 folder. Next up is to add the ContosoUniversity source code to version control under a Main folder that is configured as a branch -- see this post for fuller details. If you have your own version of ContosoUniversity from my TFS blog post series that you want to use then go ahead (see here for a utility to unbind the solution from version control prior to copying it over) or you can download a zip of the code from here. At this point you should be able to publish the database to LocalDb and run the application.
Create and Run a Build
As a final step to getting the basics configured we'll create and run a build. Although there is a Build area within VSO you can't actually create a build here, and you need to do that from within Visual Studio. From Team Explorer choose Builds and then New Build Definition. The process is very similar to the one for the full-blown TFS I describe here. The main differences are that in Build Defaults I left Staging Location set to Copy build output to server and in Process I chose the TfvcTemplate.12.xaml build process template and in Automated Tests I changed test to unittests to stop the automated web tests from running. I also set 5. Advanced > MSBuild arguments to /p:UseWPP_CopyWebApplication=true /p:PipelineDependsOnBuild=false to ensure that the web.config transform that gives the tokenised version takes place.
With the build running successfully I did notice one immediate different compared with TFS: it can take substantially longer for the build to wait in the queue. I can't find a reference but I'm pretty sure I've read or heard that a build from cold is going to be longer because VSO has to stand up the infrastructure for your build. I've also found that the first build from cold fails with missing assembly reference errors -- presumably package download not working. Inexplicably subsequent builds work fine. I still need to verify this with more testing but if you're finding this do let me know via the comments. On the plus side once your build is created you can queue it from the build section of VSO:

To finish off, the initial impression of VSO is that it's very slick and extremely well integrated with Visual Studio. It's certainly orders of magnitude easier to set up than TFS. Does it have all the flexibility of TFS when it comes to continuous delivery? We'll start to find out over the next few posts.
Cheers -- Graham
Implementing Continuous Delivery with VSO
In another series of blog posts on this website I describe how to implement continuous delivery with TFS. I start from scratch by describing how to install and configure TFS and there's no denying that it's quite a lot of work. Once installed TFS can require a not inconsiderable amount of care and feeding and in bigger organisations it's almost certainly going to be someone's full-time job. There is an alternative though -- Visual Studio Online. This is a SaaS version of TFS hosted in Azure, and started life as Team Foundation Service back in 2012. The name change coincided with the release of Visual Studio 2013 in November 2013.
VSO isn't the full-blown TFS as it's missing the SSRS reporting capabilities and the SharePoint portal integration. At the time of writing a subscription can only consist of one Team Project Collection and editing of process templates isn't supported. On the other hand, VSO receives updates approximately every three weeks so it contains new application features well ahead of TFS. A post here has a nice comparison. What you may find interesting is that as per Brian Harry's blog post Microsoft are planning to gradually move their teams currently using TFS over to VSO. If that isn't putting faith in VSO then I don't know what is!
So if it's good enough for Microsoft it's surely good enough for the rest of us. But as always the key questions for some people are how to get started and can using VSO give us the nice integration with the other tools such as Microsoft Test Manager and Release Management? This blog post series will focus on answering those very questions. I'm aiming to write a soup-to-nuts guide on how to implement continuous delivery with VSO, comparing and contrasting with the TFS blog post series as we go. Do use the comments system to give me feedback!
Cheers -- Graham
Getting Started with Visual Studio Online
Not everyone wants or needs the full-blown power of an on-premises TFS installation and if that's you then Visual Studio Online (TFS in the cloud) is a great way to integrate Visual Studio with version control, backlog management, agile planning tools and many of the other great features that are available with TFS. Some things in VSO work in a similar way to TFS so some of the learning resources can do double duty -- my Getting Started with Team Foundation Server and ALM guide is here. There are also dedicated VSO learning resources and this is my recommend list:
One of the really great things about VSO is that you can get started for free (and it can stay free within very generous limits). Combined with the free Visual Studio Community 2013 it makes for a fantastic learning opportunity for anyone without an MSDN account.
Cheers -- Graham


