Continuous Delivery with Containers – Use Visual Studio Team Services and Docker to Build and Deploy ASP.NET Core to Linux
In this blog series on Continuous Delivery with Containers I'm documenting what I've learned about Docker and containers (both the Linux and Windows variety) in the context of continuous delivery with Visual Studio Team Services. The Docker and containers world is mostly new to me and I have only the vaguest idea of what I'm doing so feel free to let me know in the comments if I get something wrong.
Although the Windows Server Containers feature is now a fully supported part of Windows it is still extremely new in comparison to containers on Linux. It's not surprising then that even in the world of the Visual Studio developer the tooling is most mature for deploying containers to Linux and that I chose this as my starting point for doing something useful with Docker. As I write this the documentation for deploying containers with Visual Studio Team Services is fragmented and almost non-existent. The main references I used for this post were:
- Building .NET Core Linux Docker Images with Visual Studio Team Services
- DotNet Core, VS 2015, VSTS and Docker
- Build, push and run Docker images with Visual Studio Team Services
However to my mind none of these blogs cover the whole process to any satisfactory depth and in any case they are all somewhat out of date. In this post I've therefore tried to piece all of the bits of the jigsaw together that form the end-to-end process of creating an ASP.NET Core app in Visual Studio and debugging it whilst running on Linux, all the way through to using VSTS to deploy the app in a container to a target node running Linux. I'm not attempting to teach the basics of Docker and containers here and if you need to get up to speed with this see my Getting Started post here.
Install the Tooling for the Visual Studio Development Inner Loop
In order to get your development environment properly configured you'll need to be running a version of Windows that is supported by Docker for Windows and have the following tooling installed:
- Visual Studio 2015 with Update 3 (ensure you install Git)
- Docker for Windows (ensure you enable Shared Drives)
- Visual Studio Tools for Docker
- .NET Core and the Visual Studio 2015 tooling
You'll also need a VSTS account and an Azure subscription.
Create an ASP.NET Core App
I started off by creating a new Team Project in VSTS and called Containers and then from the Code tab creating a New repository using Git called AspNetCoreLinux:

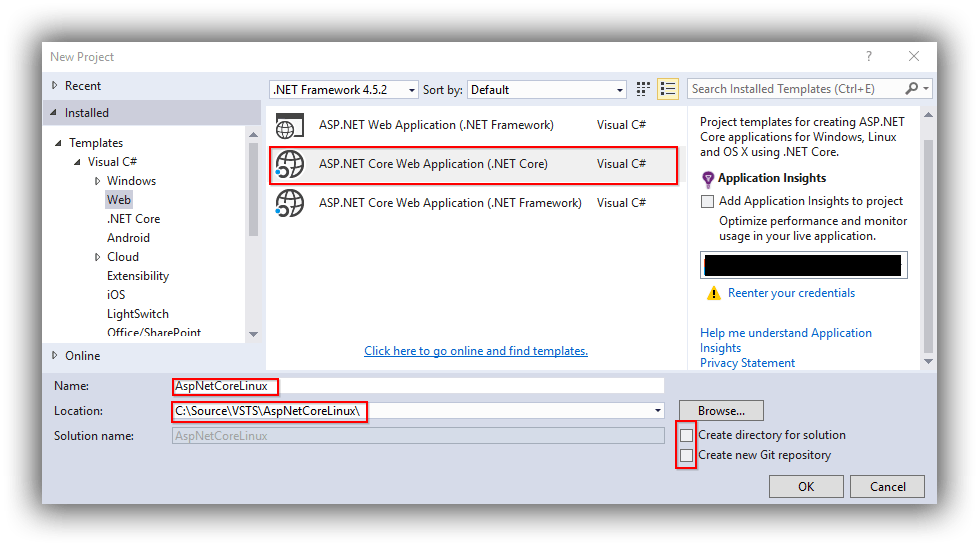
Over in Visual Studio I then cloned this repository to my source control folder (in my case to C:\Source\VSTS\AspNetCoreLinux as I prefer a short filepath) and added .gitignore and .gitattributes files (see here if this doesn't make sense) and committed and synced the changes. Then from File > New > Project I created an ASP.NET Core Web Application (.NET Core) application called AspNetCoreLinux using the Web Application template (not shown):
Visual Studio will restore the packages for the project after which you can run it with F5 or Ctrl+F5.
The next step is to install support for Docker by right-clicking the project and choosing Add > Docker Support. You should now see that the Run dropdown has an option for Docker:

With Docker selected and Docker for Windows running (with Shared Drives enabled!) you will now be running and debugging the application in a Linux container. For more information about how this works see the resources on the Visual Studio Tools for Docker site or my list of resources here. Finally, if everything is working don't forget to commit and sync the changes.
Provision a Linux Build VM
In order to build the project in VSTS we'll need a build machine. We'll provision this machine in Azure using the Azure driver for Docker Machine which offers a very neat way for provisioning a Linux VM with Docker installed in Azure. You can learn more about Docker Machine from these sources:
- Docker Machine -- Microsoft Azure Driver
- Use Docker Machine with the Azure driver
- ASP.NET Core RC2, Meet Docker (note reference to Docker Toolbox is outdated)
To complete the following steps you'll need the Subscription ID of the Azure subscription you intend to use which you can get from the Azure portal.
- At a command prompt enter the following command:
1docker-machine create -d azure --azure-subscription-id adb4a497-7e0b-querty-ab9c-e4a160567809 --azure-static-public-ip --azure-open-port 80 --azure-resource-group VstsBuildDeployRG vstsbuildvm
By default this will create a Standard A2 VM running Ubuntu called vstsbuildvm (note that "Container names must be 3-63 characters in length and may contain only lower-case alphanumeric characters and hyphen. Hyphen must be preceded and followed by an alphanumeric character.") in a resource group called VstsBuildDeployRG in the West US datacentre (make sure you use your own Azure Subscription ID). It's fully customisable though and you can see al the options here. In particular I've added the option for the VM to be created with a static public IP address as without that there's the possibility of certificate problems when the VM is shut down and restarted with a different IP address. - Azure now wants you to authenticate. The procedure is explained in the output of the command window, and requires you to visit https://aka.ms/devicelogin and enter the one-time code:

Docker Machine will then create the VM in Azure and configure it with Docker and also generate certificates at C:\Users\<yourname>\.docker\machine. Do have a poke a round the subfolders of this path as some of the files are needed later on and it will also help to understand how connections to the VM are handled. - This step isn't strictly necessary right now, but if you want to run Docker commands from the current command prompt against the Docker Engine running on the new VM you'll need to configure the shell by first running docker-machine env vstsbuildvm. This will print out the environment variables that need setting and the command (@FOR /f "tokens=*" %i IN (‘docker-machine env vstsbuilddeployvm') DO @%I) to set them. These settings only persist for the life of the command prompt window so if you close it you'll need to repeat the process.
- In order to configure the internals of the VM you need to connect to it. Although in theory you can use the docker-machine ssh vstsbuildvm command to do this in practice the shell experience is horrible. Much better is to use a tool like PuTTY. Donovan Brown has a great explanation of how to get this working about half way down this blog post. Note that the folder in which the id_rsa file resides is C:\Users\<yourname>\.docker\machine\machines\<yourvmname>. A tweak worth making is to set the DNS name for the server as I describe in this post so that you can use a fixed host name in the PuTTY profile for the VM rather than an IP address.
- With a connection made to the VM you need to issue the following commands to get it configured with the components to build an ASP.NET Core application:
- Next up is installing the VSTS build agent for Linux following the instructions for Team Services here. In essence (ie do make sure you follow the instructions) the steps are:
- Create and switch to a downloads folder using mkdir Downloads && cd Downloads.
- At the Get Agent page in VSTS select the Linux tab and the Ubuntu 16.04-x64 option and then the copy icon to copy the URL download link to the clipboard:

- Back at the PuTTY session window type sudo wget followed by a space and then paste the URL from the clipboard. Run this command to download the agent to the Downloads folder.
- Go up a level using cd .. and then make and switch to a folder for the agent using mkdir myagent && cd myagent.
- Extract the compressed agent file to myagent using tar zxvf ~/Downloads/vsts-agent-ubuntu.16.04-x64-2.108.0.tar.gz (note the exact file name will likely be different).
- Install the Ubuntu dependencies using sudo ./bin/installdependencies.sh.
- Configure the agent using ./config.sh after first making sure you have created a personal access token to use. I created my agent in a pool I created called Linux.
- Configure the agent to run as a service using sudo ./svc.sh install and then start it using sudo ./svc.sh start.


If the procedure was successful you should see the new agent showing green in the VSTS Agent pools tab:

Provision a Linux Target Node VM
Next we need a Linux VM we can deploy to. I used the same syntax as for the build VM calling the machine vstsdeployvm:
|
1 |
docker-machine create -d azure --azure-subscription-id adb4a497-7e0b-querty-ab9c-e4a160567809 --azure-static-public-ip --azure-open-port 80 --azure-resource-group VstsBuildDeployRG vstsdeployvm |
Apart from setting the DNS name for the server as I describe in this post there's not much else to configure on this server except for updating it using sudo apt-get update && sudo apt-get dist-upgrade.
Gearing Up to Use the Docker Integration Extension for VSTS
Configuration activities now shift over to VSTS. The first thing you'll need to do is install the Docker Integration extension for VSTS from the Marketplace. The process is straightforward and wizard-driven so I won't document the steps here.
Next up is creating three service end points -- two of the Docker Host type (ie our Linux build and deploy VMs) and one of type Docker Registry. These are created by selecting Services from the Settings icon and then Endpoints and then the New Service Endpoint dropdown:

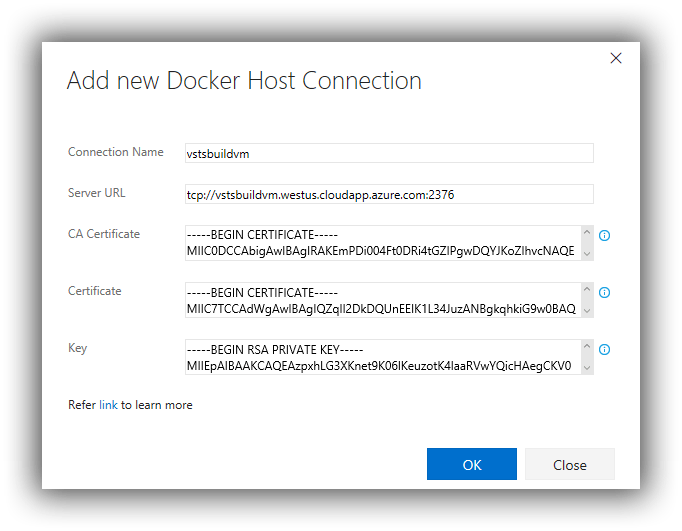
To create a Docker Host endpoint:
- Connection Name = whatever suits -- I used the name of my Linux VM.
- Server URL = the DNS name of the Linux VM in the format tcp://your.dns.name:2376.
- CA Certificate = contents of C:\Users\<yourname>\.docker\machine\machines\<yourvmname>\ca.pem.
- Certificate = contents of C:\Users\<yourname>\.docker\machine\machines\<yourvmname>\cert.pem.
- Key = contents of C:\Users\<yourname>\.docker\machine\machines\<yourvmname>\key.pem.
The completed dialog (in this case for the build VM) should look similar to this:
Repeat this process for the deploy VM.
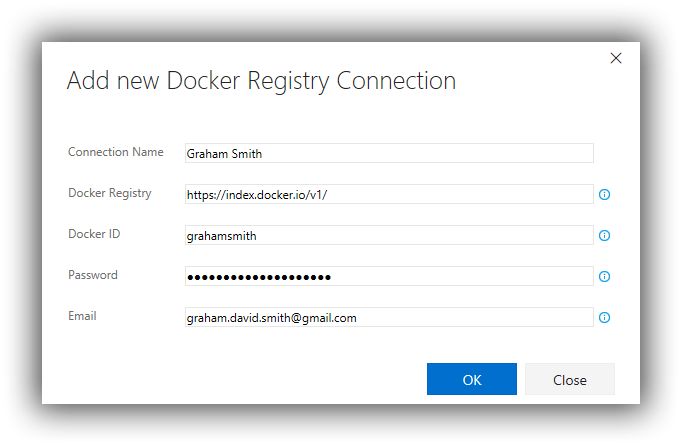
Next, if you haven't already done so you will need to create an account at Docker Hub. To create the Docker Registry endpoint:
- Connection Name = whatever suits -- I used my name
- Docker Registry = https://index.docker.io/v1/
- Docker ID = username for Docker Hub account
- Password = password for Docker Hub account
The completed dialog should look similar to this:
Putting Everything Together in a Build
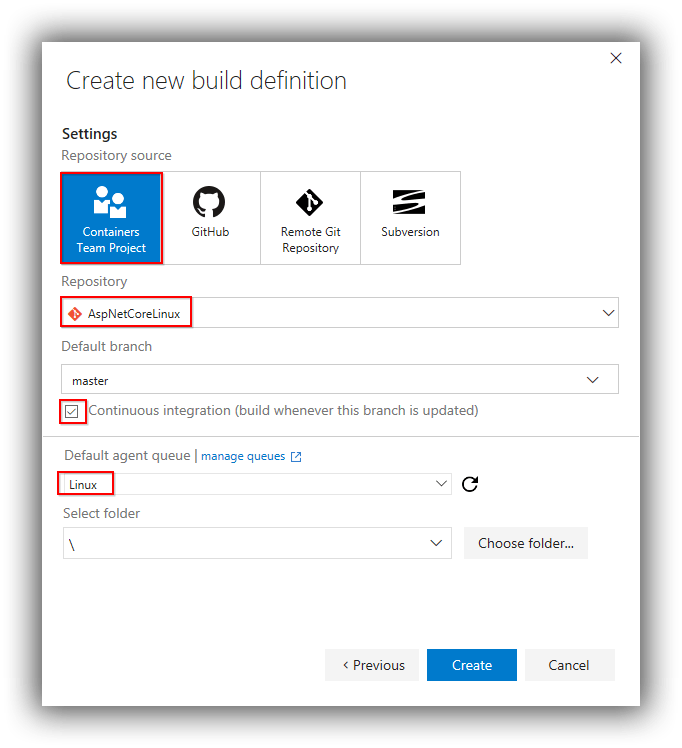
Now the fun part begins. To keep things simple I'm going to run everything from a single build, however in a more complex scenario I'd use both a VSTS build and a VSTS release definition. From the VSTS Build & Release tab create a new build definition based on an Empty template. Use the AspNetCoreLinux repository, check the Continuous integration box and select Linux for the Default agent queue (assuming you create a queue named Linux as I've done):
Using Add build step add two Command Line tasks and three Docker tasks:

In turn right-click all but the first task and disable them -- this will allow the definition to be saved without having to complete all the tasks.
The configuration for Command Line task #1 is:
- Tool = dotnet
- Arguments = restore -v minimal
- Advanced > Working folder = src/AspNetCoreLinux (use the ellipsis to select)
Save the definition (as AspNetCoreLinux) and then queue a build to make sure there are no errors. This task restores the packages specified in project.json.
The configuration for Command Line task #2 is:
- Tool = dotnet
- Arguments = publish -c $(Build.Configuration) -o $(Build.StagingDirectory)/app/
- Advanced > Working folder = src/AspNetCoreLinux (use the ellipsis to select)
Enable the task and then queue a build to make sure there are no errors. This task publishes the application to$(Build.StagingDirectory)/app (which equates to home/docker-user/myagent/_work/1/a/app).
The configuration for Docker task #1 is:
- Docker Registry Connection = <name of your Docker registry connection>
- Action = Build an image
- Docker File = $(Build.StagingDirectory)/app/Dockerfile
- Build Context = $(Build.StagingDirectory)/app
- Image Name = <your Docker ID>/aspnetcorelinux:$(Build.BuildNumber)
- Docker Host Connection = vstsbuildvm (or your Docker Host name for the build server)
- Working Directory = $(Build.StagingDirectory)/app
Enable the task and then queue a build to make sure there are no errors. If you run sudo docker images on the build machine you should see the image has been created.
The configuration for Docker task #2 is:
- Docker Registry Connection = <name of your Docker registry connection>
- Action = Push an image
- Image Name = <your Docker ID>/aspnetcorelinux:$(Build.BuildNumber)
- Advanced Options > Docker Host Connection = vstsbuildvm (or your Docker Host name for the build server)
- Advanced Options > Working Directory = $(System.DefaultWorkingDirectory)
Enable the task and then queue a build to make sure there are no errors. If you log in to Docker Hub you should see the image under your profile.
The configuration for Docker task #3 is:
- Docker Registry Connection = <name of your Docker registry connection>
- Action = Run an image
- Image Name = <your Docker ID>/aspnetcorelinux:$(Build.BuildNumber)
- Container Name = aspnetcorelinux$(Build.BuildNumber) (slightly different from above!)
- Ports = 80:80
- Advanced Options > Docker Host Connection = vstsdeployvm (or your Docker Host name for the deploy server)
- Advanced Options > Working Directory = $(System.DefaultWorkingDirectory)
Enable the task and then queue a build to make sure there are no errors. If you navigate to the URL of your deployment sever (eg http://vstsdeployvm.westus.cloudapp.azure.com/) you should see the web application running. As things stand though if you want to deploy again you'll need to stop the container first.
That's all for now...
Please do be aware that this is only a very high-level run-through of this toolchain and there many gaps to be filled: how does a website work with databases, how to host a website on something other than the Kestrel server used here and how to secure containers that should be private are just a few of the many questions in my mind. What's particularly exciting though for me is that we now have a great solution to the problem of developing a web app on Windows 10 but deploying it to Windows Server, since although this post was about Linux, Docker for Windows supports the same way of working with Windows Server Core and Nanao Server (currently in beta). So I hope you found this a useful starting point -- do watch out for my next post in this series!
Cheers -- Graham
