Deploy a Dockerized ASP.NET Core Application to Kubernetes on Azure Using a VSTS CI/CD Pipeline: Part 2
If you need to provision a new environment for your deployment pipeline, what's your process and how long does it take? For many of us the process probably starts with a request to an infrastructure team for new virtual machines. If the new VMs are in Azure the request might be completed quite quickly; if they are on premises it might take much longer. In both scenarios you might have to justify your request: there will be actual cost in Azure and on premises it's another chunk of the datacentre ‘gone'.
With the help of containers and container orchestrators I predict (and sincerely hope) that this sort of pain will become a distant memory for much of the software development community for whom it is currently an issue. The reason is that container orchestration technologies abstract away the virtual (or physical) server layer and allow you to focus on configuring services and how they communicate with each other—all through configuration files. The only time you'd need to think of virtual (or physical) servers is if the cluster running your orchestrator needed more capacity, in which case someone will need to add more nodes. A whole new environment for your pipeline just by doing some work with a configuration file? What's not to like?
In this blog post I hope to make my prediction come alive by showing you how new environments can be quickly created using Kubernetes running in Microsoft's Azure Container Service (AKS), crucially using declarative configuration files that get deployed as part of a VSTS release pipeline. This post follows directly on from a previous post, both in terms of understanding and also the components that were built in that first post, so if you haven't already done so I recommend working your way through that post before going further.
Housekeeping
In the previous post we deployed to the default namespace so it probably makes sense to clean all this up. This can all be done by the command line of course but to mix it up a bit I'll illustrate using the Kubernetes Dashboard. You can start the dashboard using the following command, substituting in the name of your resource group and the name of the cluster:
|
|
az aks browse --resource-group <resource-group> --name <cluster-name> |
This should open the dashboard in a browser displaying the default namespace. Navigate to Workloads > Deployments and using the hamburger menu delete the deployment:

Navigate to Discovery and Load Balancing > Services and delete the service:

Navigate to Config and Storage > Secret and delete the secret:

Environments and Namespaces
The Kubernetes feature that we'll use to create environments that together form part of our pipeline is Namespaces. You can think of namespaces as a way to divide the Kubernetes cluster in to virtual clusters. Within a namespace resource names need to be unique but they don't have to be across namespaces. This is great because effectively we have network isolation so that across each environment resource names stay the same. Say goodbye to having to append the environment name to all the resources in your environment to make them unique.
In this post I'll make a pipeline consisting of two environments. I'm sticking with a convention I established several years ago so I'll be creating DAT (developer automated test) and PRD (production) environments. In a complete pipeline I might also create a DQC (developer quality control) environment to sit between DAT and PRD but that won't really add anything extra to this exercise.
First up is to create the namespaces. There is an argument for saying that namespace creation should be part of the release pipeline however in this post I'm going to create everything manually as I think it helps to understand what's going on. Create a file called namespaces.yaml and add the following contents:
|
|
apiVersion: v1 kind: Namespace metadata: name: dat --- apiVersion: v1 kind: Namespace metadata: name: prd |
Note that namespace name needs to be in lower case as it needs to be DNS compatible. Open a command prompt at the same location as namespaces.yaml and execute the the following command: kubectl create -f namespaces.yaml. You should get a message back advising the namespaces have been created and at one level that's all there is to it. However there's a couple of extra bits worth knowing.
When you first start working with kubectl at the command line you are working in the default namespace. To work with other namespaces needs some configuration.
To return details of the configuration stored in C:\Users\<username>\.kube\config use:
My cluster returned the following output:
1 2 3 4 5 6 7 8 9 10 11 12 13 14 15 16 17 18 19 20 |
apiVersion: v1 clusters: - cluster: certificate-authority-data: REDACTED server: https://k8scluster-k8sresourcegroup-adb4a4-d282a31c.hcp.eastus.azmk8s.io:443 name: k8sCluster contexts: - context: cluster: k8sCluster user: clusterUser_k8sResourceGroup_k8sCluster name: k8sCluster current-context: k8sCluster kind: Config preferences: {} users: - name: clusterUser_k8sResourceGroup_k8sCluster user: client-certificate-data: REDACTED client-key-data: REDACTED token: aa16af4290c8b372d6b8812222dedd69 |
From this output you need to determine your cluster name (which you probably already know) as well as the name of the user. These details are fed in to the following command for creating a new context for an environment (in this case the DAT environment):
|
|
kubectl config set-context dat --namespace=dat --cluster=k8sCluster --user=clusterUser_k8sResourceGroup_k8sCluster |
To switch to working to this context (and hence the dat namespace) use:
|
|
kubectl config use-context dat |
To confirm (or check) the current context use:
|
|
kubectl config current-context |
To get back to the default namespace use:
|
|
kubectl config use-context <name-of-cluster> |
Normally that would be most of what you need to know to work with namespaces, however as of the time of writing there is a bug in the VSTS Deploy to Kubernetes task which requires some extra work. The bug may be fixed by the time you read this however it's handy to examine the issue to further understand what is going on behind the scenes.
Each namespace needs to access the Azure Container Registry (ACR) we created in the previous post to pull down images. This is a private registry so we don't want open access and so some form of authentication is required. This is provided by the creation of a Kubernetes secret that holds the authentication details to the ACR. The VSTS Deploy to Kubernetes task can create this secret for us however the bug is that it only creates the secret for the default namespace and fails to create the secret when a different namespace is specified. The workaround is to create the secret manually in each namespace using the following command:
|
|
kubectl create secret docker-registry <secret-name> --namespace=<namespace> --docker-server=<acr-name>.azurecr.io --docker-username=<acr-name> --docker-password=<acr-admin-password> --docker-email=<any-valid-email-address> |
In the above command secret-name is any arbitrary name you choose for the secret, namespace is the namespace in which to create the secret, acr-name is the name of your ACR, acr-admin-password is the password from the Access keys panel of your ACR and any-valid-email-address is just that. You'll need to run this command for each namespace of course. One final thing: you'll need to make sure that in the codebase the imagePullSecrets name in deployment.yaml matches the name of the secret you just created.
Amend the VSTS Pipeline to Support Multiple Environments
In this section we amend the release pipeline that was built in the previous post to support multiple environments.
- In the Pipeline tab rename Environment 1 to DAT:

- In the Variables tab create a variable to hold the name of the secret created above to authenticate with ACR. Create a second variable for the DAT environment namespace and change its scope to DAT. Remember that the value needs to be lower case:

- In the Tasks tab amend all three Deploy to Kubernetes tasks so that the Namespace field contains the $(DatEnvironment) variable. At the same time ensure that Secret name field matches the name of the secret variable created above:

- In order to test that deploying to DAT works, either trigger a build or, if you updated deployment.yaml above on your workstation commit your code. If the deployment was successful find the external IP address of the LoadBalancer by executing kubectl get services --namespace=dat and paste in to a browser to confirm that the ASP.NET Core website is running.
Amend the VSTS Pipeline to Support a New Environment
Now for the fun bit where we see just how easy it is to configure a new, network-isolated environment.
- In the Pipeline tab use the arrow next to Environments > Add to show and then select Clone environment:

- Rename the cloned environment to PRD. Create a new variable (ie PrdEnvironment) scoped to PRD to hold the prd namespace and amend each of the three Deploy to Kubernetes tasks so that the Namespace field contains the $(PrdEnvironment) variable.
- Trigger a build and check the deployment was successful by executing kubectl get services --namespace=prd to get the external IP address of the LoadBalancer which you can paste in to a browser to confirm that the ASP.NET Core website is running.
And That's It!
Yep—that really is all there is to it! Okay, this is just a trivial example, however even with more services the procedure would be the same. Granted, in a more complex application there might be some environment variables or secrets that might change but even so, it's just configuration.
I'm thrilled by the power that Kubernetes gives to developers—no more thinking about VMs or tin, no more having to append resources with environment names, and the ability to create a new environment in the blink of an eye—wow!
There's lots more I'm planning to cover in the deployment pipeline space however next time I'll be looking at the development inner loop and the options for running Kubernetes whilst developing code.
Cheers—Graham
Deploy a Dockerized ASP.NET Core Application to Kubernetes on Azure Using a VSTS CI/CD Pipeline: Part 1
Over the past 18 months or so I've written a handful of blog posts about deploying Docker containers using Visual Studio Team Services (VSTS). The first post covered deploying a container to a Linux VM running Docker and other posts covered deploying containers to a cluster running DC/OS—all running in Microsoft Azure. Fast forward to today and everything looks completely different from when I wrote that first post: Docker is much more mature with features such as multi-stage builds dramatically streamlining the process of building source code and packaging it in to containers, and Kubernetes has emerged as a clear leader in the container orchestration battle and looks set to be a game-changing technology. (If you are new to Kubernetes I have a Getting Started blog post here with plenty of useful learning resources and tips for getting started.)
One of the key questions that's been on my mind recently is how to use Kubernetes as part of a CI/CD pipeline, specifically using VSTS to deploy to Microsoft's Azure Container Service (AKS), which is now specifically targeted at managing hosted Kubernetes environments. So in a new series of posts I'm going to be examining that very question, with each post building on previous posts as I drill deeper in to the details. In this post I'm starting as simply as I possibly can whilst still answering the key question of how to use VSTS to deploy to Kubernetes. Consequently I'm ignoring the Kubernetes experience on the development workstation, I only deploy a very simple application to one environment and I'm not looking at scaling or rolling updates. All this will come later, but meantime I hope you'll find that this walkthrough will whet your appetite for learning more about CI/CD and Kubernetes.
Development Workstation Configuration
These are the main tools you'll need on a Windows 10 Pro development workstation (I've documented the versions of certain tools at the time of writing but in general I'm always on the latest version):
- Visual Studio 2017—version 15.5.6 with the ASP.NET and web development workload.
- Docker for Windows—stable channel 17.12.0-ce.
- Windows Subsystem for Linux (WSL)—see here for installation details. I'm still using Bash on Ubuntu on Windows that I installed before WSL moved to the Microsoft Store and in this post I assume you are using Ubuntu. The aim of installing WSL is to run Azure CLI, although technically you don't need WSL as Azure CLI will run happily under a Windows command prompt. However using WSL facilitates running Azure CLI commands from a Bash script.
- Azure CLI on Windows Subsystem for Linux—see here for installation (and subsequent upgrade) instructions. There are several ways to login to Azure from the CLI however I've found that the interactive log-in works well since once you're logged-in you remain so for quite a long time (many days for me so far). Use az -v to check which version you are on (2.0.27 was latest at time of writing).
- kubectl on Azure CLI—the kubectl CLI is used to interact with a Kubernetes cluster. Install using sudo az aks install-cli.
Create Services in Microsoft Azure
There are several services you will need to set up in Microsoft Azure:
- Azure Container Registry—see here for an overview and links to the various methods for creating an ACR. I use the Standard SKU for the better performance and increased storage.
- Azure Container Service (AKS) cluster—see here for more details about AKS and how to create a cluster, however you may find it easier to use my script below. I started off by creating a cluster and then destroying it after each use until I did some tests and found that a one-node cluster was costing pennies per day rather than the pounds per day I had assumed it would cost and now I just keep the cluster running.
- From a WSL Bash prompt run nano create_k8s_cluster.sh to bring up the nano editor with a new empty file. Copy and paste (by pressing right mouse key) the following script:
1 2 3 4 5 6 7 8 9 10 11 12 13 14 15 16 17 18 19 20 21 |
#!/bin/bash azureSubscriptionId="xxx1x111-1x1x-1111-xx1x-x1x1111111" resourceGroup="k8sResourceGroup" clusterName="k8sCluster" location="eastus" # Useful if you have more than one Aure subscription az account set --subscription $azureSubscriptionId # Resource group for cluster - only availble in certain regions at time of writing az group create --location $location --name $resourceGroup # Create actual cluster az aks create --resource-group $resourceGroup --name $clusterName --node-count 1 --generate-ssh-keys # Creates a config file at ~/.kube on local machine to tell kubectl which cluster it should work with az aks get-credentials --resource-group $resourceGroup --name $clusterName # Copies config file to a location easily accessible by Notepad cp ~/.kube/config /mnt/c/Users/Public |
- Change the variables to your suit your requirements. If you only have one Azure subscription you can delete the lines that set a particular subscription as the default, otherwise use az account list to list your subscriptions to find the ID.
- Exit out of nano making sure you save the changes (Ctrl +X, Y) and then apply permissions to make it executable by running chmod 700 create_k8s_cluster.sh.
- Next run the script using ./create_k8s_cluster.sh.
- One the cluster is fully up-and-running you can show the Kubernetes dashboard using az aks browse --resource-group $resourceGroup --name $clusterName.
- You can also start to use the kubectl CLI to explore the cluster. Start with kubectl get nodes and then have a look at this cheat sheet for more commands to run.
- The cluster will probably be running an older version of Kubernetes—you can check and find the procedure for upgrading here.
- Private VSTS Agent on Linux—you can use the hosted agent (called Hosted Linux Preview at time of writing) but I find it runs very slowly and additionally because a new agent is used every time you perform a build it has to pull docker images down each time which adds to the slowness. In a future post I'll cover running a VSTS agent from a Docker image running on the Kubernetes cluster but for now you can create a private Linux agent running on a VM using these instructions. Although they date back to October 2016 they still work fine (I've checked them and tweaked them slightly).
- Since we will only need this agent to build using Docker you can skip steps 5b, 5c and 5d.
- Install a newer version of Git—I used these instructions.
- Install docker-compose using these instructions and choosing the Linux tab.
- Make the docker-user a member of the docker group by executing usermod -aG docker ${USER}.
Create VSTS Endpoints
In order to talk to the various Azure services you will need to create the following endpoints in VSTS (from the cog icon on the toolbar choose Services > New Service Endpoint):
- Azure Resource Manager—to point to your MSDN subscription. You'll need to authenticate as part of the process.

- Kubernetes Service Connection—to point to your Kubernetes cluster. You'll need the FQDN to the cluster (prepended with https://) which you can get from the Azure CLI by executing az aks show --resource-group $resourceGroup --name $clusterName, passing in your own resource group and cluster names. You'll also need the contents of the kubeconfig file. If you used the script above to create the cluster then the script copied the config file to C:\Users\Public and you can use Notepad to copy the contents.

Configure a CI Build
The first step to deploying containers to a Kubernetes cluster is to configure a CI build that creates a container and then pushes the container to a Docker registry—Azure Container Registry in this case.
Create a Sample App
- Within an existing Team Project create a new Git repository (Code > $current repository$ > New repository) called k8s-aspnetcore. Feel free to select the options to add a README and a VisualStudio .gitignore.
- Clone this repo on your development workstation:
- Open PowerShell at the desired root folder.
- Copy the URL from the VSTS code view of the new repository.

- At the PowerShell prompt execute git clone along with the pasted URL.
- Make sure Docker for Windows is running.
- In Visual Studio create an ASP.NET Core Web Application in the folder the git clone command created.

- Choose an MVC app and enable Docker support for Linux.

- You should now be able to run your application using the green Docker run button on the Standard toolbar. What is interesting here is that the build process is using a multi-stage Dockerfile, ie the tooling to build the application is running from a Docker container. See Steve Lasker's post here for more details.
- In the root of the repository folder create a folder named k8s-config, which we'll use later to store Kubernetes configuration files. In Visual Studio create a New Solution Folder with the same name and back in the file system folder create empty files named service.yaml and deployment.yaml. In Visual Studio add these files as existing items to the newly created solution folder.
- The final step here is to commit the code and sync it with VSTS.
Create a VSTS Build
- In VSTS create a new build based on the repository created above and start with an empty process.
- After the wizard stage of the setup supply an appropriate name for the build and select the Agent queue created above if you are using the recommended private agent or Hosted Linux Preview if not.

- Go ahead and perform a Save & queue to make sure this initial configuration succeeds.
- In the Phase 1 panel use + to add two Docker Compose tasks and one Publish Build Artifacts task.

- If you want to be able to perform a Save & queue after configuring each task (recommended) then right-click the second and third tasks and disable them.
- Configure the first Docker Compose task as follows:
- Display name = Build service images
- Container Registry Type = Azure Container Registry
- Azure subscription = [name of Azure Resource Manager endpoint created above]
- Azure Container Registry = [name of Azure Container Registry created above]
- Docker Compose File = **/docker-compose.yml
- Project Name = $(Build.Repository.Name)
- Qualify Image Names = checked
- Action = Build service images
- Additional Image Tags = $(Build.BuildId)
- Include Latest Tag = checked
- Configure the second Docker Compose task as follows:
- Display name = Push service images
- Container Registry Type = Azure Container Registry
- Azure subscription = [name of Azure Resource Manager endpoint created above]
- Azure Container Registry = [name of Azure Container Registry created above]
- Docker Compose File = **/docker-compose.yml
- Project Name = $(Build.Repository.Name)
- Qualify Image Names = checked
- Action = Push service images
- Additional Image Tags = $(Build.BuildId)
- Include Latest Tag = checked
- Configure the Publish Build Artifacts task as follows:
- Display name = Publish k8s config
- Path to publish = k8s-config (this is the folder we created earlier in the repository root folder)
- Artifact name = k8s-config
- Artifact publish location = Visual Studio Team Services/TFS
- Finally, in the Triggers section of the build editor check Enable continuous integration so that the build will trigger on a commit from Visual Studio.
So what does this build do? The first Docker Compose task uses the docker-compose.yml file to work out what images need building as specified by Dockerfile file(s) for different services. We only have one service (k8s-aspnetcore) but there could (and usually would) be more. With the image built on the VSTS agent the second Docker Compose task pushes the image to the Azure Container Registry. If you navigate to this ACR in the Azure portal and drill in to the Repositories section you should see your image. The build also publishes the yaml configuration files needed to deploy to the cluster.
Configure a Release Pipeline
We are now ready to configure a release to deploy the image that's hosted in ACR to our Kubernetes cluster. Note that you'll need to complete all of this section before you can perform a release.
Create a VSTS Release Definition
- In VSTS create a new release definition, starting with an empty process and changing the name to k8s-aspnetcore.
- In the Artifacts panel click on Add artifact and wire-up the build we created above.
- With the build now added as an artifact click on the lightning bolt to enable the Continuous deployment trigger.
- In the default Environment 1 click on 1phase, 0 task and in the Agent phase click on + to create three Deploy to Kubernetes tasks.

- Configure the first Deploy to Kubernetes task as follows:
- Display name = Create Service
- Kubernetes Service Connection = [name of Kubernetes Service Connection endpoint created above]
- Command = apply
- Use Configuration files = checked
- Configuration File = $(System.DefaultWorkingDirectory)/k8s-aspnetcore/k8s-config/service.yaml
- Container Registry Type = Azure Container Registry
- Azure subscription = [name of Azure Resource Manager endpoint created above]
- Azure Container Registry = [name of Azure Container Registry created above]
- Secret name [any secret word of your choosing, to be used consistently across all tasks]
- Configure the second Deploy to Kubernetes task as follows:
- Display name = Create Deployment
- Kubernetes Service Connection = [name of Kubernetes Service Connection endpoint created above]
- Command = apply
- Use Configuration files = checked
- Configuration File = $(System.DefaultWorkingDirectory)/k8s-aspnetcore/k8s-config/deployment.yaml
- Container Registry Type = Azure Container Registry
- Azure subscription = [name of Azure Resource Manager endpoint created above]
- Azure Container Registry = [name of Azure Container Registry created above]
- Secret name [any secret word of your choosing, to be used consistently across all tasks]
- Configure the third Deploy to Kubernetes task as follows:
- Display name = Update with Latest Image
- Kubernetes Service Connection = [name of Kubernetes Service Connection endpoint created above]
- Command = set
- Arguments = image deployment/k8s-aspnetcore-deployment k8s-aspnetcore=$yourAcrNameHere$.azurecr.io/k8s-aspnetcore:$(Build.BuildId)
- Container Registry Type = Azure Container Registry
- Azure subscription = [name of Azure Resource Manager endpoint created above]
- Azure Container Registry = [name of Azure Container Registry created above]
- Secret name [any secret word of your choosing, to be used consistently across all tasks]
- Make sure you save the release but don't bother testing it out just yet as it won't work.
Create the Kubernetes configuration
- In Visual Studio paste the following code in to the service.yaml file created above.
|
|
apiVersion: v1 kind: Service metadata: name: k8s-aspnetcore-service labels: version: test spec: selector: app: k8s-aspnetcore ports: - port: 80 type: LoadBalancer |
- Paste the following code in to the deployment.yaml file created above. The code is for my ACR so you will need to amend accordingly.
1 2 3 4 5 6 7 8 9 10 11 12 13 14 15 16 17 18 19 20 21 22 23 24 |
apiVersion: extensions/v1beta1 kind: Deployment metadata: name: k8s-aspnetcore-deployment spec: replicas: 4 strategy: type: RollingUpdate rollingUpdate: maxSurge: 1 maxUnavailable: 1 minReadySeconds: 5 template: metadata: labels: app: k8s-aspnetcore spec: containers: - name: k8s-aspnetcore image: prmcr.azurecr.io/k8s-aspnetcore ports: - containerPort: 80 imagePullSecrets: - name: prmk8s |
- You can now commit these changes and then head over to VSTS to check that the release was successful.
- If the release was successful you should be able to see the ASP.NET Core website in your browser. You can find the IP address by executing kubectl get services from wherever you installed kubectl.

- Another command you might try running is kubectl describe deployment $nameOfYourDeployment, where $nameOfYourDeployment is the metadata > name in deployment.yaml. A quick tip here is that if you only have one deployment you only need to type the first letter of it.
- It's worth noting that splitting the service and deployment configurations in to separate files isn't necessarily a best practice however I'm doing it here to try and help clarify what's going on.
In terms of a very high level explanation of what we've just configured in the release pipeline, for a simple application such as an ASP.NET Core website we need to deploy two key objects:
- A Kubernetes Service which (in our case) is configured with an external IP address and acts as an abstraction layer for Pods which are killed off and recreated every time a new release is triggered. This is handled by the first Deploy to Kubernetes task.
- A Kubernetes Deployment which describes the nature of the deployment—number of Pods (via Replica Sets), how they will be upgraded and so on. This is handled by the second Deploy to Kubernetes task.
On first deployment these two objects are all that is needed to perform a release. However, because of the declarative nature of these objects they do nothing on subsequent release if they haven't changed. This is where the third Deploy to Kubernetes task comes in to play—ensuring that after the first release subsequent releases do cause the container to be updated.
Wrapping Up
That concludes our initial look at CI/CD with VSTS and Azure Container Service (AKS)! As I mentioned at the beginning of the post I've purposely tried to keep this walkthrough as simple as possible, so watch out for the next installment where I'll build on what I've covered here.
Cheers—Graham
Continuous Delivery with Containers – Say Goodbye to IIS Express and LocalDB, with Visual Studio 2017, Docker and Windows Containers
A view I've heard expressed a few times recently, and which I completely agree with, is that we need to be discovering problems with our applications as far to the left as possible since it's much cheaper to fix problems there than further down the line towards—or even in—production. So with this in mind is it just me who feels slightly uneasy that in the Visual Studio world the development and debugging of applications destined for Windows servers tends be on Windows desktop machines using lightweight counterparts of server applications such as IIS Express to host ASP.NET websites and LocalDB to host SQL Server databases? With this setup it seems like we could be storing up trouble for later in the pipeline...
Whether my unease is justified or not, I need feel troubled no more since the world of containers offer us a solution! Since Docker for Windows now supports Windows Containers and Visual Studio 2017 has support for Docker built-in we can now develop server applications on Windows 10 and run and debug them on the exact same operating systems they will run on in production.
In this post I take my version of Contoso University that I've been using for several years now and amend it so that in the developer inner loop phase (ie everything that happens before code is checked in to the build server) the website runs in a Windows Server 2016 container running IIS (rather than IIS Express) and the SQL Server Database Project runs on SQL Server 2016 (rather than LocalDB).
Development Environment
The world of containers is evolving rapidly and the tooling might have changed by the time you read this. At the time of writing my environment is as follows:
- Windows 10 Professional version 1703 (OS Build 15063.250)
- Visual Studio Enterprise 2017 version 15.1 (26403.7) with the ASP.NET and web development workload
- Docker for Windows 17.03.1-ce running Windows containers (I recommend the stable channel as at the time of writing the edge version had a bug that caused a problem for Docker support in Visual Studio)
Depending on the speed of your internet connection you might want to docker pull the following images if you are planning on following along:
It's perhaps worth saying here that I'm using these images for convenience because they are available on Docker Hub. In a production scenario you probably wouldn't want to rely on an image as fully formed as microsoft/aspnet and you would probably start with microsoft/windowsservercore or microsoft/nanoserver and have full control of what is installed. You definitely wouldn't start with microsoft/mssql-server-windows-developer of course.
The Contoso University sample application is essentially the same as Microsoft's version except I've changed the database from Entity Framework Code First to a SQL Server Database Project. I've also changed the application to work with SQL Server authentication (rather than Windows authentication) thus removing the need for a domain controller to supply a domain account. You can get the starting point code from here and the final code here.
Adding Initial Docker Support
The first step towards Dockerizing Contoso University is to add initial Docker support for the ASP.NET web application (out-of-the-box support for SQL Server Database Projects isn't available). This is a simple as right-clicking the ContosoUniversity.Web project and choosing Add > Docker Support. This has three main visible effects:
- A new docker-compose ‘project' is added at Solution level and is made the Startup Project. This project contains several .yml files.
- A Dockerfile file and a (nested) .dockerignore file are added to ContosoUniversity.Web.
- The toolbar button that normally launches a browser has now switched to launching Docker:

The Dockerfile added to ContosoUniversity.Web is based on the microsoft/aspnet image so at this point you should now be able to run the application using the Docker toolbar button and have the website run in a Windows Container based on that image. The database side of things isn't working at this stage of course—Web.config is pointing to LocalDB and the container running the website can't see LocalDB.
To understand what has been created, open a PowerShell session and run docker images followed by docker ps. You should see that an image called contosouniversity.web has been created with a dev tag, and that this image has been used to create a container called something like dockercompose362878786_contosouniversity.web_1.
Adding Docker Support for the SQL Server Database Project
Adding Docker support for the SQL Server Database Project requires the following steps:
- Manually add a Dockerfile file and .dockerignore file to the root of ContosoUniversity.Database. Given that these files don't have file extensions and that database projects are quite prescriptive about what they think you should be adding it's easier to add them outside of Visual Studio and then add them in as existing items. (Note that if you are using Windows Explorer you'll need to create .dockerignore as .dockerignore.—Windows will drop the trailing period).
- Optionally, close Visual Studio and reopen the solution folder in a text editor such as Visual Studio Code. Open ContosoUniversity.Database.sqlproj and search for the Dockerfile and .dockerignore entries. Change them to look as follows to achieve the nested file effect in Visual Studio:
|
|
<None Include="Dockerfile" /> <None Include=".dockerignore"> <DependentUpon>Dockerfile</DependentUpon> </None> |
- .dockerignore just needs to contain an asterisk—meaning everything should be ignored.
- Dockerfile should contain the following code:
|
|
# escape=` FROM microsoft/mssql-server-windows-developer SHELL ["powershell", "-Command", "$ErrorActionPreference = 'Stop';"] EXPOSE 1433 VOLUME c:\database ENV sa_password Very$trOngPa$$word! ENV ACCEPT_EULA=Y |
- Switching to the docker-compose ‘project', docker-compose.yml should be amended to the following:
|
|
version: '2.1' services: contosouniversity.database: image: contosouniversity.database build: .\ContosoUniversity.Database contosouniversity.web: image: contosouniversity.web build: .\ContosoUniversity.Web depends_on: - contosouniversity.database |
- A change is also needed to docker-compose.vs.debug.yml which should be amended to the following:
1 2 3 4 5 6 7 8 9 10 11 12 13 14 15 16 17 18 |
version: '2.1' services: contosouniversity.web: image: contosouniversity.web:dev build: args: source: ${DOCKER_BUILD_SOURCE} volumes: - .\ContosoUniversity.Web:C:\inetpub\wwwroot - ~\msvsmon:C:\msvsmon:ro labels: - "com.microsoft.visualstudio.targetoperatingsystem=windows" contosouniversity.database: image: contosouniversity.database:dev labels: - "com.microsoft.visualstudio.targetoperatingsystem=windows" |
At this point you should be able to run the application using the Docker toolbar button and again see the website running—in a Windows container. However this time a second image (contosouniversity.database, tagged with dev) and corresponding container (named something like dockercompose362878786_contosouniversity.database_1) will have been created, with the container now running SQL Server. This is a newly minted instance of SQL Server and doesn't have a database for our website to connect to, which is the next issue to address.
Connecting the Contoso University Website to its Database
These next steps assume you are following on from the previous section, ie that the website is open in a browser and that Visual Studio is still debugging.
- Leave the browser open but stop debugging in Visual Studio.
- In ContosoUniversity.Web edit Web.config so that the connection string Data Source points to contosouniversity.database:
|
|
<connectionStrings> <add name="SchoolContext" connectionString="Data Source=contosouniversity.database;Initial Catalog=ContosoUniversity;User Id=ContosoUniversity;Password=MySuperStrongPassw0rd!" providerName="System.Data.SqlClient" /> </connectionStrings> |
- In a PowerShell session, find the IP address of the container running SQL Server using docker inspect and passing in enough of the container's ID to make it unique:
|
|
docker inspect --format="{{.NetworkSettings.Networks.nat.IPAddress}}" <container ID> |
- In ContosoUniversity.Database edit ContosoUniversity.publish.xml so that the Target database connection points to the IP address of the SQL Server container and change the the authentication to SQL Server Authentication. The User Name should be sa (yes—I know) the password should be the same as the one specified in the Dockerfile used to build the database image. Save the profile and then click Publish.
- Back in the web browser running the Contoso University website, click on one of the menu bar links (eg Departments) that causes a database query. If everything has worked you should now have a fully functioning application.
Understanding the Developer Inner Loop Workflow
At this point we have achieved our aim of running and debugging both the website and database components of Contoso University in containers running operating systems that are the same as would be used in production. Once the images and containers have been created they will—as far as my testing is concerned—continue to be used as long as nothing changes. This is the case even if Visual Studio, Docker or even the workstation are restarted. The great thing is that any changes made to the containers—for example updating the database schema—will be preserved. Of course, if something changes in one of the Dockerfile files the images and containers will be rebuilt and in the case of the database the publish file will need to be updated with a new IP address and the database will need to be published again from scratch. Also, if the solution is cleaned (ie Build > Clean Solution) the containers are removed and rebuilt, again necessitating publishing the database from scratch. Overall though, the developer inner loop workflow feels quite slick.
Next Steps
As things stand the compose and Dockerfile files are not ready to be used in a continuous delivery pipeline. The website Dockerfile for example has Contoso University being deployed as the Default Web Site rather than a ContosoUniversity website and the database Dockerfile doesn't cater for any persistent storage. There is also the problem of checking in the database project's publish profile with an IP address specific to one developer's workstation—a real pain for other developers. I'll address these issues as part of getting Contoso University working in a Docker-based continuous delivery pipeline in the next post in this series.
Cheers -- Graham
Continuous Delivery with Containers – Azure CLI Command for Creating a Docker Release Pipeline with VSTS Part 2
In my previous post I described my experience of working through Microsoft's Continuous Integration and Deployment of Multi-Container Docker Applications to Azure Container Service tutorial which is a walkthrough of how to use an Azure CLI 2.0 command to create a VSTS deployment pipeline to push Docker images to an Azure Container Registry and then deploy and run them on an Azure Container Service running a DC/OS cluster. Whilst it's great to be able to issue some commands and have stuff magically appear it's unlikely that you would use this approach to create production-grade infrastructure: having precise control over naming things is one good reason. Another problem with commands that create infrastructure is that you don't always get a good sense of what they are up to, and that's what I found with the az container release create command.
So I spent quite a bit of time ‘reverse engineering' az container release create in order to understand what it's doing and in this post I describe, step-by-step, how to build what the command creates. In doing so I gained first-hand experience of what I think will be an import pattern for the future -- running VSTS agents in a container. If your infrastructure is in place it's quick and easy to set up and if you want more agents it takes just seconds to scale to as many as you need. In fact, once I had figured what was going on I found that working with Azure Container Service and DC/OS was pretty straightforward and even a great deal of fun. Perhaps it's just me but I found being able to create 50 VSTS agents at the ‘flick of a switch' put a big smile on my face. Read on to find out just how awesome all this is...
Getting Started
If you haven't already worked through Microsoft's tutorial and my previous post I strongly recommend those as a starting point so you understand the big picture. Either way, you'll need to have the Azure CLI 2.0 installed and also to have forked the sample code to your own GitHub account and renamed it to something shorter (I used TwoSampleApp). My previous post has all the details. If you already have the Azure CLI installed do make sure you've updated it (pip install azure-cli --upgrade) since version 2.0 was recently officially released.
Creating the Azure Infrastructure
You'll need to create the following infrastructure in Azure:
- A dedicated resource group (not strictly necessary but helps considerably with cleaning up the 30+ resources that get created).
- An Azure container registry.
- An Azure container service configured with a DC/OS cluster.
The Azure CLI 2.0 commands to create all this are as follows:
|
|
az group create --name TwoServiceAppRg --location westeurope az acr create --name TwoServiceAppAcr --resource-group TwoServiceAppRg --location westeurope --admin-enabled true az acs create --name TwoServiceAppAcs --resource-group TwoServiceAppRg --dns-prefix twoserviceappacs --generate-ssh-keys |
The az acs create command in particular is doing a huge amount of work behind the scenes, and if configuring a container service for a production environment you'd most likely want greater control over the names of all the resources that are created. I'm not worried about that here and the output of these commands is fine for my research purposes. If you do want to delve further you can examine the automation script for the top level resources these commands create.
Configuring VSTS
Over in your VSTS account you'll need to attend to the following items:
- Create a new team project (I called mine TwoServiceApp) configured for Git. (A new project isn't strictly necessary but it helps when cleaning up.)
- Create an Agent Pool called TwoServiceApp. You can get to the page that manages agent pools from the agent queues tab of your team project:

- Create a service endpoint of type Github that grants VSTS access to your GitHub account. The procedure is detailed here -- I used the personal access token method and called the connection TwoServiceAppGh.
- Create a service endpoint of type Docker Registry that grants access to the Azure container registry created above. I describe the process in this blog post and called the endpoint TwoServiceAppAcr.
- Create a personal access token (granting permission to all scopes) and store the value for later use.
- Ensure the Docker Integration extension is installed from the Marketplace.
Create a VSTS Agent
This is where the fun begins because we're going to create a VSTS agent in DC/OS using a Docker container. Yep -- you read that right! If you've only ever created an agent on ‘bare metal' servers then you need to forget everything you know and prepare for awesomeness. Not least because if you suddenly feel that you want a dozen agents a quick configuration setting will have them created for you in a flash!
The first step is to configure your workstation to connect to the DC/OS cluster running in your Azure container service. There are several ways to do this but I followed these instructions (Connect to a DC/OS or Swarm cluster > Create an SSH tunnel on Windows) to configure PuTTY to create an SSH tunnel. The host name will be something like azureuser@twoserviceappacsmgmt.westeurope.cloudapp.azure.com (you can get the master FQDN from the overview blade of your Azure container service and the default login name used by az acr create is azureuser) and you will need to have created a private key in .ppk format using PuTTYGen. Once you have successfully connected (you actually SSH to a DC/OS master VM) you should be able to browse to these URLs:
- DC/OS -- http://localhost
- Marathon -- http://localhost/marathon
- Mesos -- http://localhost/mesos
If you followed the Microsoft tutorial then much of what you see will be familiar, although there will be nothing configured of course. To create the application that will run the agent you'll need to be in Marathon:

Clicking Create Application will display the configuration interface:

Whilst it is possible to work through all of the pages and enter in the required information, a faster way is to toggle to JSON Mode and paste in the following script (overwriting what's there):
1 2 3 4 5 6 7 8 9 10 11 12 13 14 15 16 17 18 19 20 21 22 23 24 25 26 27 28 29 30 31 32 33 34 35 36 37 38 39 40 41 42 43 44 45 46 47 48 49 50 51 52 53 54 55 56 57 58 59 60 61 |
{ "id": "/vsts-agents/yourVSTSaccountname", "cmd": null, "cpus": 0.01, "mem": 256, "disk": 0, "instances": 1, "acceptedResourceRoles": [ "slave_public" ], "container": { "type": "DOCKER", "volumes": [ { "containerPath": "/var/run/docker.sock", "hostPath": "/var/run/docker.sock", "mode": "RO" }, { "containerPath": "/var/vsts", "hostPath": "/var/vsts", "mode": "RW" } ], "docker": { "image": "microsoft/vsts-agent:ubuntu-16.04-docker-1.11.2", "network": "HOST", "portMappings": null, "privileged": false, "parameters": [], "forcePullImage": true } }, "env": { "VSTS_WORK": "/var/vsts/$VSTS_AGENT", "VSTS_POOL": "twoserviceapp", "VSTS_TOKEN": "xyzb6xyzivm6go75xyz4adpumxycx7uyf3xyzcnxyz73cnnj65bb", "VSTS_ACCOUNT": "yourVSTSaccountname", "VSTS_AGENT": "${MESOS_TASK_ID:12:-28}" }, "healthChecks": [ { "protocol": "COMMAND", "command": { "value": "grep ': Listening for Jobs$' /vsts/agent/_diag/*.log" }, "gracePeriodSeconds": 300, "intervalSeconds": 5, "timeoutSeconds": 20, "maxConsecutiveFailures": 3, "ignoreHttp1xx": false } ], "portDefinitions": [ { "port": 10000, "protocol": "tcp", "labels": {} } ] } |
You will need to amend some of the settings for your environment:
- id -- choose an appropriate name for the application (note that /vsts-agents/ creates a folder for the application).
- VSTS_POOL -- the name of the agent pool created above.
- VSTS_TOKEN -- the personal access token created above.
- VSTS_ACCOUNT -- the name of your VSTS account (ie if the URL is https://myvstsaccount.visualstudio.com then use myvstsaccount).
It will only take a few seconds to create the application after which you should see something that looks like this:

For fun, click on the Scale Application button and enter a number of instances to scale to. I scaled to 50 and it literally took just a few seconds to configure them all. This resulted in this which is pretty awesome in my book for just a few seconds work:

Scaling down again is even quicker -- pretty much instant in Marathon and VSTS was very quick to get back to displaying just one agent. With the fun over, what have we actually built here?
The concept is that rather than configure an agent by hand in the traditional way, we are making use of one of the Docker images Microsoft has created specifically to contain the agent and build tools. You can examine all the different images from this page on Docker Hub. Looking at the Marathon configuration code above in the context of the instructions for using the VSTS agent images it's hopefully clear that the configuration is partially around hosting the image and creating the container and partially around passing variables in to the container to configure the agent to talk to your VSTS account and a specific agent pool.
Create a Build Definition
We're now at a point where we can switch back to VSTS and create a build definition in our team project. Most of the tasks are of the Docker Compose type and you can get further details here. Start with an empty process and name the definition TwoServiceApp. On the Options tab set the Default agent queue to be TwoServiceApp. On the tasks tab in Get sources configure the build to point to your GitHub account:

Now add and configure the following tasks (only values that need adding or amending, or which need a special mention are listed):
Task #1 -- Docker Compose
- Display name = Build repository
- Docker Registry Connection = TwoServiceAppAcr (or the name of the Docker Registry endpoint created above if different)
- Docker Compose File = **/docker-compose.ci.build.yml
- Action = Run a specific service image
- Service name = ci-build
Save the definition and queue a build. The source code will be pulled down and then the instructions in the ci-build node of docker-compose.ci.build.yml will be executed which will cause service-b to be built.
Task #2 -- Docker Compose
- Display name = Build service images
- Docker Registry Connection = TwoServiceAppAcr (or the name of the Docker Registry endpoint created above if different)
- Docker Compose File = **/docker-compose.yml
- Qualify Image Names = checked
- Action = Build service images
- Additional Image Tags = $(Build.BuildId) $(Build.SourceBranchName) $(Build.SourceVersion) (on separate lines)
- Include Source Tags = checked
- Include Latest Tag = checked
Save the definition and queue a build. The addition of this task causes causes Docker images to be created in the agent container for service-a and service-b.
Task #3 -- Docker Compose
- Display name = Push service images
- Docker Registry Connection = TwoServiceAppAcr (or the name of the Docker Registry endpoint created above if different)
- Docker Compose File = **/docker-compose.yml
- Qualify Image Names = checked
- Action = Push service images
- Additional Image Tags = $(Build.BuildId) $(Build.SourceBranchName) $(Build.SourceVersion) (on separate lines)
- Include Source Tags = checked
- Include Latest Tag = checked
Save the definition and queue a build. The addition of this task causes causes the Docker images to be pushed to the Azure container registry.
Task #4 -- Docker Compose
- Display name = Write service image digests
- Docker Registry Connection = TwoServiceAppAcr (or the name of the Docker Registry endpoint created above if different)
- Docker Compose File = **/docker-compose.yml
- Qualify Image Names = checked
- Action = Write service image digests
- Image Digest Compose File = $(Build.StagingDirectory)/docker-compose.images.yml
Save the definition and queue a build. The addition of this task creates immutable identifiers for the previously built images which provide a guaranteed way of referring back to a specific image in the container registry. The identifiers are stored in a file called docker-compose.images.yml, the contents of which will look something like:
|
|
version: '2.0' services: mycache: image: 'redis@sha256:9cd405cd1ec1410eaab064a1383d0d8854d1eef74a54e1e4a92fb4ec7bdc3ee7' service-a: image: 'twoserviceacr-on.azurecr.io/grahamdsmithtwoserviceapp_service-a@sha256:ded7456a9b607bcacd3d7ea372b13d6fb21acdf3db5e784330f214621cbfea0e' service-b: image: 'twoserviceacr-on.azurecr.io/grahamdsmithtwoserviceapp_service-b@sha256:6e84d47d806a9aded55509e5856c8724d218a90ddba79836027e36a963be301c' |
Task #5 -- Docker Compose
- Display name = Combine configuration
- Docker Registry Connection = TwoServiceAppAcr (or the name of the Docker Registry endpoint created above if different)
- Docker Compose File = **/docker-compose.yml
- Additional Docker Compose Files = $(Build.StagingDirectory)/docker-compose.images.yml
- Qualify Image Names = checked
- Action = Combine configuration
- Remove Build Options = checked
Save the definition and queue a build. The addition of this task creates a new docker-compose.yml that is a composite of the original docker-compose.yml and docker-compose.images.yml. The contents will look something like:
1 2 3 4 5 6 7 8 9 10 11 12 13 14 15 16 17 18 19 20 21 22 23 |
networks: {} services: mycache: expose: - '6379' image: 'redis@sha256:9cd405cd1ec1410eaab064a1383d0d8854d1eef74a54e1e4a92fb4ec7bdc3ee7' service-a: depends_on: - mycache - service-b image: 'twoserviceacr-on.azurecr.io/grahamdsmithtwoserviceapp_service-a@sha256:ded7456a9b607bcacd3d7ea372b13d6fb21acdf3db5e784330f214621cbfea0e' labels: com.microsoft.acs.dcos.marathon.healthcheck.path: / ports: - '8080:80' service-b: expose: - '80' image: 'twoserviceacr-on.azurecr.io/grahamdsmithtwoserviceapp_service-b@sha256:6e84d47d806a9aded55509e5856c8724d218a90ddba79836027e36a963be301c' labels: com.microsoft.acs.dcos.marathon.healthcheck.path: / version: '2.0' volumes: {} |
This is the file that is used by the release definition to deploy the services to DC/OS.
Task #6 -- Copy Files
- Display name = Copy Files to: $(Build.StagingDirectory)
- Contents = **/docker-compose.env.*.yml
- Target Folder = $(Build.StagingDirectory)
Save the definition but don't bother queuing a build since as things stand this task doesn't have any files to copy over. Instead, the task comes in to play when using environment files (see later).
Task #7 -- Publish Build Artifacts
- Display name = Publish Artifact: docker-compose
- Path to Publish = $(Build.StagingDirectory)
- Artifact Name = docker-compose
- Artifact Type = Server
Save the definition and queue a build. The addition of this task creates the build artefact containing the contents of the staging directory, which happen to be docker-compose.yml and docker-compose.images.yml, although only docker-compose.yml is needed. The artifact can be downloaded of course so you can examine the contents of the two files for yourself.
Create a Release Definition
Create a new empty release definition and configure the Source to point to the TwoServiceApp build definition, the Queue to point to the TwoServiceApp agent queue and check the Continuous deployment option:

With the definition created, edit the name to TwoServiceApp, rename the default environment to Dev and rename the default phase to AcsDeployPhase:

Add Docker Deploy task to the AcsDeployPhase and configure as follows (only values that need changing are listed):
- Display Name = Deploy to ACS DC/OS
- Docker Registry Connection = TwoServiceAppAcr (or the name of the Docker Registry endpoint created above if different)
- Target Type = Azure Container Service (DC/OS)
- Docker Compose File = **/docker-compose.yml
- ACS DC/OS Connection Type = Direct
The final result should be as follows:

Trigger a release and then switch over to DC/OS (ie at http://localhost) and the Services page. Drill down through the Dev folder and the three services defined in docker-compose.yml should now be deployed and running:

To complete the exercise the Dev environment can now be cloned (click the ellipsis in the Dev environment to show the menu) to create Test and Production environments with manual approvals. If you want to view the sample application in action follow the View the application instructions in the Microsoft tutorial.
At this point there is no public endpoint for the production instance of TwoServiceApp. To remedy that follow the Expose public endpoint for production instructions in the Microsoft tutorial. Additionally, you will need to amend the production version of the Docker Deploy task so the Additional Docker Compose Files section contains docker-compose.env.production.yml.
Final Thoughts
Between Microsoft's tutorial and my two posts relating to it you have seen a glimpse of the powerful tools that are available for hosting and orchestrating containers. Yes, this has all been using Linux containers but indications are that similar functionality -- if perhaps not using exactly the same tools -- is on the way for Windows containers. Stay tuned!
Cheers -- Graham
Continuous Delivery with Containers – Azure CLI Command for Creating a Docker Release Pipeline with VSTS Part 1
One of the aims of my blog series on Continuous Delivery with Containers is to try and understand how best to use Visual Studio Team Services with Docker, so I was very interested to learn that Azure CLI 2.0 has a command to create a VSTS deployment pipeline to push Docker images to an Azure Container Registry and then deploy and run them on an Azure Container Service running a DC/OS cluster. Even better, Microsoft have written a tutorial (Continuous Integration and Deployment of Multi-Container Docker Applications to Azure Container Service) on how to use this command.
Whilst I'm somewhat sceptical about using generic scaffolding tooling to create production-ready workloads (I find that the naming conventions used are usually unsuitable for example) there is no doubt that they are great for quickly building proof of concepts and also for learning (what are hopefully!) best practices. It was with this aim that, armed with a large cup of tea, I sat down one afternoon to plough my way through the tutorial. It was a great learning experience, however I went down some blind alleys to get the pipeline working and then ended up doing quite a lot of head scratching (due to my ignorance I hasten to add) to fully understand what had been created.
So in this post I'm writing-up my experience of working through the tutorial with notes that I hope will help anyone else using it. In a follow-up post I'll attempt to document what the az container release create command actually creates and configures. Just a reminder that with this tutorial we're still very much in the Linux container world. Whilst this might be frustrating for those eager to see advanced tutorials based on Windows containers the learning focus here is mostly Docker and VSTS so the fact that the containers are running Linux shouldn't put you off.
On a final note before we get started, I'm using a Windows 10 Professional workstation with the beta version (1.13.0 at the time of writing) of Docker for Windows installed and running.
Getting Started with the Azure CLI
The tutorial requires version 2.0 of Azure CLI which is based on Python. The Azure CLI installation documentation suggests running Azure CLI in Docker but don't go down that path as it's a dead end as far as the tutorial is concerned. Instead follow these installation steps:
- Install the latest version of Python from here.
- From a command prompt upgrade pip (package management system for Python) using the python -m pip install --upgrade pip command.
- Install Azure CLI 2.0 using pip install azure-cli. (If you have previously installed Azure CLI 2.0 you should check for an upgrade using pip install azure-cli --upgrade.)
- Check Azure CLI is working using the az command. You should see this:

The next step is to actually log in to the Azure CLI. The process is as follows:
- At a command prompt type az login.
- Navigate to https://aka.ms/devicelogin in a browser.
- Supply the one-time authentication code supplied by the az login command.
- Complete the authentication process using your Azure credentials.
If you have multiple subscriptions you may need to set the default subscription:
- At the command prompt type az account list to show details of all your accounts.
- Each account has an isDefault property which will tell you the default account.
- If you need to make a change use az account set --subscription <Id> -- you can copy and paste the subscription Id from the accounts list.
Creating the Azure Container Service Cluster with DC/OS
This step is pretty straightforward and the tutorial doesn't need any further explanation. My commands to create the resource group and the ACS cluster were:
|
|
az group create --name TwoServiceAppRg --location westeurope az acs create --name TwoServiceAppAcs --resource-group TwoServiceAppRg --dns-prefix twoserviceappacs --generate-ssh-keys |
Be aware that the az acs create command results in a request to provision 18 cores. This might exceed your quota for a given region, even if you have previously contacted Microsoft Support to request an increase in the total number of cores allowed for your subscription (which you might have to do anyway if you have cores already provisioned). I found that choosing a region where I didn't have any cores provisioned fixed a quotaExceeded exception that I was getting.
For simplicity I used the --generate-ssh-keys option to save having to do this manually. This creates id_rsa and id_rsa.pub files (ie a private / public key pair) in C:\Users\<username>\.ssh.
A word of warning -- if you are using an Azure subscription with MSDN credits be aware that an ACS cluster will eat your credits at an alarming rate. As of the time of writing this post I've not found a reliable way of turning everything off and turning it back on again with everything fully working (specifically the build agent). Consequently I tend to delete the resource group and the VSTS project when I'm finished using them and then recreate them from scratch when I next need them. If you do this do be aware that if you have multiple Azure subscriptions the az account set --subscription <Id> command to set the default subscription can't be relied upon to be ‘sticky', and you can find yourself creating stuff in a different subscription by mistake.
Working with the Sample Code
The tutorial uses sample code that consists of an Angular.js-based web app (with a Node.js backend) that calls a separate .NET Core application, and these are deployed as two separate services. The problem I found was that the name of the GitHub repo (container-service-dotnet-continuous-integration-multi-container) is extremely long and is used to name some of the artefacts that get created by the Azure CLI container release command. This makes for some very unwieldy names which I found somewhat irksome. You can fix this as follows:
- Fork the sample code to your own GitHub account.
- Switch to the Settings tab:

- Use the Rename option to give the forked repo a more manageable name -- I chose TwoServiceApp.

- Clone the repo to your workstation in your preferred way -- for me this involved opening a command prompt at C:\Source\GitHub and running git clone https://github.com/GrahamDSmith/TwoServiceApp.git.
At this point it's probably a good idea to get the sample app working locally which will help with understanding how multi-container Docker deployments work. If you want to examine the source code then Visual Studio Code is an ideal tool for the job. To run the application the first step is to build the .NET Core component. At a command prompt at the root of the application run the following command:
|
|
docker-compose -f docker-compose.ci.build.yml run ci-build |
This runs docker-compose with a specific .yml file, and executes the instructions at the ci-build node. The really neat thing about this command is that it uses a Docker container to build the .NET Core app (service-b), which means your workstation doesn't need the .NET Core to be installed for this to work. Looking at the key parts of the docker-compose.ci.build.yml file:
- image: microsoft/dotnet:1.0.0-preview2.1-sdk -- this specifies that this particular Microsoft official Docker image for .NET Core on Linux should be used.
- volumes: -- ./service-b:/src -- this causes the local service-b folder on your workstation to be ‘mirrored' to a folder named src in the container that will be created from the microsoft/dotnet:1.0.0-preview2.1-sdk image.
- working_dir: /src -- set the working directory in the container to src.
- command: /bin/bash -c "dotnet restore && dotnet publish -c Release -o bin ." -- this is the command to build and publish service-b.
Because the service-b folder on your workstation is mirrored to the src folder in the running container the result of the build command is copied from the container to your workstation. Pretty nifty!
To actually run the application now run this command:
|
|
docker-compose up --build |
By convention docker-compose will look for a docker-compose.yml file so there is no need to specify it. On examining docker-compose.yml it should be pretty easy to see what's going on -- three services (service-a, service-b and mycache) are specified and service-a and service-b are built according to their respective Dockerfile instructions. Both service-a and service-b containers are set to listen on port 80 at runtime and in addition service-a is accessible to the host (ie your workstation) on port 8080. Consequently, you should be able to navigate to http://localhost:8080 in your browser and see the app running.
Creating the Deployment Pipeline
This step is straightforward and the tutorial doesn't need any further explanation. One extra step I included was to create an Azure Container Registry instance in the same resource group used to create the Azure Container Service. Despite repeated attempts, for some reason I couldn't create this at the command line so ended up creating it through the portal. The command though should look similar to this:
|
|
az acr create --name TwoServiceAppAcr --resource-group TwoServiceAppRg --location westeurope --admin-enabled true |
To facilitate easy teardown I also created a dedicated project in VSTS called TwoServiceApp. The command to create the pipeline (GitHub token made up of course) was then as follows:
|
|
az container release create \ --target-name TwoServiceAppAcs \ --target-resource-group TwoServiceAppRg \ --registry-name TwoServiceAppAcr \ --vsts-account-name pleasereleaseme \ --vsts-project-name TwoServiceApp \ --remote-access-token 7de6f232ef9b35d9c32b7122cd55668973758ff1 |
This command results in the creation of build and release definitions in VSTS (along with other supporting items) and a deploy of the image to a Dev environment.
Viewing the Application
To view the application as deployed to the Dev environment you need to launch the DC/OS dashboard. The tutorial instructions are easy to follow, however you might get tripped-up by the instructions for configuring Pageant since the instructions direct you to "Launch PuttyGen and load the private SSH key used to create the ACS cluster (%homepath%\id_rsa)". On my machine at least the id_rsa file was created at %homepath%\.ssh\id_rsa rather than %homepath%\id_rsa. If you persist with the instructions you eventually end up running the application in the Dev environment, but if like me you are new to cluster technologies such as DC/OS it all feels like some kind of sorcery.
A final observation here is that the configuration to launch the DC/OS dashboard requires your browser's proxy to be set. This knocked-out the Internet connection for all my other browser tabs, and was the cause of alarm for a few seconds when I realised that the tab I was using to edit my WordPress blog wouldn't save. If you launched the DC/OS dashboard from the command line (using az acs dcos browse --name TwoServiceAppAcs --resource-group TwoServiceAppRg) you need to use CTRL+C from the command line to close the session. In an emergency head over to Windows Settings > Network & Internet > Proxy to reset things back to normal.
Until Next Time
That concludes the write-up of my notes for use with the Continuous Integration and Deployment of Multi-Container Docker Applications to Azure Container Service tutorial. If you work through the tutorial and have any further tips that might be of use please do post in the comments.
In the next post I'll start to document what the what the az container release create command actually creates and configures.
Cheers -- Graham
Continuous Delivery with Containers – Amending a VSTS / Docker Hub Deployment Pipeline with Azure Container Registry
In this blog series on Continuous Delivery with Containers I'm documenting what I've learned about Docker and containers (both the Linux and Windows variety) in the context of continuous delivery with Visual Studio Team Services. It's a new journey for me so do let me know in the comments if there is a better way of doing things!
In the previous post in this series I explained how to use VSTS and Docker to build and deploy an ASP.NET Core application to a Linux VM running in Azure. It's a good enough starting point but one of the first objections anyone working in a private organisation is likely to have is publishing Docker images to the public Docker Hub. One answer is to pay for a private repository in the Docker Hub but for anyone using Azure a more appealing option might be the Azure Container Registry. This is a new offering from Microsoft -- it's still in preview and some of the supporting tooling is only partially baked. The core product is perfectly functional though so in this post I'm going to be amending the pipeline I built in the previous post with Azure Container Registry to find out how it differs from Docker Hub. If you want to follow along with this post you'll need to make sure you have a working pipeline as I describe in my previous post.
Create an Azure Container Registry
At the time of writing there is no PowerShell experience for ACR so unless you want to use the CLI 2.0 it's a case of using the portal. I quite like the CLI but to keep things simple I'm using the portal. For some reason ACR is a marketplace offering so you'll need to add it from New > Marketplace > Containers > Container Registry (preview). Then follow these steps:
- Create a new resource group that will contain all the ACR resources -- I called mine PrmAcrResourceGroup.
- Create a new standard storage account for the ACR -- I called mine prmacrstorageaccount. Note that at the time of writing ACR is only available in a few regions in the US and the storage account needs to be in the same region. I chose West US.
- Create a new container registry using the resource group and storage account just created -- I called mine PrmContainerRegistry. As above, the registry and storage account need to be in the same location. You will also need to enable the Admin user:

Add a New Docker Registry Connection
This registry connection will be used to replace the connection made in the previous post to Docker Hub. The configuration details you need can be found in the Access key blade of the newly created container registry:

Use these settings to create a new Docker Registry connection in the VSTS team project:

Amend the Build
Each of the three Docker tasks that form part of the build need amending as follows:
- Docker Registry Connection = <name of the Azure Container Registry connection>
- Image Name = aspnetcorelinux:$(Build.BuildNumber)
- Qualify Image Name = checked
One of the most crucial amendments turned out to be the Qualify Image Name setting. The purpose of this setting is to prefix the image name with the registry hostname, but if left unchecked it seems to default to Docker Hub. This causes an error during the push as the task tries to push to Docker Hub which of course fails because the registry connection has authenticated to ACR rather than Docker Hub:

It was obvious once I'd twigged what was going on but it had me scratching my head for a little while!
Final Push
With the amendments made you can now trigger a new build, which should work exactly as before except now the docker image is pushed to -- and run from -- your ACR instance rather than Docker Hub.
Your next question is probably going to be how can I get a list of the repositories I've created in ACR? Don't bother looking in the portal since -- at the time of writing at least -- there is no functionality there to list repositories. Instead one of the guys at Microsoft has created a separate website which, once authenticated, shows you this information:

If you want to do a bit more you can use the CLI 2.0. The syntax to list repositories for example is az acr repository list -n <Azure Container Registry name>.
It's early days yet however the ACR is looking like a great option for anyone needing a private container registry and for whom an Azure option makes sense. Do have a look at the documentation and also at Steve Lasker's Connect(); video here.
Cheers -- Graham
Continuous Delivery with Containers – Use Visual Studio Team Services and Docker to Build and Deploy ASP.NET Core to Linux
In this blog series on Continuous Delivery with Containers I'm documenting what I've learned about Docker and containers (both the Linux and Windows variety) in the context of continuous delivery with Visual Studio Team Services. The Docker and containers world is mostly new to me and I have only the vaguest idea of what I'm doing so feel free to let me know in the comments if I get something wrong.
Although the Windows Server Containers feature is now a fully supported part of Windows it is still extremely new in comparison to containers on Linux. It's not surprising then that even in the world of the Visual Studio developer the tooling is most mature for deploying containers to Linux and that I chose this as my starting point for doing something useful with Docker. As I write this the documentation for deploying containers with Visual Studio Team Services is fragmented and almost non-existent. The main references I used for this post were:
However to my mind none of these blogs cover the whole process to any satisfactory depth and in any case they are all somewhat out of date. In this post I've therefore tried to piece all of the bits of the jigsaw together that form the end-to-end process of creating an ASP.NET Core app in Visual Studio and debugging it whilst running on Linux, all the way through to using VSTS to deploy the app in a container to a target node running Linux. I'm not attempting to teach the basics of Docker and containers here and if you need to get up to speed with this see my Getting Started post here.
Install the Tooling for the Visual Studio Development Inner Loop
In order to get your development environment properly configured you'll need to be running a version of Windows that is supported by Docker for Windows and have the following tooling installed:
You'll also need a VSTS account and an Azure subscription.
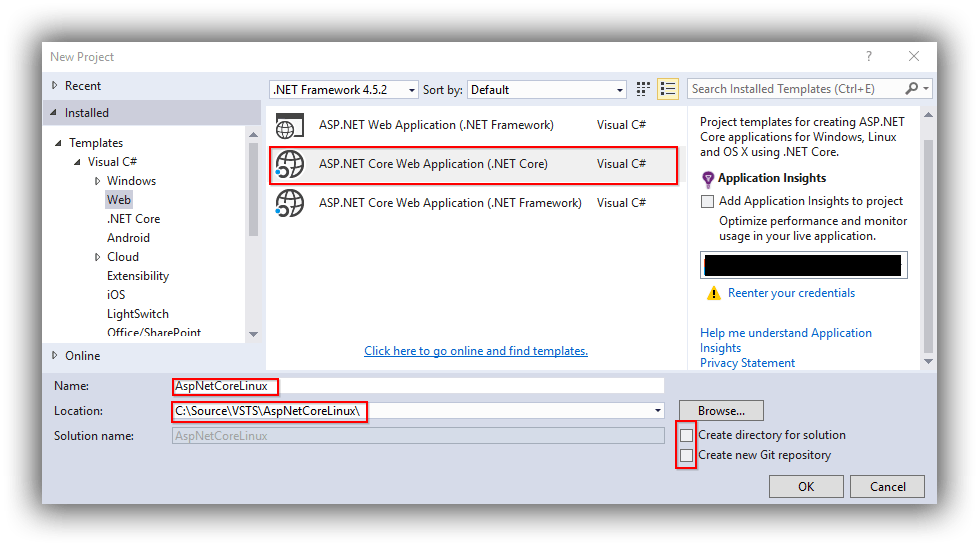
Create an ASP.NET Core App
I started off by creating a new Team Project in VSTS and called Containers and then from the Code tab creating a New repository using Git called AspNetCoreLinux:

Over in Visual Studio I then cloned this repository to my source control folder (in my case to C:\Source\VSTS\AspNetCoreLinux as I prefer a short filepath) and added .gitignore and .gitattributes files (see here if this doesn't make sense) and committed and synced the changes. Then from File > New > Project I created an ASP.NET Core Web Application (.NET Core) application called AspNetCoreLinux using the Web Application template (not shown):

Visual Studio will restore the packages for the project after which you can run it with F5 or Ctrl+F5.
The next step is to install support for Docker by right-clicking the project and choosing Add > Docker Support. You should now see that the Run dropdown has an option for Docker:

With Docker selected and Docker for Windows running (with Shared Drives enabled!) you will now be running and debugging the application in a Linux container. For more information about how this works see the resources on the Visual Studio Tools for Docker site or my list of resources here. Finally, if everything is working don't forget to commit and sync the changes.
Provision a Linux Build VM
In order to build the project in VSTS we'll need a build machine. We'll provision this machine in Azure using the Azure driver for Docker Machine which offers a very neat way for provisioning a Linux VM with Docker installed in Azure. You can learn more about Docker Machine from these sources:
To complete the following steps you'll need the Subscription ID of the Azure subscription you intend to use which you can get from the Azure portal.
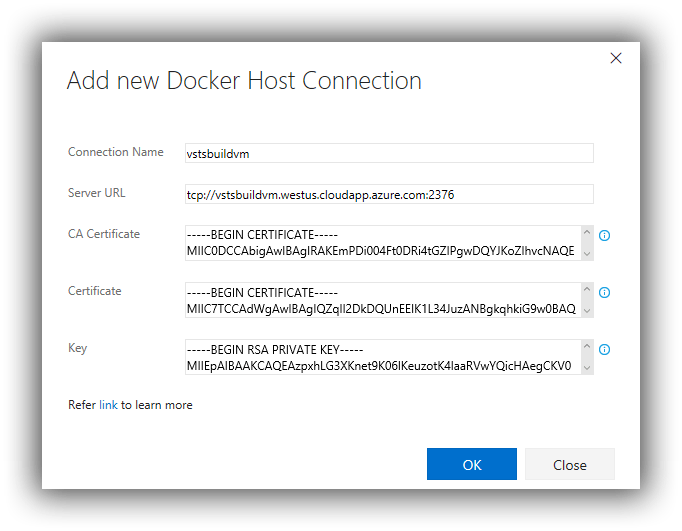
- At a command prompt enter the following command:
|
|
docker-machine create -d azure --azure-subscription-id adb4a497-7e0b-querty-ab9c-e4a160567809 --azure-static-public-ip --azure-open-port 80 --azure-resource-group VstsBuildDeployRG vstsbuildvm |
By default this will create a Standard A2 VM running Ubuntu called vstsbuildvm (note that "Container names must be 3-63 characters in length and may contain only lower-case alphanumeric characters and hyphen. Hyphen must be preceded and followed by an alphanumeric character.") in a resource group called VstsBuildDeployRG in the West US datacentre (make sure you use your own Azure Subscription ID). It's fully customisable though and you can see al the options here. In particular I've added the option for the VM to be created with a static public IP address as without that there's the possibility of certificate problems when the VM is shut down and restarted with a different IP address.
- Azure now wants you to authenticate. The procedure is explained in the output of the command window, and requires you to visit https://aka.ms/devicelogin and enter the one-time code:

Docker Machine will then create the VM in Azure and configure it with Docker and also generate certificates at C:\Users\<yourname>\.docker\machine. Do have a poke a round the subfolders of this path as some of the files are needed later on and it will also help to understand how connections to the VM are handled.
- This step isn't strictly necessary right now, but if you want to run Docker commands from the current command prompt against the Docker Engine running on the new VM you'll need to configure the shell by first running docker-machine env vstsbuildvm. This will print out the environment variables that need setting and the command (@FOR /f "tokens=*" %i IN (‘docker-machine env vstsbuilddeployvm') DO @%I) to set them. These settings only persist for the life of the command prompt window so if you close it you'll need to repeat the process.
- In order to configure the internals of the VM you need to connect to it. Although in theory you can use the docker-machine ssh vstsbuildvm command to do this in practice the shell experience is horrible. Much better is to use a tool like PuTTY. Donovan Brown has a great explanation of how to get this working about half way down this blog post. Note that the folder in which the id_rsa file resides is C:\Users\<yourname>\.docker\machine\machines\<yourvmname>. A tweak worth making is to set the DNS name for the server as I describe in this post so that you can use a fixed host name in the PuTTY profile for the VM rather than an IP address.
- With a connection made to the VM you need to issue the following commands to get it configured with the components to build an ASP.NET Core application:
- Upgrade the VM with sudo apt-get update && sudo apt-get dist-upgrade.
- Install .NET Core following the instructions here, making sure to use the instructions for Ubuntu 16.04.
- Install npm with sudo apt -y install npm.
- Install Bower with sudo npm install -g bower.
- Next up is installing the VSTS build agent for Linux following the instructions for Team Services here. In essence (ie do make sure you follow the instructions) the steps are:
- Create and switch to a downloads folder using mkdir Downloads && cd Downloads.
- At the Get Agent page in VSTS select the Linux tab and the Ubuntu 16.04-x64 option and then the copy icon to copy the URL download link to the clipboard:

- Back at the PuTTY session window type sudo wget followed by a space and then paste the URL from the clipboard. Run this command to download the agent to the Downloads folder.
- Go up a level using cd .. and then make and switch to a folder for the agent using mkdir myagent && cd myagent.
- Extract the compressed agent file to myagent using tar zxvf ~/Downloads/vsts-agent-ubuntu.16.04-x64-2.108.0.tar.gz (note the exact file name will likely be different).
- Install the Ubuntu dependencies using sudo ./bin/installdependencies.sh.
- Configure the agent using ./config.sh after first making sure you have created a personal access token to use. I created my agent in a pool I created called Linux.
- Configure the agent to run as a service using sudo ./svc.sh install and then start it using sudo ./svc.sh start.
If the procedure was successful you should see the new agent showing green in the VSTS Agent pools tab:

Provision a Linux Target Node VM
Next we need a Linux VM we can deploy to. I used the same syntax as for the build VM calling the machine vstsdeployvm:
|
|
docker-machine create -d azure --azure-subscription-id adb4a497-7e0b-querty-ab9c-e4a160567809 --azure-static-public-ip --azure-open-port 80 --azure-resource-group VstsBuildDeployRG vstsdeployvm |
Apart from setting the DNS name for the server as I describe in this post there's not much else to configure on this server except for updating it using sudo apt-get update && sudo apt-get dist-upgrade.
Gearing Up to Use the Docker Integration Extension for VSTS
Configuration activities now shift over to VSTS. The first thing you'll need to do is install the Docker Integration extension for VSTS from the Marketplace. The process is straightforward and wizard-driven so I won't document the steps here.
Next up is creating three service end points -- two of the Docker Host type (ie our Linux build and deploy VMs) and one of type Docker Registry. These are created by selecting Services from the Settings icon and then Endpoints and then the New Service Endpoint dropdown:

To create a Docker Host endpoint:
- Connection Name = whatever suits -- I used the name of my Linux VM.
- Server URL = the DNS name of the Linux VM in the format tcp://your.dns.name:2376.
- CA Certificate = contents of C:\Users\<yourname>\.docker\machine\machines\<yourvmname>\ca.pem.
- Certificate = contents of C:\Users\<yourname>\.docker\machine\machines\<yourvmname>\cert.pem.
- Key = contents of C:\Users\<yourname>\.docker\machine\machines\<yourvmname>\key.pem.
The completed dialog (in this case for the build VM) should look similar to this:

Repeat this process for the deploy VM.
Next, if you haven't already done so you will need to create an account at Docker Hub. To create the Docker Registry endpoint:
- Connection Name = whatever suits -- I used my name
- Docker Registry = https://index.docker.io/v1/
- Docker ID = username for Docker Hub account
- Password = password for Docker Hub account
The completed dialog should look similar to this:

Putting Everything Together in a Build
Now the fun part begins. To keep things simple I'm going to run everything from a single build, however in a more complex scenario I'd use both a VSTS build and a VSTS release definition. From the VSTS Build & Release tab create a new build definition based on an Empty template. Use the AspNetCoreLinux repository, check the Continuous integration box and select Linux for the Default agent queue (assuming you create a queue named Linux as I've done):

Using Add build step add two Command Line tasks and three Docker tasks:

In turn right-click all but the first task and disable them -- this will allow the definition to be saved without having to complete all the tasks.
The configuration for Command Line task #1 is:
- Tool = dotnet
- Arguments = restore -v minimal
- Advanced > Working folder = src/AspNetCoreLinux (use the ellipsis to select)
Save the definition (as AspNetCoreLinux) and then queue a build to make sure there are no errors. This task restores the packages specified in project.json.
The configuration for Command Line task #2 is:
- Tool = dotnet
- Arguments = publish -c $(Build.Configuration) -o $(Build.StagingDirectory)/app/
- Advanced > Working folder = src/AspNetCoreLinux (use the ellipsis to select)
Enable the task and then queue a build to make sure there are no errors. This task publishes the application to$(Build.StagingDirectory)/app (which equates to home/docker-user/myagent/_work/1/a/app).
The configuration for Docker task #1 is:
- Docker Registry Connection = <name of your Docker registry connection>
- Action = Build an image
- Docker File = $(Build.StagingDirectory)/app/Dockerfile
- Build Context = $(Build.StagingDirectory)/app
- Image Name = <your Docker ID>/aspnetcorelinux:$(Build.BuildNumber)
- Docker Host Connection = vstsbuildvm (or your Docker Host name for the build server)
- Working Directory = $(Build.StagingDirectory)/app
Enable the task and then queue a build to make sure there are no errors. If you run sudo docker images on the build machine you should see the image has been created.
The configuration for Docker task #2 is:
- Docker Registry Connection = <name of your Docker registry connection>
- Action = Push an image
- Image Name = <your Docker ID>/aspnetcorelinux:$(Build.BuildNumber)
- Advanced Options > Docker Host Connection = vstsbuildvm (or your Docker Host name for the build server)
- Advanced Options > Working Directory = $(System.DefaultWorkingDirectory)
Enable the task and then queue a build to make sure there are no errors. If you log in to Docker Hub you should see the image under your profile.
The configuration for Docker task #3 is:
- Docker Registry Connection = <name of your Docker registry connection>
- Action = Run an image
- Image Name = <your Docker ID>/aspnetcorelinux:$(Build.BuildNumber)
- Container Name = aspnetcorelinux$(Build.BuildNumber) (slightly different from above!)
- Ports = 80:80
- Advanced Options > Docker Host Connection = vstsdeployvm (or your Docker Host name for the deploy server)
- Advanced Options > Working Directory = $(System.DefaultWorkingDirectory)
Enable the task and then queue a build to make sure there are no errors. If you navigate to the URL of your deployment sever (eg http://vstsdeployvm.westus.cloudapp.azure.com/) you should see the web application running. As things stand though if you want to deploy again you'll need to stop the container first.
That's all for now...
Please do be aware that this is only a very high-level run-through of this toolchain and there many gaps to be filled: how does a website work with databases, how to host a website on something other than the Kestrel server used here and how to secure containers that should be private are just a few of the many questions in my mind. What's particularly exciting though for me is that we now have a great solution to the problem of developing a web app on Windows 10 but deploying it to Windows Server, since although this post was about Linux, Docker for Windows supports the same way of working with Windows Server Core and Nanao Server (currently in beta). So I hope you found this a useful starting point -- do watch out for my next post in this series!
Cheers -- Graham