Continuous Delivery with TFS: Preparing for the Deployment Pipeline
This post is part of a series of posts on building a continuous delivery pipeline with TFS. We are getting very close to the point where we can use Release Management to build the deployment pipeline but there are still a few configuration tasks to take care of first.
In the previous post we created the infrastructure that we will deploy application components to however we didn't do much in the way of configuration on the servers. Although it's possible to do some of this configuration automatically most pipelines will deploy application components to already configured web applications and databases. We're going to be deploying to DAT and DQA environments so we'll need to configure web applications and databases accordingly.
Basic Web Server and Database Server Configuration
Starting with the web server (ALMWEB01) navigate to c:\inetpub\wwwroot and create two folders: CU-DAT and CU-DQA. Now switch to IIS Manager and from the Application Pools node create two application pools (CU-DAT and CU-DQA) against .NET CLR Version v4.0.30319. Moving to the Default Web Site node create two web applications (CU-DAT and CU-DQA) configuring them to point to the folders and application pools that were just created. Moving to the database server (for me this is ALMSQL01) open up SQL Server Management Studio and from the Databases node create CU-DAT and CU-DQA databases.
Web Server and Database Server Security Configuration
We now need to configure security so that our websites can access SQL Server. We want to adhere to an important best practice here which is to ensure that the parts of database security that are environment specific do not make their way in to the SQL Server Database Project that we configured here. Rather, anything that is environment specific should be handled separately so it can be applied on an environment-by-environment basis. I'll illustrate that here with a self-imposed requirement that dedicated and different SQL Server logins (of the Windows variety) are required to access the CU-DAT and CU-DQA databases. Starting with the SSDP, open up the ContosoUniversity solution in Visual Studio and create a new folder called Security in the ContosoUniversity.Database project and then a folder under that called Database Roles. In that folder add a new file called db_webapp.sql. Note you can actually add an item called Database Role if you want help with the syntax:

This file should have the following T-SQL to create a dedicated role for the web application:
|
1 |
CREATE ROLE [db_webapp] |
Now create another file called db_webapp_permissions.sql and add the following T-SQL to grant specific permissions to the role:
|
1 |
GRANT SELECT, UPDATE, INSERT, DELETE, EXECUTE on SCHEMA::dbo to [db_webapp] |
On the domain controller create two domain accounts ALM\CU-DAT and ALM\CU-DQA. On the web server open up IIS Manager and navigate to the Application Pools node. Edit the CU-DAT and CU-DQA application pools via Advanced Settings and change the Identity property so that it uses the corresponding domain account you've just created. That's actually it for the moment since the other side of the security coin -- creating a login and database user will be applied as part of the Release Management workflow.
Creating a Nightly Build Definition
The next piece of preparation we need to do is to create a new Build Definition that will run on a nightly schedule to trigger a build of the application followed by a deployment to the DAT environment so that automated acceptance tests can be run. This will be based on a build process template that has been specially configured to work with Release Management. All this is achieved through the following steps on your development machine that has the Release Management client installed:
- In the root of the ContosoUniversity folder (ie at ..\Source\Workspaces\ContosoUniversity\) create a new folder called BuildProcessTemplates.
- Navigate to C:\Program Files (x86)\Microsoft Visual Studio 12.0\Release Management\Client\bin and copy ReleaseTfvcTemplate.12.xaml (assuming you are using VS 2013) to the BuildProcessTemplates folder and add (and check in) to version control.
- On your TFS admin VM create a folder called c:\drops and share with Everyone setting Read/Write permissions. (I'm using Everyone for low friction. In a non-demo environment this is unlikely to be appropriate.)
- In Visual Studio navigate to Team Explorer > Builds and clone (from right-click menu) ContosoUniversity_Main_Checkin renaming the clone to ContosoUniversity_Main_Nightly.
- Make the following changes to ContosoUniversity_Main_Nightly:
- Trigger = Schedule (this is what you would do in a non-demo environment but you may want to set to Manual for this demo).
- Build Defaults = Copy build output to the following drop folder (specify the share created in 3 which will be something like \\almtfsadmin\Drops).
- Process > Default Template = Change to point to $/ContosoUniversity/BuildProcessTemplates/ReleaseTfvcTemplate.12.xaml by selecting the New button and navigating to that file. (Screenshot shows New button and the finished effect after selecting the new template.)

- Process > Build process parameters > 2. Build > 5. Advanced > MSBuild arguments = /p:UseWPP_CopyWebApplication=true /p:PipelineDependsOnBuild=false
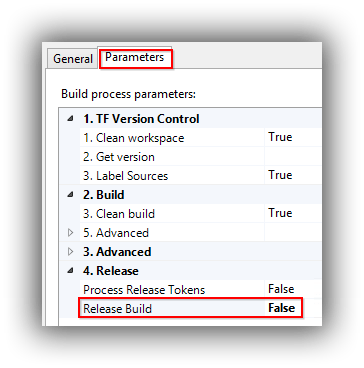
- Process > Build process parameters > 6. Release > Release Build = True
- Save and close the build definition tab and then manually queue the build. Before you start the build switch to the Parameters tab and change the Release Build parameter to False since we haven't configured Release Management yet.

- Check that the build succeeded and resulted in a code drop to \\almtfsadmin\Drops.

Configuring Web.config Tokenisation
The final piece of preparatory configuration we need to make is to the Contoso University application. One of the key challenges in implementing continuous delivery is to manage application configuration. Release Management's approach to this is to use a tokenisation system where specified files are scanned for tokens that begin and end with a double underscore and actual values for are substituted as part of deploying to a specific environment. The out-of-the-box solution is to create a copy of a configuration file with a .token extension and then to tokenise values that need to change between environments. This means the .token file becomes a maintenance headache. A nicer way for Web.config at least is to use Web.config transformation to get the desired result. So, open the ContosoUniversity solution and in Web.Release.config add the following before the start of <system.web>:
|
1 2 3 4 5 |
<connectionStrings> <add name="SchoolContext" connectionString="Data Source=__DATA_SOURCE__;Initial Catalog=__INITIAL_CATALOG__;Integrated Security=SSPI;" providerName="System.Data.SqlClient" xdt:Transform="SetAttributes" xdt:Locator="Match(name)"/> </connectionStrings> |
Check the change in to version control and then start a manual build of ContosoUniversity_Main_Nightly as above. Assuming the build is successful navigate to the drops folder and down to ..\_PublishedWebsites\ContosoUniversity.Web. Examine Web.config and you should find that it contains the tokenised values. The magic is in the MSBuild argument specified in the build process template above which causes the transformation to take place even though we are not going to be using Web One Click Publish to deploy our application.
With all that configuration out of the way we can now move to actually building the deployment pipeline which is the subject of the next post.
Cheers -- Graham
