Git with Visual Studio 2015 and TFS 2015
If you work in an organisation that has a longstanding investment in TFS chances are that you haven't done much with Git. This is because when you create a new team project in TFS you have to choose the version control system you want to use and once chosen that's it -- no changing your mind. (This was correct when I first started writing this post but things are changing as I mention later.) If your projects were created a few years ago either Git wasn't an option back then since it only became available in early 2013 or you may have thought it was just too new and shiny to consider for use with TFS, and very likely these projects use Team Foundation Version Control (TFVC).
That has all changed now and Git is firmly embedded in TFS. In fact Git seems to be firmly embedded everywhere, not least at Microsoft where open source projects are being hosted on GitHub and internal teams are using Git via Visual Studio and TFS. Keen to understand what all the fuss is about I've been learning about and using Git over the past few months and the recent release of Visual Studio 2015 and TFS 2015 seemed like a good time to share some of my experiences. As always when learning something new I recommend taking some time to do some training and to that end I have a Getting Started blog post here where I've compiled what I think are the most useful resources for Visual Studio developers.
The Bigger Picture
Before getting in to the tooling I want to take a step back and say a few words about the big picture because if you want to start using Git and already have a team project based on TFVC you have some thinking to do. When I first started writing this post moving to Git would have meant creating a new Team Project based on Git and either starting from scratch or importing history and / or work items from the TFVC-based project. There are some resources that offer help in this regard and I've compiled a short list to help anyone contemplating a migration understand what's involved:
I haven't tried to perform a migration and with luck I won't have to, since Microsoft recently announced support for creating a Git repo in a TFVC project. It looks like this will ship with TFS 2015.1 although quite what we'll get in practice remains to be seen. If you want to know more there is some commentary here.
Trying this at Home
For this post I used TFS 2015.RTM and Visual Studio 2015.RTM. If you don't have access to TFS 2015 then you can follow along using VSO since features in TFS tend to appear first in VSO, although some of the screenshots in this post may be slightly different. If you are new to VSO I have a Getting Started post here, however be aware that a key difference compared with TFS is that you create a new team project in the VSO web portal.
Whilst writing this post I encountered what seemed to be a bug in Visual Studio and in my description of how I fixed it I talk about dropping to the command line. For this you'll need to have Git installed and the easiest route is probably to get it from Chocolatey. The Install and Configure Git video in this MVA series has a step-by-step walkthrough.
Getting Started
The first step to working with Git in TFS is to create a new Team Project based on Git. In Visual Studio connect to the Team Collection where you want to create the new project and in Team Explorer navigate to Home and then click on Home (or use the down arrow button) to display the Home menu. The ability to create a New Team Project is available under Projects and My Teams:

Navigate through the wizard and ensure you choose Git at the Specify Source Control Settings page:

With the new project created (I called mine ContosoUniversity and used the Scrum process template) you will need to clone the repository before you can do much else. Team Explorer helpfully prompts you to do this:

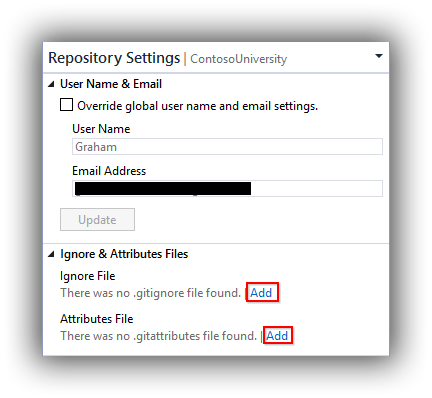
Some people like to clone to a folder created off the root of a drive (possibly to avoid maximum path length issues?) but I accepted the offered default of C:\Users\Graham.ALM\Source\Repos\ContosoUniversity. If you examine the folder that is created you'll see that it is empty, although in reality there is a hidden .git folder. I don't like placing code files in my repo until it contains the .gitignore and .gitattributes files and Visual Studio has a neat feature for adding these. In Team Explorer navigate to Home and then choose Settings. In the lower Git panel choose Repository Settings. This pane allows you to add the the .gitignore and .gitattributes files as well as alter other aspects of the repo (not all details shown):
The great thing about the .gitignore file that Visual Studio adds is that it's tuned for Visual Studio development. It's the small things...
This is a good time perform a commit, so choose Changes from the Team Explorer menu bar and notice that you are requested to Configure your user name and email address before committing changes. Defaults are taken from the current TFS connection -- edit as required, optionally choose to Enable download of author images from 3rd party source and click Update. Now head back to Changes, enter a commit message and click Commit.

Bear in mind that at the moment we have only committed locally and the TFS knows nothing about the changes. Before pushing any changes to TFS let's get a Visual Studio solution added. I used my ContosoUniversity solution which you can download here. After unblocking and unzipping it copy the contents of the folder that contains the solution file and project folders to the root of your repo. Switching back to Visual Studio and the Team Explorer Home panel and you should see that the Contoso University solution file is listed under Solutions:

Now navigate to the Changes panel and notice that there are Untracked Files:

Click on Add All to move these files to Included Changes, add a suitable comment and Commit the change. Back at the Home panel you can now open the solution. If you are opening the solution on a machine with only Visual Studio 2015 installed you might get a warning about LocalDB versions. You can ignore this but if you want to run the application do update the connection strings in CU-DEV.publish.xml in ContoUniversity.Database and Web.config in ContosoUniversity.Web with (localdb)\MSSQLLocalDB as per this post.
Whilst editing CU-DEV.publish.xml you will likely see that it is being ignored by Git. We do want this file to be included in version control as it's how new developers can quickly publish the database to LocalDB. Right-clicking the file shows Add Ignored File to Source Control which looks promising so let's try that. Navigating to Team Explorer -- Changes you'll see that there is a change and you can add a commit message and commit the change. Except you can't, or at least I couldn't:

The situation here seems to be a standoff between .gitignore which is indicating that CU-DEV.publish.xml should be ignored and Visual Studio which is honoring our desire to add the file. The fix was to drop to the command line and to open a command prompt at the root of the repo and run git add ContosoUniversity.Database\CU-DEV.publish.xml -f. This forces the file to be added against .gitignore's wishes. Presumably the problem is that Visual Studio is not using the -f switch. One to report...
The final task for this section is to publish the local changes to TFS. If you want proof that no code has been pushed to TFS yet you can open the project in the TFS Web Portal and navigate to the Code tab. You'll see something like this:

In Visual Studio Team Explorer -- Synchronization you use the Push link to publish Outgoing Commits to TFS:

I've not shown it here but refreshing the Code tab of the TFS Web Portal will now display your code along with the latest comment for each file and folder.
Pull Request Workflow
One aspect of the Git integration with Visual Studio and TFS that I particularly like is the pull request workflow since it lends itself very well for code reviews. To evaluate this for yourself the first step is to set up a branch policy to ensure that the pull request workflow cannot be circumvented. From the TFS Web Portal make sure you are somewhere in your team project and open the Control Panel (cog icon on the right of the blue bar). Navigate to the Version Control tab and then in the Git repositories panel expand the tree until the required branch is highlighted -- master in my case. Now click on Branch Policies in the right-hand panel and as a minimum check Require code reviews using pull request. You'll probably also want to check Allow users to approve their own changes if you are only using one account for the evaluation.

As you can see from the screenshot there are more options and you can find details here. I'm keeping things simple and with the changes saved it's time to head back to Visual Studio to see what's different. As a quick test, make a simple change to a file and commit to master (remember this is just your local copy). Now try and push the change to TFS. You should get an Errors encountered during push. See the Output window for details. message. In the Output window you should see a The following errors were reported during push: refs/heads/master, TF402455: Pushes to this branch are not permitted; you must use pull requests to commit changes. message.
The starting point to create a pull request is to create a branch from master. In Team Explorer -- Branches right click master and select New Local Branch From. In the panel that is now displayed type a name for the branch and click Create Branch.
This new branch is now shown in bold and is considered checked out. Make another simple change to a file and commit it and then in Team Explorer -- Synchronization click Publish to publish the branch and push both the change that was just made to the new branch and the earlier change to master.
The workflow now switches back to TFS Web Portal and in either Code > Explorer or Code > Pull Requests there should be a button to Create Pull Request:

Slightly confusingly this button doesn't do what it says but rather displays the Pull Requests panel with options to configure aspects of this pull request. In particular there is a more options link that does give you more options:

The changes you can make are all fairly obvious although I didn't make any. (Do note the existence of the New Pull Request link which allows you to configure your own pull request.) From this panel the Create Pull Request link does what you expect it to do.
The pull request as created above will sit in the Assigned to the team list of pull requests:

When a particular pull request is selected the panel allows comments to be made as a Discussion, right in the Files that have changed or against Commits. It's quite a busy window and there's a lot going on since it's also the place where Reviewers are selected and can indicate their approval decision:

In my case above there were no merge conflicts so once I'd marked my approval I could click the Complete pull request button. This then morphs in to a Delete source branch button to allow you to get rid of the source branch which for most teams is probably the right thing to do since you want these to be short lived.
Back in Visual Studio and your local repo, master hasn't got the latest changes and the short-lived branch created for the pull request is still hanging around. To fix all this up, in Team Explorer -- Branches double-click master so it's checked-out. Then navigate to Team Explorer -- Synchronization and use the Pull link to bring the changes to down to master. Finally back in Team Explorer -- Branches right-click the short-lived branch and delete it.
Tour Finishes Here
That's as far as I'm planning to cover in this post but obviously there's lots more I could have covered -- resolving merge conflicts for example. Whilst I like the pull request workflow a colleague pointed out that it could lead to Scrum team members working in silos and a presentation at this year's Agile on the Beach conference made the point that pull request workflows can have a negative effect on effective continuous integration. Whilst important and valid points these are probably people and process problems and if they are going to happen with Git they are probably already happening with TFVC shelvesets.
Cheers -- Graham
Getting Started with Git for Visual Studio Developers
If you are just getting started with learning Git it's important to distinguish between Git the actual version control technology and services that use Git such as GitHub and TFS / VSO / Visual Studio. The resources below are the ones I think will provide a good starting point for the Visual Studio developer wishing to use Git in conjunction with repositories hosted in GitHub, TFS or VSO.
The integration of Git with TFS / Visual Studio dates back to early 2013 and in mid 2015 now feels particularly mature. Additionally there is the fairly recent announcement of the GitHub extension for Visual Studio 2015. Despite all the great integration with Visual Studio it's worth remembering that sometimes you may need to drop down to the command line to perform some Git operations. This is where having spent some time learning the Git basics will pay off. The MVA jump start course above covers Git basics and a web search will provide numerous other sources.
Cheers -- Graham
Upgrading a TFS 2013 Continuous Delivery Platform to TFS 2015
In a previous post I described the high-level process for upgrading the continuous delivery platform I've been using for my Continuous Delivery with TFS blog post series to TFS 2013 Update 5. With the release of TFS 2015 on 6 August 2015 it's now time to upgrade this platform to the brand new version. See my previous post for the list of servers that participate in my continuous delivery platform, and as with the upgrade to TFS 2013 Update 5 all servers had been patched with the latest Windows Updates.
Team Foundation Server
There is a wealth of advice for upgrading to TFS 2015 and if you are upgrading a production instance you'll probably want to do some research. A good starting point is the ALM Rangers' TFS Upgrade -- New Elements of TFS 2015 that influence an upgrade. I can also recommend listening to Radio TFS episode 95 -- Out and About with TFS 2015, and don't forget to check out the show links.
Since I was upgrading a non-production instance I dove straight in, mounted the iso and started the setup routine. After installing the bits the Upgrade Wizard started automatically and as with previous upgrades each page of the wizard was straightforward.

One addition to the wizard is a page to configure the new Team Foundation Build. Although in the fullness of time anyone upgrading will want to move to the new build system it is quite likely that you will need to keep existing XAML builds running as you gradually move over. This is fully supported but you will need to enable this from the Team Foundation Server Administration Console under Additional Tools and Components > XAML Build Configuration. The good news is that settings from the previous version of TFS are remembered. You can read the release notes for TFS 2015 here and the list of known issues here.
Visual Studio
Although TFS 2015 is backwards compatible with some prior versions of Visual Studio many teams are likely to want to move to Visual Studio 2015 at the same time as moving to TFS 2015. Visual Studio 2015 installs side-by-side with previous versions and whilst the installation process is straightforward there are some other things to consider since the installation routine now offers third party products as well as the ability to select just the Microsoft components you require. I chose to keep things light but did take the opportunity to install PowerShell and Git-based components as they are areas I want to explore for future blogs.

As a test of Visual Studio 2015 I opened up my Contoso University sample application (previously created in Visual Studio 2013) and the only issue was with the SQL Server Database Project whose connection string was referring to a previous version of LocalDB. This was a quick fix as per Bill Wagner's post -- don't forget to update Web.config as well if this affects you. Whilst Contoso University worked fine locally, running an existing XAML build on the new TFS 2015 instance wasn't quite as successful and partially failed with TF900547: The directory containing the assemblies for the Visual Studio Test Runner is not valid ‘C:\Program Files (x86)\Microsoft Visual Studio 14.0\Common7\IDE\CommonExtensions\Microsoft\TestWindow'. I'd pretty much expected something like this since I hadn't installed Visual Studio 2015 yet on my all-in-one TFS machine which hosts the build agent, and performing the install (Microsoft components only) fixed this problem. (As an aside, I always make sure Visual Studio instances on a build agent server are registered with a licence key to avoid trial period expiry problems.) You can read the release notes for Visual Studio 2015 here and the list of known issues here.
Release Management
As discussed in my previous post there was no Update 5 to Release Management 2013 and instead Release Management 2015 was released and is backwards compatible with TFS 2013. Since I'd already upgraded to Release Management 2015 there was nothing much for me to do except test that the build definition that started my release pipeline still worked -- which it did! However, the automated web tests part of the pipeline (based on the MTM Automated Tests Manager tool) was still running against 2013 Agents and Microsoft Test Manager 2013 and naturally I wanted to get these components upgraded.
Microsoft Test Manager and Agents for Visual Studio
Microsoft Test Manager 2015 (aka Test Professional 2015) is installed as part of Visual Studio 2015 Enterprise however it is also available as a separate installation for testers who don't use Visual Studio or where it is needed to run the bundled tcm.exe. The latter scenario applies to me as I have a Windows 8.1 web client machine that runs automated web tests written using Selenium that require FireFox, Microsoft Test Manager and Agents for Visual Studio (Test Agent component) to be installed. I upgraded this machine (please keep reading as most of what I did was unnecessary) by first uninstalling Microsoft Test Manager 2013 and the Agents for Visual Studio 2013 and then installing and configuring the 2015 replacements. One key difference was that at the time of writing there was no upgrade to the Test Controller component of the Agents for Visual Studio 2015 so the Test Agent was shipping as a standalone exe. However, when I came to configure the Test Agent there was no Test Agent Configuration Tool for Agents for Visual Studio 2015. No matter since I knew it would be possible to partially configure the agent from Microsoft Test Manager 2015 (Lab Center > Environments and then choose to repair). However, all this did was install Agents for Visual Studio 2013. (Note that when it does this the service will run under Network Service. If you want to use a domain account you need to use the Test Agent Configuration Tool on the machine where the test agent is installed.) So a lot of work for nothing and it looks like we'll need to wait for a new Test Controller before the Test Agent can be upgraded.
Last Piece of the Puzzle
I wasn't done yet, since I upgraded Microsoft Test Manager on the web client and it turns out that the PowerShell script that forms part of the MTM Automated Tests Manager tool in Release Management 2015 hasn't been upgraded to work with the Visual Studio 2015 installation path. The proper way to fix this would be to create a new tool in Release Management (since the built-in tools can't be edited) with an updated script that includes a reference to the VS140COMNTOOLS system environment variable which allows the script to locate tcm.exe. Since I'm due to retire my current continuous delivery infrastructure in the near future (as I prepare for a new blog post series based on TFS2015 Update 1 which should contain the new web-based Release Management) I opted for the quick and dirty trick of pointing the VS120COMNTOOLS system environment variable to C:\Program Files (x86)\Microsoft Visual Studio 14.0\Common7\Tools\. Probably not something for a production environment but good enough to get my automated web tests working and showing green. Always a relief...
Cheers -- Graham
Upgrading a TFS 2013 Continuous Delivery Platform to Update 5
For both Microsoft and .NET developers alike 20 June 2015 was a big day, with a huge raft of updates being released. Whilst the headline news was Visual Studio 2015 (TFS 2015 missing the original launch date because of quality issues) there was also an Update 5 release for Visual Studio 2013 and TFS 2013. Whilst I'm sure Microsoft would love everyone to move to TFS 2015 very quickly for many organisations this isn't a possibility for a variety of reasons. On the other hand, an upgrade to Update 5 may well be following a well-trodden path and a more realistic next step in the upgrade cycle.
I decided to upgrade the Azure-based TFS 2013 continuous delivery platform I've been using for my Continuous Delivery with TFS blog post series to Update 5 as it's one option we're considering where I work. However when I stopped to think about what was involved I realised that it amounted to quite a few upgrades. I've documented the high-level process I followed in case it helps anyone else considering this route.
Server Landscape
My setup in Azure is focussed on conserving the Azure credits I get with MSDN rather than creating a typical TFS environment, so I have fewer servers than might otherwise be present in a live environment. My setup comprises:
- Active Directory Domain Controller running Windows Server 2012 R2.
- All-in-one TFS server (including SQL Server 2012 SP2) running Windows Server 2012 R2.
- Development machine for Visual Studio, Release Management Client, Microsoft Test Manager and the like running Windows 8.1.
- Application web server (for IIS) running Windows Server 2012 R2.
- Application database server (for SQL Server 2012 SP2) running Windows Server 2012 R2.
- Application client machine (for FireFox and Microsoft Test Manager) running Windows 8.1.
All machines were patched with the latest Windows Updates and the TFS ecosystem components were all at Update 4.
Team Foundation Server
Because I have an all-in-one machine for TFS that was the only box that needed the new version, however if you have build controller and build agent machines (and there are other variants) don't forget you will need to upgrade these machines as well. I have upgraded TFS many times and always found it to be a very slick, the wizard-driven process being very intuitive. However, if you are upgrading your live environment then do take all the usual upgrade precautions of having backups available and so on. Don't forget that the process involves uninstalling the current version of TFS (the databases are not affected) and then installing and configuring the new version, although the installer takes care of all of this. You can read the release notes here and the list of fixed bugs and known issues here.
Visual Studio
Whilst it's pretty obvious that you will have Visual Studio installed on your development machine(s) it's easy to forget that you probably have it installed on the machines running your build agents as this is the easiest way to ensure a build agent server has all of the bits needed to compile your application. This can add up to quite a few servers in a live environment but in my case I only had two instances. Update 5 for Visual Studio 2013 updates an existing instance of Visual Studio and the upgrade -- as usual -- was uneventful. One thing I did do after upgrading both versions of Visual Studio was check for any new versions of extensions (Tools > Extensions and Updates). The extensions that seemed most critical were an update to NuGet, the latest version of the Microsoft Azure SDK and the latest release of the SQL Server Data Tools.
Since there was an update to NuGet I also ensured that the version of NuGet used by TFS Build was updated, as this is not the one installed as the Visual Studio extension. The procedure is to open an Administrative command prompt at C:\Program Files\Microsoft Team Foundation Server 12.0\Tools and run nuget.exe update -self. You can read the release notes for Visual Studio 2013 Update 5 here and the list of fixed bugs and known issues here.
Release Management
The Release Management situation might seem confusing at first because there is no Update 5 for Release Management 2013 however there is a Release Management 2015 release. This 2015 release is fully compatible with TFS 2013 and is the upgrade to go for if you want the current latest and greatest. It's worth mentioning here that TFS 2015 Update 1 will ship with an all-new browser-based release management service which will presumably eventually replace the current offering so it's worth bearing this in mind if you are considering starting a new project with the Release Management 2013 / 2015 tooling.
There are three separate components to Release Management: server, client and deployment agent. As with TFS the existing components need uninstalling (the database is unaffected) before the new ones are installed, however unlike TFS the installer doesn't do this for you and it's a manual process. During the installation process for all components it amusingly looks like you are forced in to joining the customer experience program which is greyed-out and can't be unchecked:

As it turned out it was possible to change this when configuring each component -- possibly important if your servers don't have access to the Internet.
There is only one installed instance of the server component of course and for me this lives on my all-in-one TFS server. I have the client installed on my all-in-one TFS server and my development machine and the deployment agent on my three application machines. It's a few minutes' work to get all this upgraded and it's not helped by the components not remembering any of their previous configuration settings (with the exception of the server component that remembered a couple of them).
Whilst the upgrade process was successful the initial testing wasn't, and the release part of the build process kept returning an Exception Message: The directory name is invalid (type Win32Exception) error. I eventually traced this to an updated ReleaseTfvcTemplate.12.xaml template that shipped with Release Management 2015. Fixing this involved copying this file from C:\Program Files (x86)\Microsoft Visual Studio 14.0\Release Management\Client\bin to the BuildProcessTemplates folder of my Team Project workspace and checking the file in. I then cloned an existing (but failing) build definition and upgraded the template in Process > Build process template. The reason for cloning is that I've edited my build process template so when I get some time I'll need to fix the template in the original build definition. If you go down the cloning route do make sure you remove any spaces from the build definition name (otherwise automated tests run via tcm.exe are unlikely to run) and also update the properties of the Release Management template with the new build definition name or nothing will run. Don't ask me how I know.
Microsoft Test Manager
Although there is an Update 5 for Microsoft Test Manager 2013 it's not immediately obvious how to apply it since as far as I know there is no separate standalone installer for Microsoft Test Manager. Rather, if Microsoft Test Manager 2013 was installed at the same time as Visual Studio 2013 it will be upgraded to Update 5 when you upgrade Visual Studio. If you installed Microsoft Test Manager separately -- on a Web client machine for example -- then one way to upgrade is to use the Updates link on the home screen:

All this really does though is start the Visual Studio 2013 Update 5 installer so feel free to use that if you have a copy handy. Please don't miss upgrading standalone versions of Microsoft Test Manager as I have seen nasty bugs when using the recording tools on an outdated version against an upgraded TFS instance.
Agents for Visual Studio
Last but not least is ensuring that any test controller or test agent services are upgraded. My test controller is on my all-in-one TFS server and upgrading was just a case of running the exe from the TestController folder of the mounted iso. A reboot was required after which it's necessary to run the Test Controller Configuration Tool. The settings hadn't been remembered so make sure you have these handy before upgrading.
You need the test agent installed anywhere you are running tests or collecting metrics and for me this was my Web client machine and my application Web server which I'd previously configured for Test Impact Analysis. The iso contains an exe in a TestAgent folder and this starts a configuration mini wizard which again doesn't remember previous settings. You'll probably find that after upgrading the environment that the machine running the test agent has errors so you'll need to go to Microsoft Test manager and repair the environment from Lab Center > Lab > Environments.
Final Thoughts
Although I encountered relatively few glitches with this multi-machine upgrade it took a good few hours to accomplish over several days. Having the iso files already downloaded from MSDN and copied a media library was a big time saver as was knowing what was installed on which server. My continuous delivery platform is now in good shape to be upgraded to TFS 2015 soon after the RTM is available. As always, please share your own experiences in the comments!
Cheers -- Graham
Upgrade TFS 2013 Reports
For some organisations the Stakeholder licence that was introduced for on premises TFS 2013 with Update 4 probably means that an increasing number of individuals are interacting with TFS. Inevitably this leads to more people asking the question "What reports can we have?".
Most TFS administrators will of course know that TFS ships with reports written for SQL Server Reporting Services (SSRS) out of the box. What might be less obvious is that the reports were updated with TFS 2013 Update 3. There is a gotcha though, in that reports that have already been deployed for existing projects do not get upgraded. However, help is at hand with a utility that can upgrade deployed reports. In this post we look at the steps to run the utility, which will upgrade TFS 2013 reports associated with Team Projects created in TFS 2012 through to TFS 2013 Update 2. Team Projects created after Update 3 was installed will of course already be on the new version.
Overview
The process isn't complicated but it's worth explaining the big picture. The TFS Reporting Bulk Update Tool is a PowerShell script that takes the URI of a Team Collection as its parameter and, in conjunction with Team Project process templates, creates a file that contains a Team Foundation Power Tool Command Line (tfpt.exe) command that actually performs the upgrade. The process can be performed on a developer workstation with http(s) access to TFS but appropriate permissions will obviously be required.
Prerequisites
Procedure
- On the machine where you will perform the process create a working folder eg C:\ReportUpdate.
- Download, unblock and unzip ReportingBulkUpdateToolForTfs2013.ps1 to this folder from its location on CodePlex.
- Download the process template(s) that have been specified for the Team Projects in the Team Collection you are upgrading:
- In an instance of Visual Studio that is connected to the Team Collection navigate to Team > Team Project Collection Settings > Process Template Manager.
- In the Process Template Manager dialog download whichever templates are in use in the Team Collection to C:\ReportUpdate:

- Open up PowerShell ISE (or other PowerShell editor of choice) as Administrator and change directory to the working folder.
- Construct and run a PowerShell command based on ReportingBulkUpdateToolForTfs2013.ps1 appropriate to the Team Collection you are working against, for example:
|
|
.\ReportingBulkUpdateToolForTfs2013.ps1 -ProjectCollectionUri "http://almtfsadmin:8080/tfs/PrmCollection" |
- If there were no errors the preceding command should have created BulkUpload.cmd in C:\ReportUpdate. This can now be run from the PowerShell command line using Invoke-Item .\BulkUpload.cmd.
- You can verify if the update was successful by navigating to the SSRS report portal in a browser (something like this: http://almtfsadmin/Reports/Pages/Folder.aspx?ItemPath=%2fTfsReports%2fPrmCollection%2fContosoUniversity) and switching to Details View:

- In Details View you can examine the Modified Date column which should show the date and time you ran BulkUpload.cmd. Of course, whether anything actually changed will depend on whether the reports were created before TFS 2013 Update 3 was applied.
- Finally, you should of course check that the reports still actually work.
Wrap-up
Do take the time to read the opening comments of ReportingBulkUpdateToolForTfs2013.ps1 because there are some caveats that you need to consider. In particular is that if you have made any customisations to the report or to data sources they will be overwritten. Hopefully you will have any customised reports saved in version control but as always it would be wise to take a backup.
Cheers -- Graham
Continuous Delivery with TFS: Track Technical Debt with SonarQube
So far in this blog post series on building continuous delivery pipelines with the TFS ecosystem the focus on baking quality in to the application has centred mainly on static code analysis, unit tests and automated web tests. But just because you have no broken static code analysis rules and all your various types of tests are green isn't a guarantee that there aren't problems lurking in your codebase. On the contrary, you may well be unwittingly accumulating technical debt. And unless you go looking for it chances are you won't find out that you have a technical debt problem until it starts to cause you major problems.
For some years now the go-to tool for analysing technical debt has been SonarQube (formerly Sonar). However SonarQube hails from the open source world and it hasn't exactly been a seamless fit in to the C# and TFS world. All that changed around the time of Build 2015 with the announcement that Microsoft had joined forces with the makers of SonarQube to start to address the situation. The video from Build 2015 which tells the story is well worth watching. To coincide with this announcement the ALM Rangers published a SonarQube installation guide aimed at TFS users. I used this guide to assist me in writing this blog post to see how SonarQube can be set up to work with our continuous delivery pipeline. It's worth noting that the guide mentions that it's possible to use integrated security with the jTDS driver that SonarQube uses to connect to SQL Server but I struggled for several hours before throwing in the towel. Please share in the comments if you have had success in doing this. Another difference between the guide and my setup is that the guide uses the all-in-one Brian Keller VM whereas I'm installing on distributed VMs.
Create New SonarQube Items
SonarQube requires a running Java instance and needs quite a bit of horsepower so the recommendation is to run it on a dedicated server. You'll need to create the following:
- A new domain service account -- I created ALM\SONARQUBE.
- A new VM running in your cloud service -- I called mine ALMSONARQUBE. As always in a demo Azure environment there is a desire to preserve Azure credits so I created mine as a basic A4 running Windows Server 2012 R2. Ensure the server is joined to your domain and that you add ALM\SONARQUBE to the Local Administrators group.
Install SonarQube
The following steps should be performed on ALMSONARQUBE :
- Download and install a Java SE Runtime Environment appropriate to your VMs OS. There are myriad download options and it can be confusing to the untrained Java eye but on the index page look out for the JRE download button:

- Download and unblock the latest version of SonarQube from the downloads page. There isn't a separate download for Windows -- the zip contains files that allow SonorQube to run on a variety of operating systems. Unzip the download to a temp location and copy the bin, conf and other folders to an installation folder. I chose to create C:\SonarQube\Main as the root for the bin, conf and other folders however this is slightly at odds with the ALM guide where they have a version folder under the main SonarQube folder. As this is my first time installing SonarQube I'm not sure how upgrades are handled but my guess is that everything apart from the conf folder can be overwritten with a new version.
- At this point you can run C:\SonarQube\Main\bin\windows-x86-64\StartSonar.bat (you may have to shift right-click and Run as administrator) to start SonarQube against its internal database and browse to http://localhost:9000 on ALMSONARQUBE to confirm that the basic installation is working. To stop SonarQube simply close the command window opened by StartSonar.bat.
Confirm SQL Server Connectivity
If you are intending to connect to a remote instance of SQL Server I highly recommend confirming connectivity from ALMSONARQUBE as the next step:
- On the ALMSONARQUBE machine create a new text file somewhere handy and rename the extension to udl.
- Open this Data Link Properties file and you will be presented with the ability to make a connection to SQL Server via a dialog that will be familiar to most developers. Enter connection details that you know work and use Test Connection to confirm connectivity.
- Possible remedies if you don't have connectivity are:
- The domain firewall is on for either or both machines. Consider turning it off as I do in my demo environment or opening up port 1433 for SQL Sever.
- SQL Sever has not been configured for the TCP/IP protocol. Open Sql Server Configuration Manager [sic] and from SQL Server Network Configuration > Protocols for MSSQLSERVER enable the TCP/IP protocol. Note that you'll need to restart the SQL Server service.
Create a SonarQube Database
Carry out the following steps to create and configure a database:
- Create a new blank SQL Server database on 2008 or 2012 -- I created SonarQube. I created my database on the same instance of SQL Server that runs TFS and Release Management. That's fine in a demo environment but in a production environment where you may be using the complimentary SQL Server licence for running TFS that may cause a licensing issue.
- SonarQube needs the database collation to be case-sensitive (CS) and accent-sensitive (AS). You can actually set this when you create the database but if it needs doing afterwards right-click the database in SSMS and choose Properties. On the Options page change the collation to SQL_Latin1_General_CP1_CS_AS.
- Still in SSMS, create a new SQL Server login from Security > Logins, ensuring that the Default language is English. Under User Mapping grant the login access to the SonarQube database and grant access to the db_owner role.
- On ALMSONARQUBE navigate to C:\SonarQube\Main and open sonar.properties from the conf folder in Notepad or similar. Make the follwoing changes:
- Find and uncomment sonar.jdbc.username and sonar.jdbc.password and supply the credentials created in the step above.
- Find the Microsoft SQLServer 2008/2012 section and uncomment sonar.jdbc.url. Amend the connection string so it includes the name of the database server and the database. The final result should be something like sonar.jdbc.url=jdbc:jtds:sqlserver://ALMTFSADMIN/SonarQube;SelectMethod=Cursor.
- Now test connectivity by running SonarStart.bat and confirming that the database schema has been created and that browsing to http://localhost:9000 is still successful.
Run SonarQube as a Service
The next piece of the installation is to configure SonarQube as a Windows service:
- Run C:\SonarQube\Main\bin\windows-x86-64\InstallNTService.bat (you may have to shift right-click and Run as administrator) to install the service.
- Run services.msc and find the SonarQube service. Open its Properties and from the Log On tab change the service to log on as the ALM\SONARQUBE domain account.
- Again test all is working as expected by browsing to http://localhost:9000.
Configure for C#
With a working SonarQube instance the next piece of the jigsaw is to enable it to work with C#:
- Head over to the C# plugin page and download and unblock the latest sonar-csharp-plugin-X.Y.jar.
- Copy the sonar-csharp-plugin-X.Y.jar to C:\SonarQube\Main\extensions\plugins and restart the SonarQube service.
- Log in to the SonarQube portal (http://localhost:9000 or http://ALMSONARQUBE:9000 if on a remote machine) as Administrator -- the default credentials are admin and admin.
- Navigate to Settings > System > Update Center and verify that the C# plugin is installed:

Configure the SonarQube Server as a Build Agent
In order to integrate with TFS a couple of SonarQube components we haven't installed yet need access to a TFS build agent. The approach I've taken here is to have the build agent running on the actual SonarQube server itself. This keeps everything together and ensures that your build agents that might be servicing checkins are not bogged down with other tasks. From ALMSONARQUBE:
- Run Team Foundation Server Setup (typically by mounting the iso and running tfs_server.exe) and perform the install.
- At the Team Foundation Server Configuration Center dialog chose Configure Team Foundation Build Service > Start Wizard.
- Use the usual dialogs to connect to the appropriate Team Project Collection and then at the Build Services tab choose the Scale out build services option to add more build agents to the existing build controller on the TFS administration server.
- In the Settings tab supply the details of the domain service account that should be used to run the build agents.
- Install Visual Studio 2013.4 as it's the easiest way to get all the required bits on the build server.
- From within Visual Studio navigate to Tools > Extensions and Updates and then from the Updates tab update Microsoft SQL Server Update for database tooling.
- Update nuget.exe by opening an Administrative command prompt at C:\Program Files\Microsoft Team Foundation Server 12.0\Tools and running nuget.exe update -self.
- Finally, clone an existing Contoso University build definition that is based on the TfvcTemplate.12.xaml template, or create and configure a new build definition for Contoso University. I called mine ContosoUniversity_SonarQube. Queue a new build based on this template and make sure that the build is successful. You'll want to fix any glitches at this stage before proceeding.
Install the SonarQube Runner Component.
The SonarQube Runner is the is recommended as the default launcher to analyse a project with SonarQube. Installation to ALMSONARQUBE is as follows:
- Create a Runner folder in C:\SonarQube.
- Download and unlock the latest version of sonar-runner-dist-X.Y.zip from the downloads page.
- Unzip the contents of sonar-runner-dist-X.Y.zip to C:\SonarQube\Runner so that the bin, conf and lib folders are in the root.
- Edit C:\SonarQube\Runner\conf\sonar-runner.properties by uncommenting and amending as required the following values:
- sonar.host.url=http://ALMSONARQUBE:9000
- sonar.jdbc.url=jdbc:jtds:sqlserver://ALMTFSADMIN/SonarQube;SelectMethod=Cursor
- sonar.jdbc.username=SonarQube
- sonar.jdbc.password=$PasswordForSonarQube$
- Create a new system variable called SONAR_RUNNER_HOME with the value C:\SonarQube\Runner.
- Amend the Path system variable adding in C:\SonarQube\Runner\bin.
- Restart the build service -- the Team Foundation Server Administration Console is just one place you can to do this.
Integration with Team Build
In order to call the SonarQube runner from a TFS build definition a component called Sonar.MSBuild.Runner has been developed. This needs installing on ALMSONARQUBE is as follows:
- Create an MSBuild folder in C:\SonarQube.
- Download and unlock the latest version of SonarQube.MSBuild.Runner-X.Y.zip from the C# downloads page.
- Unzip the contents of SonarQube.MSBuild.Runner-X.Y.zip to C:\SonarQube\MSBuild so that the files are in the root.
- Copy SonarQube.Integration.ImportBefore.targets to C:\Program Files (x86)\MSBuild\12.0\Microsoft.Common.Targets\ImportBefore. (This folder structure may have been created as part of the Visual Studio installation. If not you will need to create it manually.)
- The build definition cloned/created earlier (ContosoUniversity_SonarQube) should be amended as follows:
- Process > 2.Build > 5. Advanced > Pre-build script arguments = /key:ContosoUniversity /name:ContosoUniversity /version:1.0
- Process > 2.Build > 5. Advanced > Pre-build script path = C:\SonarQube\MSBuild\SonarQube.MSBuild.Runner.exe
- Process > 3. Test > 2. Advanced > Post-test script path = C:\SonarQube\MSBuild\SonarQube.MSBuild.Runner.exe
- Configure the build definition for unit test results as per this blog post. Note though that Test assembly file specification should be set to **\*unittest*.dll;**\*unittest*.appx to avoid the automated web tests being classed as unit tests.
Show Time
With all the configuration complete it's time to queue a new build. If all is well you should see that the build report contains a SonarQube Analysis Summary section:

Clicking on the Analysis results link in the build report should take you to the dashboard for the newly created ContosoUniversity project in SonarQube:

This project was created courtesy of the Pre-build script arguments in the build definition (/key:ContosoUniversity /name:ContosoUniversity /version:1.0). If for some reason you prefer to create the project yourself the instructions are here. Do note that the dashboard is reporting 100% unit tests coverage only because my Contoso University sample action uses quick and dirty unit tests for demo purposes.
And Finally...
Between the ALM Rangers guide and the installation walkthrough above I hope you will find getting started with SonarQube and TFS reasonably straightforward. Do be aware that I found the ALM Ranger's guide to be a little confusing in places. There is the issue of integrated security with SQL Server that I never managed to crack and then a strange reference on page 22 about sonar-runner.properties not being needed after integrating with team build which had me scratching my head since how else can the components know how to connect to the SonarQube portal and database? It's early days though and I'm sure the documentation will improve and mature with time.
Performing the installation is just the start of the journey of course. There is a lot to explore, so do take time to work through the resources at sonarqube.org.
Cheers -- Graham
Getting Started with Visual Studio Online
Not everyone wants or needs the full-blown power of an on-premises TFS installation and if that's you then Visual Studio Online (TFS in the cloud) is a great way to integrate Visual Studio with version control, backlog management, agile planning tools and many of the other great features that are available with TFS. Some things in VSO work in a similar way to TFS so some of the learning resources can do double duty -- my Getting Started with Team Foundation Server and ALM guide is here. There are also dedicated VSO learning resources and this is my recommend list:
One of the really great things about VSO is that you can get started for free (and it can stay free within very generous limits). Combined with the free Visual Studio Community 2013 it makes for a fantastic learning opportunity for anyone without an MSDN account.
Cheers -- Graham
Continuous Delivery with TFS: Automatically Versioning Assemblies as Part of The Build
In a previous post in this series on implementing continuous delivery with TFS we looked at how some simple tweaks to the build process can help with the goal of baking quality in. This post continues in the vein of making improvements to the pipeline by addressing the issue of assembly versioning. What issue is that, I hear some of you asking? It's the situation where your Visual Studio solution contains many projects (maybe dozens) and you want all the projects to have same assembly versioning, ie the details you would traditionally set in AssemblyInfo.cs. A Google search will reveal several ways to accomplish this but most techniques involve some maintenance when a new project is added. In this post I explain how to make a publicly available low maintenance solution work with the Release Management build process template. I should point out that this issue won't affect everyone, and if you or your business don't care about this issue then do feel free to ignore. It is quite interesting though as it involves editing a build process template.
TFSVersioning on CodePlex
If assembly versioning is important to you and you use TFS there is a good chance you've seen the TFSVersioning solution available on CodePlex. It's a very nice piece of work that versions all of your solution's assemblies as part of the build process. If a new project is added it automatically gets included, so it's a low maintenance solution. There are essentially two ways to use TFSVersioning -- with the build process template that the project provides or with your own process template. This latter technique is a little involved as it requires editing your build template, but it's the technique we need to use here since we would like to use the ReleaseTfvcTemplate.12.xml build process template that ships with Release Management 2013.4. It turns out that editing this template is quite a job and I'm indebted to my good friend, colleague and TFS guru Bharath Sundaresan for figuring out all of the complicated details. An additional required hurdle is that the project hasn't been updated for TFS 2013 but fortunately it's not a lot of work to remedy this. The TFSVersioning deployment pack is available from the Downloads page and it has some great documentation which I recommend reading before you begin.
Update TFSVersioning for TFS2013
The core component that we need to update for TFS 2013 is TfsBuild.Versioning.Activities.dll. To accomplish this follow these steps:
- Download the latest source code for TFSVersioning from the Source Code page and unzip to somewhere convenient.
- Navigate to the latest version under Prod and open BuildVersioning.sln. Remove the TfsBuild.Versioning.Activities.Tests and TfsBuild.Versioning.Activities.Tests.Stubs projects as we don't need to amend them for what we are doing here.
- Expand the References node of the TfsBuild.Versioning.Activities project and notice that the Microsoft.TeamFoundation.* references are marked as missing:

- Remove these references and replace them with the 2013 versions from C:\Program Files (x86)\Microsoft Visual Studio 12.0\Common7\IDE\ReferenceAssemblies\v2.0.
- You shoud now be able to build a Release version of TfsBuild.Versioning.Activities.dll.
Once you have succesfully updated the project for TFS 2013 it's probably a good idea to make sure that a basic installation of TFSVersioning works. Follow these steps to verify this:
- Download and unzip the latest TFSVersioning deployment pack -- currently 2.0.1. Copy VersioningBuildTemplate20.xaml from the pack to the ContosoUniversity BuildProcessTemplates folder and check in to version control.
- Under ContosoUniversity create a new folder called CustomActivityStorage and copy over the new version of TfsBuild.Versioning.Activities.dll. Check in to version control.
- From Team Explorer in Visual Studio navigate to Builds > Actions > Manage Build Controllers.
- In Manage Build Controllers dialog choose Properties and in Manage Controller Properties set Version control path to custom assemblies to $/ContosoUniversity/CustomActivityStorage.

- Now create a test build definition, replacing the standard release template with VersioningBuildTemplate20.xaml and setting all required properties including the drop folder.
- Whilst editing the build definition set any properties under the Build Versioning and Build Versioning (Optional) sections as you wish. Refer to the documentation for TFSVersioning for details.
- Queue a manual build of the test build definition. Observe in the drops folder that the ContosoUniversity.* binaries all have the same File version.
Update the ReleaseTfvcTemplate.12 Release Template with the TFSVersioning Custom Activity
This process broadly follows the Harder Installation but More Instructive section of the TfsVersioning User and Development Guide however modifying ReleaseTfvcTemplate.12.xaml requires several more steps. Partly this is because TfsBuild.Versioning.Activities.dll contains more functionality that isn't referred to in the documentation and partly because ReleaseTfvcTemplate.12.xaml is missing some activities that (reading between the lines) were present in the template that was used by the TFSVersioning project. In the instructions below I assume a degree of familiarity with editing release templates. If you need guidance take a look here for just one example of how to get started. You should be aware that there are two ways to edit templates: through the XAML designer and through notepad. The former is less prone to error but slow and the latter is much faster but with the distinct possibility of a copy and paste error. The technique I describe below also sets you up for relatively easy debugging of the process template since there is a good chance of not getting everything right first time.
- Install the updated TfsBuild.Versioning.Activities.dll to the Global Assembly Cache by opening a Visual Studio command prompt (from C:\Program Files (x86)\Microsoft Visual Studio 12.0\Common7\Tools\Shortcuts if your shortcuts are missing in Windows 8.1) and issuing a command similar to gacutil -i "C:\Users\Graham\Downloads\tfsversioning-103318\Prod\V 2.0.1.0\Source\TfsBuild.Versioning.Activities\bin\Release\TfsBuild.Versioning.Activities.dll".
- Copy C:\Program Files (x86)\Microsoft Visual Studio 12.0\Release Management\Client\bin\ReleaseTfvcTemplate.12.xaml to the ContosoUniversity BuildProcessTemplates folder and check in to version control. Chances are you already have a template with the same name so you'll probably want to change the name to ReleaseTfvcTemplate.12.Versioning.xaml or similar. Once checked in open this template in Visual Studio so it displays in the XAML editor.
- Set up the Visual Studio Toolbox to work with TfsBuild.Versioning.Activities.dll in a custom tab. You can reference the version in CustomActivityStorage. Note that you only need to add the VersionAssemblyInfoFiles item.
- Drag the VersionAssemblyInfoFiles activity from the toolbox to the workflow as the first item under Compile, Test and Publish. Feel free to give the activity a custom name. If you examine the properties of the activity you will see all the InArguments that need to be married up with either Variables or Arguments that do not yet exist in the process template:

- The arguments can be created as per the TfsVersioning User and Development Guide instructions using the Arguments editor but a faster way is to open the template in Notepad, copy the following values and append them to the <x:Members> section.
1 2 3 4 5 6 7 8 9 10 11 12 13 14 15 16 17 18 |
<x:Property Name="AssemblyCompanyPattern" Type="InArgument(x:String)" /> <x:Property Name="AssemblyConfigurationPattern" Type="InArgument(x:String)" /> <x:Property Name="AssemblyCopyrightPattern" Type="InArgument(x:String)" /> <x:Property Name="AssemblyCulturePattern" Type="InArgument(x:String)" /> <x:Property Name="AssemblyDescriptionPattern" Type="InArgument(x:String)" /> <x:Property Name="AssemblyFileVersionPattern" Type="InArgument(x:String)" /> <x:Property Name="AssemblyInfoFilePattern" Type="InArgument(x:String)" /> <x:Property Name="AssemblyInformationalVersionPattern" Type="InArgument(x:String)" /> <x:Property Name="AssemblyProductPattern" Type="InArgument(x:String)" /> <x:Property Name="AssemblyTitlePattern" Type="InArgument(x:String)" /> <x:Property Name="AssemblyTrademarkPattern" Type="InArgument(x:String)" /> <x:Property Name="AssemblyVersionPattern" Type="InArgument(x:String)" /> <x:Property Name="BuildNumberPrefix" Type="InArgument(x:Int32)" /> <x:Property Name="BuildSettings" Type="InArgument(mtbwa:BuildSettings)" /> <x:Property Name="DoCheckinAssemblyInfoFiles" Type="InArgument(x:Boolean)" /> <x:Property Name="ForceCreateVersion" Type="InArgument(x:Boolean)" /> <x:Property Name="UseVersionSeedFile" Type="InArgument(x:Boolean)" /> <x:Property Name="VersionSeedFilePath" Type="InArgument(x:String)" /> |
- The next step is to add the metatdata items that allow each of the above arguments to be set. Again, it's possible to use the Metadata editor but the faster Notepad way is to copy the following values and append them to the <mtbw:ProcessParameterMetadataCollection> section.
1 2 3 4 5 6 7 8 9 10 11 12 13 14 15 16 17 |
<mtbw:ProcessParameterMetadata Category="Build Versioning" Description="This is the pattern used to replace the AssemblyFileVersion value." DisplayName="Assembly File Version Pattern" ParameterName="AssemblyFileVersionPattern" /> <mtbw:ProcessParameterMetadata Category="Build Versioning" Description="This is the pattern used to replace the AssemblyVersion value." DisplayName="Assembly Version Pattern" ParameterName="AssemblyVersionPattern" /> <mtbw:ProcessParameterMetadata Category="Build Versioning" Description="This is the pattern used to find the AssemblyInfo files. Generally, you shouldn't need to change this value." DisplayName="AssemblyInfo File Pattern" ParameterName="AssemblyInfoFilePattern" /> <mtbw:ProcessParameterMetadata Category="Build Versioning" Description="Indicated whether the AssemblyInfo files should be checked back into source control after they are modified." DisplayName="Perform Check-in of the AssemblyInfo Files" ParameterName="DoCheckinAssemblyInfoFiles" /> <mtbw:ProcessParameterMetadata Category="Build Versioning" Description="If true, the versioning process will create AssemblyVersion or AssemblyFileVersion values even if they do not already exist." DisplayName="Force Create Version" ParameterName="ForceCreateVersion" /> <mtbw:ProcessParameterMetadata Category="Build Versioning" Description="Indicate which values to use as the versioning patterns. If set to True, the "seedfile.xml" file must exist in the location described by the "Version Seed File Path" setting. Otherwise, the "Assembly Version Pattern" and "Assembly File Version Pattern" values will be used." DisplayName="Use Version Seed File" ParameterName="UseVersionSeedFile" /> <mtbw:ProcessParameterMetadata Category="Build Versioning" Description="Relative path location for the seed (xml) file containing the Assembly Version and Assembly File Version values." DisplayName="Version Seed File Path" ParameterName="VersionSeedFilePath" /> <mtbw:ProcessParameterMetadata Category="Build Versioning" Description="Number added to the version component that uses the "B" symbol pattern (Build Number). This helps create a unique version for a build definition." DisplayName="Build Number Prefix" ParameterName="BuildNumberPrefix" /> <mtbw:ProcessParameterMetadata Category="Build Versioning (Optional)" Description="Assembly Title Attribute: String value specifying a friendly name for the assembly. For example, an assembly named comdlg might have the title Microsoft Common Dialog Control." DisplayName="Assembly Title Pattern" ParameterName="AssemblyTitlePattern" /> <mtbw:ProcessParameterMetadata Category="Build Versioning (Optional)" Description="Assembly Description Attribute: String value specifying a short description that summarizes the nature and purpose of the assembly." DisplayName="Assembly Description Pattern" ParameterName="AssemblyDescriptionPattern" /> <mtbw:ProcessParameterMetadata Category="Build Versioning (Optional)" Description="Assembly Configuration Attribute: String value indicating the configuration of the assembly, such as Retail or Debug. The runtime does not use this value." DisplayName="Assembly Configuration Pattern" ParameterName="AssemblyConfigurationPattern" /> <mtbw:ProcessParameterMetadata Category="Build Versioning (Optional)" Description="Assembly Company Attribute: String value specifying a company name." DisplayName="Assembly Company Pattern" ParameterName="AssemblyCompanyPattern" /> <mtbw:ProcessParameterMetadata Category="Build Versioning (Optional)" Description="Assembly Product Attribute: String value specifying product information." DisplayName="Assembly Product Pattern" ParameterName="AssemblyProductPattern" /> <mtbw:ProcessParameterMetadata Category="Build Versioning (Optional)" Description="Assembly Copyright Attribute: String value specifying copyright information." DisplayName="Assembly Copyright Pattern" ParameterName="AssemblyCopyrightPattern" /> <mtbw:ProcessParameterMetadata Category="Build Versioning (Optional)" Description="Assembly Trademark Attribute: String value specifying trademark information.
" DisplayName="Assembly Trademark Pattern" ParameterName="AssemblyTrademarkPattern" /> <mtbw:ProcessParameterMetadata Category="Build Versioning (Optional)" Description="Assembly Culture Attribute: Enumerated field indicating the culture that the assembly supports. An assembly can also specify culture independence, indicating that it contains the resources for the default culture." DisplayName="Assembly Culture Pattern" ParameterName="AssemblyCulturePattern" /> <mtbw:ProcessParameterMetadata Category="Build Versioning (Optional)" Description="Assembly Informational Version Attribute: String value specifying version information that is not used by the common language runtime, such as a full product version number. " DisplayName="Assembly Informational Version Pattern" ParameterName="AssemblyInformationalVersionPattern" /> |
- Back in the XAML editor navigate to the Arguments editor and supply default values for some arguments as follows:
- AssemblyFileVersionPattern = "1.0.J.B"
- AssemblyInfoFilePattern = "AssemblyInfo.*"
- AssemblyVersionPattern = "1.0.0.0"
- BuildNumberPrefix = 0
- DoCheckinAssemblyInfoFiles = False
- ForceCreateVersion = False
- UseVersionSeedFile = False
- VersionSeedFilePath= "TfsVersion\VersionSeed.xml"
- Navigate to the Variables editor and create the following variables (you may need to Browse for Types to get some of the variable types):
- Name = BuildAgent; Variable Type = Microsoft.TeamFoundation.Build.Client.iBuildAgent; Scope = Compile, Test and Publish
- Name = BuildDetail; Variable Type = Microsoft.TeamFoundation.Build.Client.iBuildDetail; Scope = Compile, Test and Publish
- Name = BuildDirectory; Variable Type = String; Scope = Compile, Test and Publish
- Name = Workspace, Variable Type = Microsoft.TeamFoundation.VersionControl.Client.Workspace; Scope = Compile, Test and Publish
- From Toolbox > Team Foundation Build Activities add the following activities to the top of Compile, Test and Publish so they appear in the order listed:
- Activity = GetBuildAgent; Result = BuildAgent
- Activity = GetBuildDetail; Result = BuildDetail
- Activity = GetWorkspace; Name = String.Format("{0}_{1}_{2}", BuildDetail.BuildDefinition.Id, Microsoft.TeamFoundation.LinkingUtilities.DecodeUri(BuildAgent.Uri.AbsoluteUri).ToolSpecificId, BuildAgent.ServiceHost.Name); Result = Workspace
- Return to the properties of the VersionAssemblyInfoFiles activity and use the ellipsis at the end of each row to replace Enter a VB expression with the correct value. The result should be as follows:

- As a final step in this section save all the changes and check them in to version control.
Testing the Updated ReleaseTfvcTemplate.12 Release Template
At long last we are in a position to test the new template. The easiest way is to edit the test build definition created above and replace VersioningBuildTemplate20.xaml with our updated ReleaseTfvcTemplate.12.xaml version. Set any properties as required and queue a new build. With luck you will have a successful build and a set of uniformly versioned assemblies!
If you are having difficulty in implementing the steps above the debugging process is reasonably straightforward. Once the build template has been added to the test build definition you can make changes to the template, save them and then check them in to version control. Simply queue a new build to check your changes.
The final piece of the jigsaw when everything is working is to edit ContosoUniversity_Main_Nightly to use the new version of the template. And to enjoy a well-deserved drink.
Cheers -- Graham
Getting Started with Microsoft Test Manager
Microsoft Test Manager is the part of the TFS ecosystem that helps you test your application. Test Cases are organised in to Test Suites which are all contained in a Test Plan. There's a wealth of automated capability for taking some of the drudgery out of manual testing and all manner of features for analysing and managing test results. That's only about 5% of what it does so be sure to check out these resources to learn about the full breadth of what MTM can do:
One thing to be aware of is that Team Web Access (the browser component of TFS) has a growing number of test features available directly in the browser. In some sitations that may be all you need See here for just one article that has more details.
Cheers -- Graham
Continuous Delivery with TFS: Configuration Tweaks to Help Bake Quality In
In the previous post in my series on implementing continuous delivery with TFS we got to the point of being able to deploy our sample application to each stage of the delivery pipeline. That's a great point to get to because we've now automated our deployment process and have a mechanism (which isn't perfect since it's not version controlled) for managing configuration. However there is a lot more we can and should do to help ensure that our software and ALM processes have quality baked in from the outset rather than added as an afterthought.
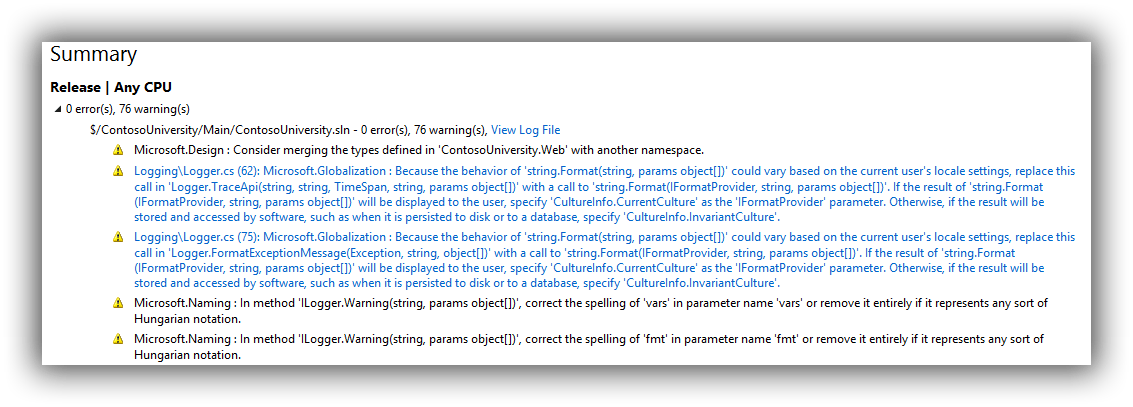
A simple first step is to configure Code Analysis for the ContosoUniversity.Web project. (We've already done this for ContosoUniversity.Database.) From the properties page of ContosoUniversity.Web navigate to the Code Analysis tab and change the Configuration to All Configurations. and check Enable Code Analysis on Build. By default the rule set that is selected is Microsoft Managed Recommended Rules but this doesn't generate any code analysis issues -- at least on my project. That doesn't help illustrate the benefit so change the rule set to Microsoft All Rules. Save the setting and perform a build (ie F6) and the Code Analysis tool window should present us with a nice list of ‘issues'.

Check the change in to version control and then edit the ContosoUniversity_Main_Checkin build definition setting Process > Build process parameters > 2. Build 5. Advanced > Perform code analysis = Always (belt and braces since the AsConfigured setting ought to work but this ensures it will if anyone meddles with the project settings). Save ContosoUniversity_Main_Checkin and queue a new build. The build report should now show the issues as warnings (abridged version in screenshot):
To keep everything synchronised perform the same change to ContosoUniversity_Main_Nightly and check that it too generates the same warnings. The combination of running code analysis when the solution builds both locally and during continuous integration should give developers enough of a clue that they should be attending to these warnings. To be fair, just setting projects up to use Microsoft All Rules and forcing them all to be fixed isn't a likely recipe for success. Some rules might not apply or might not be appropriate. And if the development team are working on an inherited brownfield application all bets are off! If a more Draconian approach is genuinely needed there is another trick up TFS's sleeve which I mention later in this post. For now you may want to switch back to Microsoft Managed Recommended Rules to keep the noise down.
Configure Unit Test Results
Unit testing is hopefully by now an ingrained aspect of your team's software development practices. But how do you keep track of progress? This is pretty easy to do as part of the TFS build and our starting point is to add a Unit Test Project.

I'm calling mine ContosoUniversity.Web.UnitTests to differentiate from the automated web tests that we'll be adding in a later post but the takehome message here is that you should have a naming convention that works for your scenario as these test projects can quickly get your solution in to a mess if you are not pro-active about managing them. With that out of the way I want to be quite clear that this post isn't going to be a lesson in how to write unit tests and I'm simply going to do some daft things with Assert to quickly illustrate what can be achieved as part of the TFS build process. With that in mind amend the UnitTest1 class so you have two test methods with simple Assert statements:
|
|
[TestMethod] public void TestMethod1() { Assert.AreEqual(1, 1); } [TestMethod] public void TestMethod2() { Assert.AreEqual(1, 1); } |
Run the tests from Test Explorer and we should now have two passing tests. Check everything in to version control and queue a new build from ContosoUniversity_Main_Checkin. Examining the build report you should see that a test run was completed with 100% pass rate.

Now change one of the tests so that it will fail (Assert.AreEqual(1, 0);), check the change in to version control and queue another build from ContosoUniversity_Main_Checkin. The build report should now show that the build only partially succeeded:

Additionally the Summary section now advises on the specifics of how many tests passed:

We haven't had to do anything to get this information about our unit tests and that's because out of the box the build template comes configured to run any tests that are in projects conforming to a **\*test*.dll;**\*test*.appx file specification. All this can be configured from a build definition under Process > Build process parameters > 3. Test > 1. Automated tests. Hours of fun can be had tweaking all this but there are two other options which may be of interest which you can access by clicking on the ellipsis of the 1. Test source row. This brings up the Add/Edit Test Run dialog where it's possible to set Fail build on test failure and Enable Code Coverage from the Options dropdown:

To see the effect of these settings make the changes and save out of the build definition editing process. Queue a new build which should now fail. You should also see that we now have code coverage results:

To be very clear this isn't the end of this story because code coverage is reporting on our unit test project which isn't what we want. To exclude the unit test project itself we need to add a .runsettings file to the solution. That's out of scope in this post but you can find more details here if you want to try it out. If you want even more details about the state your code is in you should look at something like SonarQube.
Source Control Settings
A final area that we'll look at in this post are the settings that can be accessed via Team Explorer > Settings > Team Project > Source Control. This brings up the Source Control Settings dialog where Check-in Policy > Add is of particular interest.

This allows the following to be configured (descriptions shamelessly copied from the Description label):
- Builds -- This policy requires that the last build was successful for each affected continuous integration build definition.
- Changeset Comments Policy -- This policy will require users to provide check-in comments.
- Code Analysis -- This policy requires that Code Analysis is run before check-in.
- Custom Path Policy -- This policy scopes other policies to specific folders or file types.
- Forbidden Patterns Policy -- This policy prevents users from checking in files with forbidden filename patterns.
- Work Item Query Policy -- This policy allows you to specify a work item query whose results will be the only legal work items for a check-in to be associated with.
- Work Items -- This policy requires that one or more work items be associated with every check-in.
I'm not going to explain these further than their descriptions as they are pretty self-explanatory, suffice to say that there's a lot one can do here to ensure a robust check-in process. A word of caution though: most of these policies can be overridden so use them wisely or your developers will start to do just that.
That's it for this post. Next up is the thrilling world of developing automated web tests with Selenium.
Cheers -- Graham


