When I first started listing the draft titles of blog posts for my series on implementing continuous delivery with TFS naturally the vNext / Agent-less / PowerShell DSC feature of Release Management that shipped with 2013.3 was on my list. And why not? Surely this was the successor to the agent-based way of doing things? Out with the old and in with the new...
Naturally I'd looked in to PowerShell DSC and knew that it was touted as a make-it-so technology for configuring Windows servers: rather than using an imperative script to install and configure components one uses a declarative approach that describes what a server should look like and PowerShell DSC goes off and does one's bidding, so to speak. It wasn't immediately obvious how the new vNext features of Release Management would relate to the delivery pipeline I was building in Azure but I trusted that time would tell. Well time has now told and as far as my research is concerned I can't see that the vNext features have any part to play. Deploying a DACPAC? Running automated tests via Microsoft Test Manager? The vNext features appear to be irrelevant.
Interestingly I'm not the only one who has come to the conclusion that vNext is not a must-do replacement for agent-based deployments. Both Colin Dembovsky and Donovan Brown have recently blogged on similar lines. So what is the point of the vNext features in Release Management? Clearly if you want to ensure that your environment is configured correctly before you deploy your components then a vNext release template might be the way to go. But most organisations are probably (or should be) thinking about automating the configuration of their servers at a higher, more global level, not just when it comes to triggering an actual deployment. Certainly at the time of writing this post I think I'm right in saying that if you want to use Release Management with Visual Studio Online you have to use a vNext release template, but this just feels like Microsoft haven't implemented using agent-based release templates yet.
Although I'm planning to cover PowerShell DSC in a different blog post series as far as this series is concerned I'm not going to complicate things by covering the vNext way of implementing releases as it feels like it won't add much value and will be entering a world of unnecessary rework and pain. Disagree? Sound off in the comments...
In this instalment of my series on implementing continuous delivery with TFS we pick up where we left off in the previous post and add the automated web tests we created to Microsoft Test Manager. We then look at how to schedule these tests for automatic execution through the deployment pipeline. Exciting stuff so lets get started...
Configure a Test Controller
Our starting point is to configure our TFS admin machine as a test controller. (You could create a dedicated machine of course but in our demo environment it's an unnecessary overhead.)
Create a new domain account called TFSTEST and add to the Administrators group on your ALMTFSADMIN machine.
Download the Agents for Microsoft Visual Studio 2013. See here for 2013.4 releases.
Mount the Agents for Microsoft Visual Studio 2013 iso and from the TestController folder install the test controller on ALMTFSADMIN configuring it to run with the TFSTEST account and for the appropriate Team Project Collection:
Click Apply settings to ensure that the configuration steps were successful.
Configure a Web Client Test Machine
The big picture here is that we will deploy the Contoso University application to the DAT (Development Automated Test) environment and then run the automated tests against DAT. We won't be using our development machine and instead will make use of a dedicated web client test machine which should be configured as follows:
Create an new Azure VM from a Windows 8.1 Enterprise (x64) image called ALMCLIENTWIN81. (Note that Windows desktop editions are only available to MSDN subscribers).
Add the RMDEPLOYER and TFSTEST to the Administrators group.
Install the Release Management Deployment Agent and ensure it is in the Ready status in the Release Management client. (See here for details.)
Install Microsoft Test Manager 2013.
Mount the Agents for Microsoft Visual Studio 2013 iso (see above) and from the TestAgent folder install the test agent configuring it to run with the TFSTEST account and to register with the test controller installed above:
Click Apply settings to ensure that the configuration steps were successful.
Install FireFox.
Configure Microsoft Test Manager
As usual I'm assuming you have a degree of familiarity with the tooling, in this case Microsoft Test Manager 2013. If not then see my getting started with Microsoft Test Manager blog post here. You will need to have installed MTM on to your development machine and successfully connected to your ContosoUniversity Team Project. Now carry out the following steps.
Open MTM and connect to Lab Center. Navigate to Controllers and ensure that ALMTFSADMIN is registered as the Test Controller and that the Test Agent on ALMCLIENTWIN81 is in the Ready status:
Navigate to Lab and create a new Standard environment called ALMCLIENTWIN81. From the Machines page add ALMCLIENTWIN81 and give it the Web Client role and specify credentials which are in the Administrators group on ALMCLIENTWIN81. From the Verification page click Verify to initiate the verification procedure. If all verifications pass you should end up with a new environment in the ready state:
Navigate to Test Settings and create a new entry called Automated Test Run and choose Automated for the What type of tests do you want to run? question. From the Roles page choose the Web Client role which should match the environment created above. From the Data and Diagnostics page choose everything except Screen and Voice Recorder and feel free to configure each option as you see fit. Click on Finish to save the settings and close MTM.
Open MTM and connect to Testing Center. If this is the first time you have connected you will need to Add a Test Plan:
Add a test plan called Regression and then choose Select plan to open it at the Contents tab. Add a new suite called Department by right-clicking the Regression node and choosing New suite:
Now over in the right-hand pane create two new test cases called Can_Navigate_To_Departments and Can_Create_Departmemt:
Note the IDs of these new test cases and switch to Visual Studio, opening the ContosoUniversity solution if it isn't already open. From Team Explorer > Work Items search for each of the two new test cases and in turn open them to carry out the next step for both test cases.
Click on the Associated Automation tab and then choose the ellipsis at the right of the Automated test name field. This brings up the Choose Test dialog from where you can select the required test:
Make sure to save the test case work items after associating the automated tests.
Back in Microsoft Test Manager navigate to the Run Settings tab of the test plan. Under Automated runs set Test settings = Automated Test Run and Test environment = ALMCLIENTWIN81 -- the items we created above. Make sure you Save and Close.
Configure Release Management
With our automated web tests incorporated in to an MTM Test Plan the next step is to configure Release Management to run them as part of the DAT stage of the deployment pipeline. Carry out the following steps from within Release Management:
From Configure Paths > Servers add ALMCLIENTWIN81 and ensure it is in the Ready status.
From Configure Paths > Environments add ALMCLIENTWIN81 via the Link Existing button.
From Configure Apps > Components create a new component called Contoso University\Run MTM Auto Tests and configure as follows:
Source > Builds with application (= selected) > Path to package = \
Deployment > Tool = MTM Automated Tests Manager
Configuration Variables > Variable Replacement Mode = Only in Command
From Configure Apps > Agent-based Release Templates open Contoso University\DAT>DQA and edit the Deployment Sequence for DAT as follows:
From Toolbox > Servers drag ALMCLIENTWIN81 to the Deployment Sequence below ALMSQL01.
From Toolbox > Components right click the node and add Contoso University\Run MTM Auto Tests.
Now drag Contoso University\Run MTM Auto Tests to ALMCLIENTWIN81 and configure the compnent as follows:
TestRun Title = Department Tests
PlanId = 28 (or whatever your Plan ID is as it is likely to be different)
SuiteId = 29 (or whatever your Suite ID is as it is likely to be different)
ConfigId = 1 (or whatever your Configuration ID is as it is likely to be different)
TfsCollection = http://almtfsadmin:8080/tfs/PrmCollection (or whatever your Team Collection URL is as it is likely to be different)
TeamProject = ContosoUniversity
TestEnvironment = ALMCLIENTWIN81
Build Directory = $(PackageLocation)
Some Final Configuration
In order for automated tests to run I've found that as a minimum the Deployment Agent account (RMDEPLOYER) needs to be in the Project Collection Administrators group. It may be possible to fine tune this requirement but it's a level of trial and error I haven't had time to perform. This permission can be granted on your TFS admin machine from Team Foundation Server Administration Console > $(TfsAdminMachineName) > Application Tier > Team Project Collections > $(TeamProjetName) > General > Group Membership > [$(TeamProjetName)]\Project Collection Administrators > Properties.
If your Visual Studio solution contains a mix of unit test and automated test projects and the build definition is configured to run unit tests you are going to want to ensure the automated tests are excluded as they will fail and cause the build to report it only partially succeeded. There are various ways to do this but the technique I've used is to modify all build definitions to change Process > Build Process Parameters > 3. Test > 1. Automated tests > 1. Test source > Test sources spec to unittest where it was previously just test. This obviously ties in with my project naming convention of ContosoUniversity.Web.UnitTests and ContosoUniversity.Web.AutoTests.
Start a Deployment
From Visual Studio manually queue a new build from ContosoUniversity_Main_Nightly. If everything is in place the build should succeed and you can open Microsoft Test Manager to check the results. Navigate to Testing Center > Test > Analyze Test Runs. You should see your test run listed and double-clicking it will open up the fruits of all our endeavours so far, the test run results:
Wrap-Up
If getting to this stage felt like it required a huge amount of detailed configuration you are probably right. There are a great many moving parts to get working correctly and any future simplification of the process by Microsoft in the in the future will be welcomed.
Although we've reached a major milestone on this continuous delivery journey there is still plenty more to talk about so do watch out for the next installation.
In this blog post (which is part of my series on on implementing continuous delivery with TFS) we look at creating automated web tests with Selenium. Although the need for manual testing will probably never go away any organisation that wants to deploy software on a frequent basis is going to have to automate some if not most of the application testing effort if quality has any hope of being maintained. Clearly, if you want to release your application once a week but it takes two weeks to properly manually test your application you have a big problem, and automation is probably the only sensible answer.
Let's be clear that test automation is a mammoth subject and not only involves automating the driving of the application but also data setup and teardown and service virtualisation ie stubbing interfaces to external systems. Then there is managing your tests between sprints or projects -- when you have 500 or so this is a non-trivial task. I can't possibly cover the subject properly in a couple of posts and instead my aim is to show you how to begin to create a framework for writing automated tests and crucially how to make them run in the TFS ecosystem. I'll be using Selenium since it's used by John Sonmez in his superb Pluralsight course Creating an Automated Testing Framework With Selenium. I thoroughly recommend this course to anyone who is embarking on an automated testing project, and some of the code I use comes directly from John's course (with his kind permission). If you are using a different automation technology such as CodedUI similar principles will apply. As with many other things in software development there is a quick and dirty way to write automated tests (by recording them which makes them very brittle -- think recorded Excel macros) and there is the professional approach where you put the time and effort in to make a much more robust solution. I'll be using the latter technique although I will only scratch the surface of what's possible.
Create the Framework
Our simple automation solution will be in two parts, the first of which is a fluent API framework that models the web application's web pages. To get the ball rolling create a new class library project in the ContosoUniversity solution called ContosoUniversity.Web.SeFramework and complete these steps:
Via NuGet install Selenium WebDriver and Selenium WebDriver Support Classes.
Remove Class1.cs and add a class called Driver.cs. Ensure Driver.cs contains the following code:
Open the properties of ContosoUniversity.Web and from the Web tab find the IIS Express port number. Replace the four zeros in the above code with the port number.
Add a new class called DepartmentsPage.cs and ensure it contains the following code:
To keep everything in layers we'll create our tests in a new Unit Test project. We need to use the MSTest framework because (jumping ahead here) Microsoft Test Manager only works with MSTest at the moment. So, add a new Unit Test project called ContosoUniversity.Web.AutoTests and complete these steps:
Create a project reference to ContosoUniversity.Web.SeFramework.
Add a new class called ContosoTest.cs and ensure it contains the following code:
Build the solution so the tests are found in Test Explorer. Select the Can_Cerate_Department and Can_Navigate_To_Departments tests then add them to a new playlist by right-clicking and selecting Add to Playlist. Save the playlist in the root of ContosoUniversity.Web.AutoTests.
Running the Tests
In order to run the tests using the code above you'll need to install FireFox. You can't just run the tests though because you need to take steps to ensure there is a web server to handle the requests. The technique is to run the solution so the application starts and IIS Express is running (the icon should appear in the System Tray). Then from the Debug menu in Visual Studio select Detach All. This will close the browser that is running the application but will leave IIS Express running. You can now run the tests (make sure you are running in a Debug configuration) and watch Selenium do all the hard work!
What Have we Done Here?
I want to reiterate that this post isn't meant to be a tutorial on how to write automated tests and you should regard the code as an example of how to get up-and-running quickly rather than being of production-ready quality. Although this isn't a tutorial some explanation of what's going on is in order.
In the ContosoUniversity.Web.SeFramework project the Driver class is essentially the link to FireFox and also has some methods (not used here) to help with tricky web pages that take time to do their thing. The DepartmentsPage has a method to navigate to the page that lists all of the departments and a helper property and method for use in Assert statements. The interesting class is NewDepartmentPage since this illustrates the technique for writing code that allows the use of a fluent syntax for writing tests.
In the ContosoUniversity.Web.AutoTests project the ContosoTest class is a base class that contains common functionality (starting and stopping the browser) for actual test classes to inherit. DepartmentTests inherits ContosoTest and uses the fluent API to cause the browser to navigate around the application doing things that we want to test. It's all very basic but hopefully enough to illustrate the huge potential of this type of testing.
With our automated web tests created we now need to configure the infrastructure and tooling to automate their execution according to a schedule. Watch out for the next instalment when we'll be doing just that.
In the previous post in my series on implementing continuous delivery with TFS we got to the point of being able to deploy our sample application to each stage of the delivery pipeline. That's a great point to get to because we've now automated our deployment process and have a mechanism (which isn't perfect since it's not version controlled) for managing configuration. However there is a lot more we can and should do to help ensure that our software and ALM processes have quality baked in from the outset rather than added as an afterthought.
Configure Code Analysis
A simple first step is to configure Code Analysis for the ContosoUniversity.Web project. (We've already done this for ContosoUniversity.Database.) From the properties page of ContosoUniversity.Web navigate to the Code Analysis tab and change the Configuration to All Configurations. and check Enable Code Analysis on Build. By default the rule set that is selected is Microsoft Managed Recommended Rules but this doesn't generate any code analysis issues -- at least on my project. That doesn't help illustrate the benefit so change the rule set to Microsoft All Rules. Save the setting and perform a build (ie F6) and the Code Analysis tool window should present us with a nice list of ‘issues'.
Check the change in to version control and then edit the ContosoUniversity_Main_Checkin build definition setting Process > Build process parameters > 2. Build 5. Advanced > Perform code analysis = Always (belt and braces since the AsConfigured setting ought to work but this ensures it will if anyone meddles with the project settings). Save ContosoUniversity_Main_Checkin and queue a new build. The build report should now show the issues as warnings (abridged version in screenshot):
To keep everything synchronised perform the same change to ContosoUniversity_Main_Nightly and check that it too generates the same warnings. The combination of running code analysis when the solution builds both locally and during continuous integration should give developers enough of a clue that they should be attending to these warnings. To be fair, just setting projects up to use Microsoft All Rules and forcing them all to be fixed isn't a likely recipe for success. Some rules might not apply or might not be appropriate. And if the development team are working on an inherited brownfield application all bets are off! If a more Draconian approach is genuinely needed there is another trick up TFS's sleeve which I mention later in this post. For now you may want to switch back to Microsoft Managed Recommended Rules to keep the noise down.
Configure Unit Test Results
Unit testing is hopefully by now an ingrained aspect of your team's software development practices. But how do you keep track of progress? This is pretty easy to do as part of the TFS build and our starting point is to add a Unit Test Project.
I'm calling mine ContosoUniversity.Web.UnitTests to differentiate from the automated web tests that we'll be adding in a later post but the takehome message here is that you should have a naming convention that works for your scenario as these test projects can quickly get your solution in to a mess if you are not pro-active about managing them. With that out of the way I want to be quite clear that this post isn't going to be a lesson in how to write unit tests and I'm simply going to do some daft things with Assert to quickly illustrate what can be achieved as part of the TFS build process. With that in mind amend the UnitTest1 class so you have two test methods with simple Assert statements:
C#
1
2
3
4
5
6
7
8
9
10
11
[TestMethod]
publicvoidTestMethod1()
{
Assert.AreEqual(1,1);
}
[TestMethod]
publicvoidTestMethod2()
{
Assert.AreEqual(1,1);
}
Run the tests from Test Explorer and we should now have two passing tests. Check everything in to version control and queue a new build from ContosoUniversity_Main_Checkin. Examining the build report you should see that a test run was completed with 100% pass rate.
Now change one of the tests so that it will fail (Assert.AreEqual(1, 0);), check the change in to version control and queue another build from ContosoUniversity_Main_Checkin. The build report should now show that the build only partially succeeded:
Additionally the Summary section now advises on the specifics of how many tests passed:
We haven't had to do anything to get this information about our unit tests and that's because out of the box the build template comes configured to run any tests that are in projects conforming to a **\*test*.dll;**\*test*.appx file specification. All this can be configured from a build definition under Process > Build process parameters > 3. Test > 1. Automated tests. Hours of fun can be had tweaking all this but there are two other options which may be of interest which you can access by clicking on the ellipsis of the 1. Test source row. This brings up the Add/Edit Test Run dialog where it's possible to set Fail build on test failure and Enable Code Coverage from the Options dropdown:
To see the effect of these settings make the changes and save out of the build definition editing process. Queue a new build which should now fail. You should also see that we now have code coverage results:
To be very clear this isn't the end of this story because code coverage is reporting on our unit test project which isn't what we want. To exclude the unit test project itself we need to add a .runsettings file to the solution. That's out of scope in this post but you can find more details here if you want to try it out. If you want even more details about the state your code is in you should look at something like SonarQube.
Source Control Settings
A final area that we'll look at in this post are the settings that can be accessed via Team Explorer > Settings > Team Project > Source Control. This brings up the Source Control Settings dialog where Check-in Policy > Add is of particular interest.
This allows the following to be configured (descriptions shamelessly copied from the Description label):
Builds -- This policy requires that the last build was successful for each affected continuous integration build definition.
Changeset Comments Policy -- This policy will require users to provide check-in comments.
Code Analysis -- This policy requires that Code Analysis is run before check-in.
Custom Path Policy -- This policy scopes other policies to specific folders or file types.
Forbidden Patterns Policy -- This policy prevents users from checking in files with forbidden filename patterns.
Work Item Query Policy -- This policy allows you to specify a work item query whose results will be the only legal work items for a check-in to be associated with.
Work Items -- This policy requires that one or more work items be associated with every check-in.
I'm not going to explain these further than their descriptions as they are pretty self-explanatory, suffice to say that there's a lot one can do here to ensure a robust check-in process. A word of caution though: most of these policies can be overridden so use them wisely or your developers will start to do just that.
That's it for this post. Next up is the thrilling world of developing automated web tests with Selenium.
In this instalment of my series on implementing continuous delivery with TFS we finally get to build the deployment pipeline with Release Management. This won't be a tutorial on how to use Release Management so if you need to get up to speed with it I have a getting started post here. One point to note is that there are two ways to implement a deployment pipeline with Release Management: using Agent-based Release Templates which use Release Management Actions, Tools and Components and using vNext Release Templates which leverage PowerShell DSC. This post focusses on Agent-based Release Templates and a future post will look at the vNext Release Templates.
Administration Settings
We are going to be deploying to DAT and DQA environments so our starting point in Release Management is to navigate to Administration > Manage Pick Lists and add entries for DAT and DQA. Now add two new groups from Administration > Manage Groups called Development and Quality Assurance. There is a lot that can be done here to lock down each group to certain stages and activities but for our demo environment it's probably overkill, although feel free to configure away if you would like. The only configuration needed is to add yourself to each group.
Configure Paths Settings -- Servers and Environments
Next we need to confirm that the two servers (ALMWEB01 and ALMSQL01) that we will be deploying to are registered and Ready via Configure Paths > Servers. Still in the Configure Paths tab move to the Environments page and configure two environments called Contoso University\DAT and Contoso University\DQA). For each environment link the ALMWEB01 and ALMSQL01 servers. The screenshot shows the configured DAT environment:
Now move to Configure Paths > Agent-based Release Paths and create a new path called Contoso University\DAT>DQA. Add two stages to it, one for DAT and another for DQA, and configure with the appropriate environments. Set all the approvals for the DAT stage to the Development group and make all the steps automated. Set all the approvals for the DQA stage to the Quality Assurance group and make all the steps manual. Additionally add Quality Assurance as an Approval Step. The result should be as follows:
This will have the effect of making the DAT stage completely automated, and if the DAT stage is successful leaving anyone in the Quality Assurance group able to manually accept a build in to DQA. (We want this to be manual because if Quality Assurance is part way through some manual testing in DQA they probably don't want to have a new build automatically overwrite the one they are working with.)
Configure Apps Settings -- Components
Next up we need to create three Components: one to deploy the web site, one to deploy the DACPAC and one to run an SQL script to create environment-specific logins and associated database users. (As an aside, we need to create components any time the build location is required and a component is based on -- or inherits if you like -- an existing tool. We need to perform other tasks as well such as deleting files and we do this using Actions. Actions are usually based on a tool but since they typically take a simple parameter they can be used directly.)
The first component we are going to make will deploy the web site. From Configure Apps > Components create a new component called Contoso University\Deploy Web Site and configure as follows:
Source > Builds with application (= selected) > Path to package = \_PublishedWebsites\ContosoUniversity.Web
Deployment > Tool = XCopy Deployer
Configuration Variables:
Variable Replacement Mode = After Installation
File Extension Filter = *.config
Parameter #1 = DATA_SOURCE | Standard | Connection String: Data Source
The second component we need will deploy the DACPAC. From Configure Apps > Components create a new component called Contoso University\Deploy DACPAC and configure as follows:
Source > Builds with application (= selected) > Path to package = \
Deployment > Tool = DACPAC Database Deployer
The third component will run an SQL script. From Configure Apps > Components create a new Component called Contoso University\Run Login & User SQL Script (not an ideal name but length is limited) and configure as follows:
Source > Builds with application (= selected) > Path to package = \Scripts
We now use these three components in a Release Template. Create a new template called Contoso University\DAT >DQA from Configure Apps > Agent-based Release Templates and select the Release Path to Contoso University\DAT>DQA. Now edit the Build Definition and select ContosoUniversity as the Team Project and ContosoUniversity_Main_Nightly as the Build Definition. Lastly before closing this dialog check Can Trigger a Release from a Build?.
We are now presented with the ability to edit the Deployment Sequence for DAT as follows:
Expand the Servers node of the Toolbox and drag ALMWEB01 to the Deployment Sequence area of the workflow designer.
Expand the Windows OS node of the Toolbox and drag a Delete File(s) or Folder Action over to ALMWEB01, double-click it and set the FileFolderName parameter to C:\inetpub\wwwroot\CU-DAT\*.*. Use the breadcrumb trail to navigate back to ALMWEB01.
Right-click the Component node of the Toolbox and Link the two components we created earlier and drag the Contoso University\Deploy Web Site to ALMWEB01 so it follows the delete action. Double-click it and set the parameters as follows:
Installation Path = C:\inetpub\wwwroot\CU-DAT
DATA_SOURCE = ALMSQL01
INITIAL_CATALOG = CU-DAT
Use the breadcrumb trail to navigate back to Deployment Sequence and drag ALMSQL01 to the workflow designer so it follows ALMWEB01.
Drag the Contoso University\Deploy DACPAC component to ALMSQL01, double-click and set the parameters as follows:
FileName = ContosoUniversity.Database.dacpac
ServerName = ALMSQL01
DatabaseName = CU-DAT
Use the breadcrumb trail to navigate back to ALMSQL01 and drag the Contoso University\Run Login & User SQL Script component so it follows the Deploy DACPAC component, double-click and set the parameters as follows:
ServerName = ALMSQL01
ScriptName = Create login and database user.sql
LOGIN_OR_USER = ALM\CU-DAT
DB_NAME = CU-DAT
Next create the Create login and database user.sql as follows:
In the ContosoUniversity solution navigate to the ContosoUniversity.Database project and add a folder called Scripts.
Add a script file called Create login and database user.sql and set Copy to Output Directory = Copy always in the File Properties.
With the DAT stage configured we now want to configure the DQA stage. There is great shortcut for this -- right click the DAT tab and choose Copy Deployment Sequence.
Now right-click the DQA tab and choose Paste Deployment Sequence. Accept the confirmation dialog and the sequence appears in DQA. Each part of the sequence now needs to be changed to replace all instances of DAT with DQA. Notice how the Configuration Variables link can be clicked to open a viewer to check the configuration of different components for different stages.
Ensuring Correct Permissions
With the DAT and DQA stages configured it's almost time to test the deployment but before we do we'll need to make sure that several permissions are in place:
The first thing I'll discuss are the deployment targets, ie ALMWEB01 and ALMSQL01. They both have the deployment agent service account (ALM\RMDEPLOYER) in the local administrators group so performing operations in the file system and so on is all taken care of. However this won't be enough for SQL Server, where (for recent versions of SQL Server at least) local administrators do not automatically get rights in SQL Server. You'll need to add ALM\RMDEPLOYER as a login to SQL Server and then think very carefully what permissions you grant this login. If a database doesn't exist then the dbcreator role will fix that but then the login won't be able to do anything at a higher level. In this case the securityadmin role does the trick but if we were to add further functionality to the stage the permissions might need to change again. Clearly in a non-demo situation you will need to get your DBA involved right from the start of the continuous delivery adoption process so they fully understand what is trying to be achieved and can help to find the best way to manage the database permissions side of things.
The second area for discussion is the accounts that need to be added to Release Management to make everything work. The Release Management server is running under the ALM\TFSSERVICE account so that will already be there as a Service User. This account does need the Make requests on behalf of others permission for the Project Collection -- details on how to set this are here. The two accounts that you will need to add are ALM\TFSBUILD (again in the Service User role) as that needs to be able to communicate with Release Management server to start the deployment after the build completes and also ALM\RMDEPLOYER in the Service User role as it also needs to communicate with the Release Management server.
Testing the Deployment
At long last it's time to test the deployment. In Visual Studio navigate to Team Explorer > Builds and queue a build of ContosoUniversity_Main_Nightly. If everything has been configured correctly you should be able to observe the deployment progressing in the Release Management client from Releases > Releases. If all the components deploy successfully (only to DAT at the moment since that is the only automated stage) you will want to check that the CU-DAT website works. From any server in the demo environment you should be able to browse to http://almweb01/CU-DAT and confirm the full working of Contoso University.
Testing the Approvals Workflow
The final piece of the jigsaw as far as this post is concerned is with the approvals workflow for the DQA stage. In the Release Management client navigate to Releases > My Approvals Requests and notice that your successful release is at the DQA stage waiting to be approved. Click on the Approve button and work your way past the confirmation dialog and the deployment then starts to the DQA environment. Back to Releases > My Approvals Requests and you will then see two more approvals requests -- one to validate the deployment and one to approve it. Finally back to Releases > Releases and we see that the release is Released!
It's been quite a journey but that's it for this post. Watch out for future posts where we add extra functionality and features to the pipeline.
This post is part of a series of posts on building a continuous delivery pipeline with TFS. We are getting very close to the point where we can use Release Management to build the deployment pipeline but there are still a few configuration tasks to take care of first.
In the previous post we created the infrastructure that we will deploy application components to however we didn't do much in the way of configuration on the servers. Although it's possible to do some of this configuration automatically most pipelines will deploy application components to already configured web applications and databases. We're going to be deploying to DAT and DQA environments so we'll need to configure web applications and databases accordingly.
Basic Web Server and Database Server Configuration
Starting with the web server (ALMWEB01) navigate to c:\inetpub\wwwroot and create two folders: CU-DAT and CU-DQA. Now switch to IIS Manager and from the Application Pools node create two application pools (CU-DAT and CU-DQA) against .NET CLR Version v4.0.30319. Moving to the Default Web Site node create two web applications (CU-DAT and CU-DQA) configuring them to point to the folders and application pools that were just created. Moving to the database server (for me this is ALMSQL01) open up SQL Server Management Studio and from the Databases node create CU-DAT and CU-DQA databases.
Web Server and Database Server Security Configuration
We now need to configure security so that our websites can access SQL Server. We want to adhere to an important best practice here which is to ensure that the parts of database security that are environment specific do not make their way in to the SQL Server Database Project that we configured here. Rather, anything that is environment specific should be handled separately so it can be applied on an environment-by-environment basis. I'll illustrate that here with a self-imposed requirement that dedicated and different SQL Server logins (of the Windows variety) are required to access the CU-DAT and CU-DQA databases. Starting with the SSDP, open up the ContosoUniversity solution in Visual Studio and create a new folder called Security in the ContosoUniversity.Database project and then a folder under that called Database Roles. In that folder add a new file called db_webapp.sql. Note you can actually add an item called Database Role if you want help with the syntax:
This file should have the following T-SQL to create a dedicated role for the web application:
Transact-SQL
1
CREATEROLE[db_webapp]
Now create another file called db_webapp_permissions.sql and add the following T-SQL to grant specific permissions to the role:
On the domain controller create two domain accounts ALM\CU-DAT and ALM\CU-DQA. On the web server open up IIS Manager and navigate to the Application Pools node. Edit the CU-DAT and CU-DQA application pools via Advanced Settings and change the Identity property so that it uses the corresponding domain account you've just created. That's actually it for the moment since the other side of the security coin -- creating a login and database user will be applied as part of the Release Management workflow.
Creating a Nightly Build Definition
The next piece of preparation we need to do is to create a new Build Definition that will run on a nightly schedule to trigger a build of the application followed by a deployment to the DAT environment so that automated acceptance tests can be run. This will be based on a build process template that has been specially configured to work with Release Management. All this is achieved through the following steps on your development machine that has the Release Management client installed:
In the root of the ContosoUniversity folder (ie at ..\Source\Workspaces\ContosoUniversity\) create a new folder called BuildProcessTemplates.
Navigate to C:\Program Files (x86)\Microsoft Visual Studio 12.0\Release Management\Client\bin and copy ReleaseTfvcTemplate.12.xaml (assuming you are using VS 2013) to the BuildProcessTemplates folder and add (and check in) to version control.
On your TFS admin VM create a folder called c:\drops and share with Everyone setting Read/Write permissions. (I'm using Everyone for low friction. In a non-demo environment this is unlikely to be appropriate.)
In Visual Studio navigate to Team Explorer > Builds and clone (from right-click menu) ContosoUniversity_Main_Checkin renaming the clone to ContosoUniversity_Main_Nightly.
Make the following changes to ContosoUniversity_Main_Nightly:
Trigger = Schedule (this is what you would do in a non-demo environment but you may want to set to Manual for this demo).
Build Defaults = Copy build output to the following drop folder (specify the share created in 3 which will be something like \\almtfsadmin\Drops).
Process > Default Template = Change to point to $/ContosoUniversity/BuildProcessTemplates/ReleaseTfvcTemplate.12.xaml by selecting the New button and navigating to that file. (Screenshot shows New button and the finished effect after selecting the new template.)
Process > Build process parameters > 2. Build > 5. Advanced > MSBuild arguments = /p:UseWPP_CopyWebApplication=true /p:PipelineDependsOnBuild=false
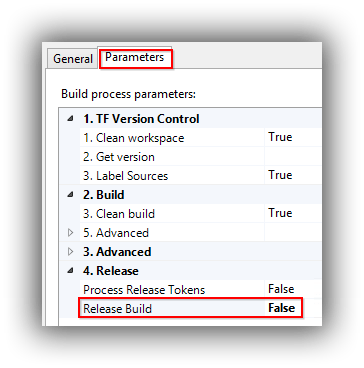
Process > Build process parameters > 6. Release > Release Build = True
Save and close the build definition tab and then manually queue the build. Before you start the build switch to the Parameters tab and change the Release Build parameter to False since we haven't configured Release Management yet.
Check that the build succeeded and resulted in a code drop to \\almtfsadmin\Drops.
Configuring Web.config Tokenisation
The final piece of preparatory configuration we need to make is to the Contoso University application. One of the key challenges in implementing continuous delivery is to manage application configuration. Release Management's approach to this is to use a tokenisation system where specified files are scanned for tokens that begin and end with a double underscore and actual values for are substituted as part of deploying to a specific environment. The out-of-the-box solution is to create a copy of a configuration file with a .token extension and then to tokenise values that need to change between environments. This means the .token file becomes a maintenance headache. A nicer way for Web.config at least is to use Web.config transformation to get the desired result. So, open the ContosoUniversity solution and in Web.Release.config add the following before the start of <system.web>:
Check the change in to version control and then start a manual build of ContosoUniversity_Main_Nightly as above. Assuming the build is successful navigate to the drops folder and down to ..\_PublishedWebsites\ContosoUniversity.Web. Examine Web.config and you should find that it contains the tokenised values. The magic is in the MSBuild argument specified in the build process template above which causes the transformation to take place even though we are not going to be using Web One Click Publish to deploy our application.
With all that configuration out of the way we can now move to actually building the deployment pipeline which is the subject of the next post.
At this point in my series of posts on building a continuous delivery pipeline with TFS we have installed and configured quite a lot of the TFS infrastructure that we will need however as yet we don't have an environment to deploy our sample application to. We'll attend to that in this post, but first a few words about the bigger environments picture.
Thinking About the Bigger Environments Picture
When thinking about what can cause an application deployment to fail the first things we probably think about are the application code itself and then any configuration settings the code needs in order to run. That's only one side of the coin though, and the configuration of the environments we are deploying to might equally be to blame when things go wrong. It makes sense then that we need tooling to manage both the application and its configuration and also the environments we deploy to. The TFS ecosystem addresses the former but doesn't address the latter. So what does? There are two large pieces to consider: provisioning the servers that form the environment our application needs to run in and then the actual configuration of those servers our application will run on.
Provisioning servers is very much a horses for courses affair: what you do depends on where your servers will run and whether they need to be created afresh each time they are used. On premises it might be fine for servers to be long-lived and always on. In the cloud you may want the ability to create a test environment for a specific task and then tear it down afterwards to save costs. In the Windows world dynamically creating environments can be achieved pretty much anywhere using scripting tools such as PowerShell. In Azure there are further options since there is now tooling such as Brewmaster or Resource Manager that can create servers using templates that describe what is required.
Managing the internal configuration of servers using tooling once they have been created can and should be done wherever your servers are running. The idea is that the only way a server gets changed is through the tooling so that if the server needs to be recreated (or more of the same are needed) it's pretty much a push-button exercise. (This is probably in contrast to the position most organisations are in today where servers are tweaked by hand as required until they become works of art that nobody knows how to faithfully recreate. If you are in the position of needing to know the configuration of an existing server then a product such as GuardRail can probably help.) The tooling to manage server configuration includes Puppet, Chef and Microsoft's new offering in this space PowerShell Desired State Configuration (DSC).
The techniques and tools mentioned above are definitely the way to go, however in this post I'm ignoring all that because the aim is to get the simplest thing working possible (although researching and writing about automating infrastructure and server configuration is on my list). Additionally, because we are setting up a demo environment we'll be working in multi-tenancy mode, ie multiple environments are hosted on the same server to keep the number of VMs that will be required to a minimum.
Provisioning Web and Database Servers
Our sample application consists of a web front end talking to a SQL Server database so we'll need two servers -- ALMWEB01 running IIS and ALMSQL01 running SQL Server 2014 or whatever version makes you happy. I use a basic A2 VM for the web server and a basic A3 for SQL Server, both created from a Windows Server 2012 R2 Datacenter image and configured as per my Azure foundations post. Once stood up the VMs need joining to the domain and configuring for their server roles, the details of which I'm not covering here as I'm assuming you already know or can learn. One point to note is that you need to resist the temptation to create the SQL Server VM from a preconfigured SQL Server image from the gallery. This will eat your Azure credits as you pay for the SQL Server licence time with these images. Rather, download SQL Server from MSDN and do the installation yourself on a vanilla Windows Server VM.
Installing the Release Management Deployment Agent
The final configuration we need to perform to make these VMs ready to participate in the delivery pipeline is to install the Release Management Deployment Agent. The agent needs to run with a service account so create a domain account (I use ALM\RMDEPLOYER) and add it to the Administrators group of the two servers. Next open up the Release Management client and add this account (Administration > Manage Users) giving it the Service User role. Back on your deployment servers you can now run the Deployment Agent install and provide the appropriate configuration details:
After clicking Apply settings the installer will run through its list of items to configure and if there are no errors the agent will be up-and-running and ready to communicate with the Release Management server. To check this open up the Release Management client and navigate to Configure Paths > Servers. Click on the down arrow next to the New button and choose Scan for Agents. This will bring up the Unregistered Servers dialog which allows one to scan for and then register servers. If all is well you'll be able to register your two servers which should appear in the Servers tab as follows:
We're not quite ready to start building a pipeline with Release Management yet and in the next instalment we'll carry out the configuration steps that will take us to that point.
This is the ninth post in my series on building a continuous delivery pipeline with TFS and I'm going to be covering the installation of Release Management for Visual Studio. This is the component of the TFS ecosystem that gives us reasonably straightforward tooling to deploy the components of an application to target servers and to carry out other activities such as running automated acceptance tests. If you are new to Release Management be sure to check out my getting started post here. There are quite a few blogs that describe the detail of how to install Release Management and so I'm not going to give a blow-by-blow account in this post. Rather, I'll provide some big picture details and discuss how whichever installation instructions that you end up referring to will need to be tailored for our all-in-one TFS server installation.
Release Management Components
The first thing to understand about Release Management is that there are three components: server, client and deployment agent. The deployment agent is installed on machines that are targets for code installations or tasks that need to be run as part of the delivery pipeline (running automated acceptance tests for example). The client is typically installed on developer workstations and is used to build and manage the delivery pipeline. The server component is, as you would expect, at the centre of everything. The server component is actually split in to two main pieces -- a SQL Server database and a collection of web services. In a production environment some thought will need to be given as to where these pieces will live. The database is probably fine sitting alongside the other databases that are part of the TFS ecosystem however the web services component is a possible candidate for running on its own server depending on your organisation's attitude to keeping applications separate. It will certainly sit alongside the TFS web services very happily and that's how we'll do it here. In a production environment you will also need to think carefully about what service accounts you employ -- do you want Release Management running under its own account for example? Here we'll keep things simple and use the TFS service account to run the Release Management service and a dedicated account for the deployment agents.
Server Installation
The official installation guide for Release Management can be found here and the MSDN guidance is here. For a more visual approach Martin Hinslewood has a nice YouTube video:
The first difference between Martin's video and our installation is that for the server component Martin is specifying Network service as the identity to run the Release Management services whereas we're going to be using the TFS domain service account (TFSSERVICE if you are using Microsoft's example name). Other than that the installation of the server component should be straightforward because everything is being installed on the same server (ALMTFSADMIN in my case).
Client Installation
The configuration of Release Management is done through the client and that's the next bit of the installation. Martin's video shows the client being installed on the same machine as the server and although this isn't an absolute requirement you will need to do this if the account you used to install the server is different from the account you will use to run the client on a different machine since this account will need to be added to Release Management in order to authenticate. So, go ahead and install the client on the server machine and note that connecting is very easy since the URL can simply be localhost:
Initial Configuration
After dismissing the dialog with the OK button the Release Management client (a WPF application) opens. There are probably two areas to look at as part of the initial configuration. The first is to make a connection to TFS from Administration > Manage TFS. Click on the New button and supply details as follows:
You will need to verify the connection details before you can Save & Close, after which you will see your connection listed. It's worth noting that you can have multiple connections to TFS and you will need to take advantage of this if for some reason you have more than one Project Collection.
The second area you may want to look at now is Administration > Manage Users, particularly if you will run the Release Management client using a different account on a different machine in which case you should add that account and give it the Release Manager role. Note that if you fill in the email details you will have had to have filled-in the SMTP Server Configuration details in Administration > Settings > System Settings for emails to be sent. On Azure the easiest way to make this work is to sign-up for a free SendGrid subscription and fill in the SMTP details thus:
At this point it's probably a good idea to install the client on your developer workstation to check that there are no connectivity or authentication problems. The install will differ slightly from above since you will need to specify the Release Management server name for the URL which should be something like http://almtfsadmin:1000.
And There's More...
Although I mentioned earlier that there is a third component (the deployment agent) that needs installing we can't do that yet because we haven't created any servers that will be targets for code deployments. In the next instalment we'll do just that!
This post picks up from a previous post in my series on building a continuous delivery pipeline with TFS where we got to the point of adding the sample application to version control. The next step is to configure the application for continuous integration (CI).
The ThoughtWorks people have a nice definition of CI here. The practice is essential where multiple developers are working on the same code branch because of the very real possibility of one developer making changes in the same area of code as another. By checking code in to version control and then running a build on that checked-in code any conflicts that have broken the build are detected early and can be fixed early.
Configuring a Build Controller and Build Agents
The starting point for implementing CI with TFS is to have a configured and running Build Controller that can communicate with one or more Build Agents. If you followed my guide on setting up an all-in-one TFS server you should already have the necessary build infrastructure in place. You can check this from within Visual Studio by selecting the Home tab of Team Explorer and choosing Builds. From the Actions dropdown choose Manage Build Controllers. You should see something similar to this:
(The above assumes that Visual Studio is connected to your Team Collection and that the build infrastructure has been configured for your Team Collection.)
Creating a Build Definition
In order to configure CI you need to create a build definition which you do by clicking on the New Build Definition link on the Build tab of Team Explorer. Jumping ahead a little bit you will almost certainly want to devise a naming convention for your build definitions in a production environment since it's all too easy for them to multiply and get out of hand. As a minimum you will probably want one definition that is triggered when code is checked in by developers and one that runs on a schedule that starts the nightly run of the continuous delivery pipeline. In our demo pipeline these will be called ContosoUniversity_Main_Checkin and ContosoUniversity_Main_Nightly. I'm purposefully using underscores as build definition names (at least those that copy output files) get sewn in to filepath names as part of the CI process.
Let's get started by creating a new build definition and naming it ContosoUniversity_Main_Checkin on the General tab. Now configure tabs as follows (only settings that need changing are listed):
Trigger = Continuous Integration -- Build each check-in
Source Settings > Working folders:
Build Defaults > Staging location = This build does not copy output files to a drop folder
Process > 2. Build > 2. Configurations = Any CPU|Release
In a future post we'll look at enhancing this build definition with features such as file and assembly versioning (so all EXEs and DLLs have the same file and assembly version) however for now we're keeping things simple so go ahead and save and close the Build Definition configuration tab.
Testing the Build Definition
In order to test the new definition right-click it and choose Queue New Build. Accept the defaults on the Queue Build dialog and click on Queue to start the build. In the My Builds section of Team Explorer's Builds tab you should now see the queued build:
If the build succeeds you should see something like this:
You can double-click a build at any time to open it and see fuller details. If you do that you should see that there were No Test Results and No Code Coverage Results. Additionally No tests were impacted. I'll be addressing this in a future post but meantime we have one more test to carry out: to ensure that the build definition kicks off a build when code is checked in. If required open the ContosoUniversity solution in Visual Studio and make a change -- add a comment to web.config for example. Check the change in and navigate to the Builds tab of Team Explorer. You should see a new queued build has been created for the changeset:
As alluded to above there is a lot more we can and should do with this build definition to try and ensure that code meets certain quality requirements before it is checked in to version control (or at least cause the build to fail if those requirements aren't met). Future posts will provide details of how to layer these quality checks on to the delivery pipeline however the next post is where it gets really interesting as we finally get to installing and configuring Release Management for Visual Studio.
In this instalment of my series about building a continuous delivery pipeline with TFS we pick up from a previous post (in which we configured the Contoso University sample application to work with a SQL Server Database Project) and add the Visual Studio solution to TFS version control. We'll be using the Visual Studio development machine that we created here and we'll be connecting to the TFS instance that we created here. As usual I'm assuming a degree of familiarity with the tooling and if that's missing you can look at my Getting Started posts to get acquainted.
Confirming or Creating a Team Project Collection
The first step is to check that your TFS instance is hosting at least one Team Project Collection. The installation process normally creates a collection called DefaultCollection which is fine, but if you didn't elect to create a collection now is the time to jump on to your TFS administration machine and create a new collection from the Administration Console ($SeverName$ > Application Tier > Team Project Collections > Create Collection). Use whatever name suits however as an aside bear in mind that if you have yet to implement TFS in a production environment most organizations will only ever need one collection and you may want to choose a name accordingly.
Creating a Team Project
With a Team Project Collection in place you can connect to TFS from your development machine and create the next-level container which is a Team Project. For this blog series I'm keeping things simple and creating a project called ContosoUniversity (ie the Team Project will just be for the Contoso University application) but do be aware that there are other patterns that can make more sense in a production environment eg one Team Project can contain many applications. To create a new Team Project, from within Visual Studio open the Team Explorer pane and click on the two-pronged plug icon on the toolbar. This panel has a link to Create Team Project and it's just a case of stepping through the wizard, choosing the Scrum process template and Team Foundation Version Control (TFVC).
Mapping a Workspace
Next up you will need to map a Workspace. Although the Team Explorer pane might offer to do this for you I prefer to configure this manually so I get exactly what I want -- useful if your Team Project contains many applications and you want a workspace for each one. In this case though I just want to map the Contoso University source location to a corresponding folder in the Workspaces folder of my profile, so from Source Control Explorer's Workspace dropdown choose Workspaces to Manage Workspaces then Add to create a new one. The completed dialogue should look something like this:
Adding the Solution to Version Control
Back in Source Control Explorer add a folder called Main to the ContosoUniversity node and check it in. Next convert this folder to a Branch (right-click the folder and select Branching and Merging > Convert to Branch).
In Windows Explorer you can now add the Visual Studio solution file and the ContosoUniversity.Database and ContosoUniversity.Web folders to the Main folder. If you are following my recommendation and have the Microsoft Visual Studio Team Foundation Server 2013 Power Tools installed you can select these three items and add them to TFVC:
TFVC is smart enough to know which files should be included and which should be excluded, and once the add has been performed you can either use the same menu to perform a Check In or switch to Visual Studio to do the same.
Launching the Sample Application
Finally, navigating to Team Explorer's Home tab in Visual Studio should show the Contoso University solution file which you can double-click to launch and test the application:
When you build the solution the NuGet packages will be restored and these will be detected as add(s) in the Pending Changes tab of Team Explorer. To get TFVC to ignore the packages folder click on the Detected add(s) link and then in the Promoted Candidate Changes dialog box right click one of the files and choose Ignore by folder. A .tfignore file is created which you should check in.
Although that's as far as we are going with version control in this post you should be aware that there are plenty of other configuration options, mostly around making sure check ins are accompanied by comments or work items and so on. All very useful for production environments but out of scope here.
In the next post we'll be configuring continuous integration.